remove a GPU sounds simple, and it is, but one wrong move, like yanking a card while the rear latch is still locked, can damage the slot or the card itself. Whether you are upgrading, cleaning, troubleshooting, or selling, doing it gently and in the right order keeps everything safe. This guide explains when and why you would remove a graphics card, the tools you need, and the exact steps to take it out cleanly without harming your hardware.
Getting Ready to Remove Your GPU
The key to safe removal is releasing everything that holds the card before you lift, and lifting evenly rather than twisting. A few minutes of preparation and the right order of operations turns a potentially stressful job into a thirty-second one. Most removal mishaps come from forgetting a single latch or cable rather than from any real difficulty. Slowing down for thirty seconds to confirm everything is disconnected is all it takes to turn removal into a completely safe, routine task.
When and Why You Need to Remove a GPU
There are several common reasons to remove a graphics card: upgrading to a new one, cleaning dust from the card or the case, troubleshooting a suspected fault, applying fresh thermal paste, or packing the card to sell or transport. Each of these starts with the same safe removal process.
Knowing your reason helps you prepare. If you are storing or shipping the card, you will want an anti-static bag and padding ready, whereas if you are simply cleaning, you only need somewhere safe to set it down for a few minutes. Matching your preparation to your reason means you are never caught mid-job hunting for a bag or a screwdriver you should have had ready.
What You Will Need Before You Start
Removal needs very little, but a couple of items make it safer.
You will want a Phillips-head screwdriver to undo the bracket screws, and a magnetic one helps you avoid dropping screws into the case; a compact magnetic screwdriver set is handy for this and every other PC job. An anti-static wrist strap protects the card from static while you handle it, which matters most if you plan to keep or resell the card. A card destined for resale especially deserves this care, since a static-damaged board can fail unpredictably and is impossible to spot by eye.
If you are storing the card after removal, have an anti-static bag and some padded protection ready, since bare cards are vulnerable to both static and physical knocks once they are out of the case.
Preparing the PC Safely
Shut the PC down fully, switch off the power supply at its rear switch, and unplug the power cable from the wall so there is no power anywhere in the system. This is the essential first step before touching anything inside.
Press the power button once to discharge residual electricity, then open the side panel and ground yourself by touching bare metal on the case or wearing an anti-static strap. Give the card and the area around it a moment of inspection so you can see the power cables, screws, and slot latch before you start. Identifying each of these in advance means you will not be fumbling blindly behind a large cooler once you begin the removal.
It also helps to lay the case on its side on a stable surface so the card lifts straight up and out rather than sideways. Working with the system flat keeps gravity on your side and removes any temptation to twist the card, which is the motion most likely to stress the slot.
How to Remove a GPU Step by Step
With the PC powered down and opened, removal is quick and gentle. Follow these steps in order, never forcing anything, and the card will lift straight out without stress on the slot. If it resists, something is still holding it, and the fix is to check rather than to pull harder.
Disconnecting Power and Software Prep
If you are removing the card permanently or swapping brands, it is good practice to uninstall the graphics drivers first from within Windows before you shut down, which avoids leftover software conflicts later. For a simple clean-and-reinstall of the same card, this step is optional.
With the PC off and opened, locate the PCIe power cables plugged into the top edge of the card and disconnect each one. Some connectors have a small clip you need to press while pulling, so release that gently rather than tugging the cable, which protects both the card and the cable. Pulling on the wire itself instead of the connector is a common way to damage a cable, so always grip the plug.
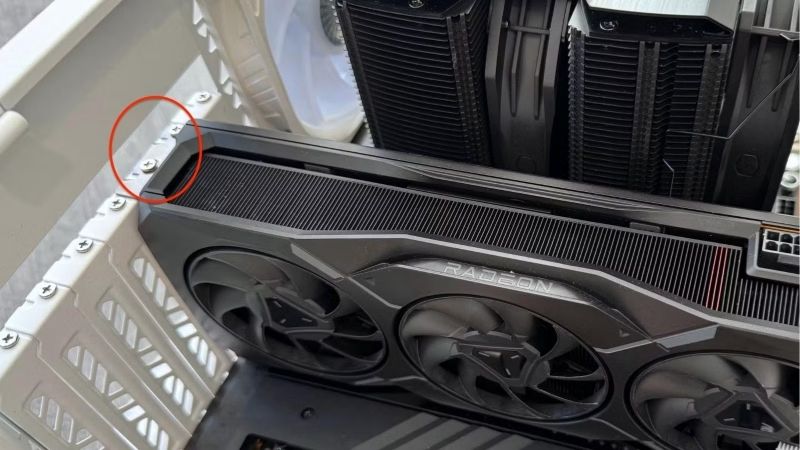
Releasing the PCIe Latch and Screws
Now free the card with these steps:
- Unscrew the bracket screws at the back of the case that hold the card’s metal bracket in place, and set them somewhere safe.
- Find the PCIe slot latch at the end of the slot nearest the front of the case, usually a small plastic tab or lever that locks the card in.
- Press or pull the latch to release it, which you may need to do with a finger reached past the card; you should feel or hear it unlock.
- Confirm nothing else is attached, double-checking that all power cables are disconnected and all screws are out before you lift.
That latch is the step people most often forget, and trying to lift a still-locked card is the main way slots get damaged, so make sure it has clearly released before moving on. If the card does not begin to lift with gentle, even pressure, that is your cue to stop and check the latch again rather than to pull harder.
Lifting Out and Storing the Card
Grip the card by its edges and lift it straight up and out of the slot in one smooth, even motion, without rocking it heavily from side to side. It should come free easily once the latch and screws are clear; if it resists, stop and check what is still holding it.
Set the card down on a soft, non-conductive surface, handling it only by the edges and bracket. If you are storing or shipping it, slide it into an anti-static bag and add padding, which protects it from both static discharge and physical damage until it is needed again. For shipping in particular, suspending the card so nothing presses on its fans or backplate is the safest way to send it.
Pros, Cons, and Expert Tips for Removing a GPU
Removing a GPU is easy once you know the order of operations, but a few mistakes and habits make the difference between a clean job and a damaged slot. A little care here protects components worth far more than the effort involved. None of it is difficult, and the simple habit of working calmly and in sequence is what keeps an expensive component perfectly safe every single time you take it out of the case. That care is the whole difference between a routine swap and an avoidable accident.
Mistakes to Avoid When Removing a GPU
The most damaging mistake is forgetting the PCIe latch and forcing the card out, which can crack the slot or stress the card’s connector. Always confirm the latch has released before lifting, and never rely on brute force.
Another common error is leaving a power cable connected and yanking the card, or dropping a loose screw onto the motherboard. Working methodically, disconnecting every cable, and using a magnetic screwdriver all prevent these easily avoided slip-ups. A dropped screw landing on a powered or delicate component is a frustrating, entirely preventable cause of damage.
People also sometimes rush the job and forget which cable went where, making reinstallation more confusing than it needs to be. Slowing down, working in order, and keeping the screws in one small container turns removal into a tidy, repeatable routine rather than a scramble.
Pro Tips for Safe Removal
A helpful habit is to take a quick photo of the cable connections before you start, so reinstalling or installing a replacement is effortless. Handling the card only by its edges and bracket protects both the contacts and the delicate components from static and oils.
If the latch is hard to reach behind a large card, a gentle nudge with a non-metallic tool can release it without risking a slip. Plastic spudgers or even a fingernail are far safer here than a screwdriver tip near the motherboard. And keeping the card flat and supported the moment it is out prevents accidental knocks to its fans or heatsink.
See More:
Pros and Cons of Doing It Yourself
On the plus side, removing a GPU yourself is free, fast, and gives you full control over cleaning, upgrading, or reselling on your own terms. It is also a core skill that makes every other maintenance task easier.
On the downside, there is a small risk of static damage or a cracked slot if you rush or skip the latch, and a card is briefly vulnerable while out of the case. These risks are minor with basic care, which makes doing it yourself worthwhile for almost everyone.
To sum up, learning how to remove a GPU safely is mostly about order and gentleness: power down fully, disconnect the cables, release the latch and screws, then lift straight out and store the card protected. Respect that latch, handle the card by its edges, and the whole job takes under a minute. To keep your card safe during removal and storage, check the recommended anti-static straps, screwdriver sets, and storage bags linked below.


Write Your Review
No reviews yet. Be the first to share your experience!