anisotropic filtering is one of the most misunderstood graphics options in PC gaming, yet it delivers a bigger visual payoff than almost any toggle in your settings menu. If textures look crisp right in front of you but smear into a blurry mush as they stretch toward the horizon, this single feature is the fix. In this guide you will learn exactly what it does, how the technique works, how to turn it on in under a minute, and the precise configuration that gives you the cleanest image for the lowest possible performance cost.
Understanding Anisotropic Filtering and Why It Matters
Texture filtering decides how sharp a surface looks when it is viewed at a steep, glancing angle — think of a road, a tiled floor, or a long wall receding into the distance. Anisotropic filtering, usually abbreviated as AF, is the highest-quality method available on consumer GPUs, and on modern Nvidia hardware it is so cheap to run that leaving it off is almost always a mistake. Before you can dial it in correctly, it helps to understand what it is solving and how it earns its keep.
What Anisotropic Filtering Actually Is
Anisotropic filtering is a texture-sampling technique that keeps surfaces sharp when they are tilted away from the camera. The word “anisotropic” simply means “not the same in every direction,” which is exactly the problem it solves: a floor seen at an angle needs more texture detail along one axis than the other.
Older methods such as bilinear and trilinear filtering treat every direction equally, so they blur angled surfaces to hide aliasing. AF is smarter. It samples the texture along the direction of view, preserving readable detail far into the scene instead of collapsing it into a gray smear.
In short, AF is not adding new detail to your game — the detail was always there in the texture. It is simply preventing the GPU from throwing that detail away the moment a surface tilts, which is why the effect looks so natural rather than artificially sharpened.
How Anisotropic Filtering Works Under the Hood
GPUs store textures at multiple resolutions called mipmaps. When a surface tilts away from you, basic filtering snaps to a lower-resolution mipmap to avoid shimmering, and that low-res jump is the blur you see. AF instead takes multiple weighted samples across the surface so the high-resolution detail survives the angle.
The number you pick — 2x, 4x, 8x, or 16x — is the maximum sample count the GPU is allowed to use per pixel. Higher values mean more samples and sharper distant textures. The cost scales with that number, but on any GPU from the last several generations the difference between 16x and off is typically a fraction of a frame per second.
This is why AF behaves so differently from anti-aliasing or ray tracing: it targets texture clarity specifically, not edges or lighting, and it does so with very little memory-bandwidth pressure. That low cost is the single most important fact to remember when you configure it.
Why Texture Filtering Changes Your Visuals
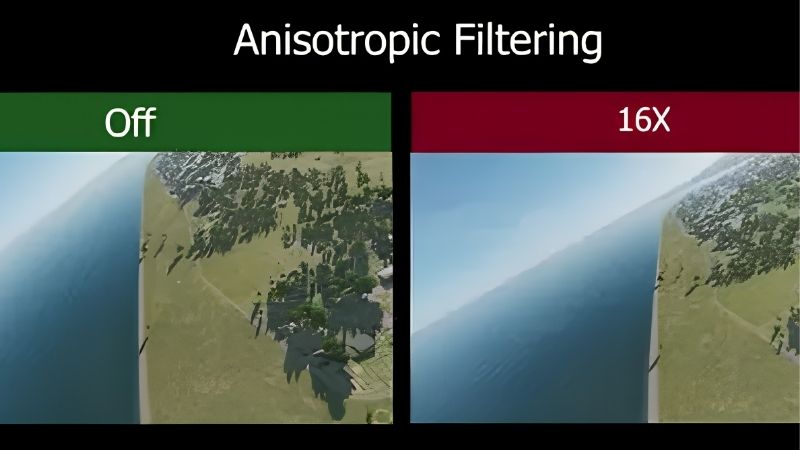
Once you see AF working, you cannot unsee its absence. Roads stay paved instead of melting, brick walls keep their mortar lines, and grass textures stop turning into a flat blur ten meters out. The world simply feels more solid and in-focus.
The effect is most obvious in open-world and racing games, where you spend a lot of time looking at long, angled ground planes. In tight corridor shooters the benefit is smaller but still visible on floors and ceilings.
Because the cost is so low and the improvement is so consistent, there is no quality tier — from a budget esports rig to a flagship 4K build — where AF is not worth using. It is one of the few settings that improves the picture for nearly everyone.
How to Enable Anisotropic Filtering on an Nvidia GPU
You can set AF inside a game’s own graphics menu or force it globally through Nvidia’s driver software, which guarantees consistent quality even in titles that hide the option or default it to a low value. Forcing it at the driver level is the most reliable approach, and it takes under a minute. Here is what you need and exactly how to do it.
What You Will Need Before You Start
The good news is that anisotropic filtering needs no special hardware — it is a software setting. To actually appreciate the extra clarity, though, a couple of things help and they are worth a quick mention.
A reasonably modern Nvidia GPU is all that is strictly required, since AF is essentially free on current cards; if you are still on very old hardware and want more visual headroom across the board, a capable mid-range GPU upgrade pays off in every game, not just this setting. A sharp 1440p or 4K monitor also makes the sharpened distant textures genuinely visible, so a quality display is the second thing worth investing in.
Finally, the current Nvidia App — the free replacement for the old Control Panel and GeForce Experience — is the tool you will use to force the setting, so make sure it is installed and updated before you begin.
Step-by-Step Setup in the Nvidia App
Follow these steps to force 16x anisotropic filtering for every game at once:
- Open the Nvidia App and go to the Graphics tab. This is where global and per-game driver overrides live.
- Select the Global settings profile so the change applies to every title, or pick a specific game if you only want it there.
- Find “Anisotropic filtering” in the settings list and switch it from Application-controlled to 16x. This overrides any weaker in-game value.
- Apply the change and launch your game. The new setting takes effect immediately on the next load.
If a game exposes its own AF slider, setting it to 16x there does the same job. Forcing it in the driver is simply insurance for titles that cap the option or leave it out entirely, and it means you never have to think about the setting again.
Recommended Settings for Different GPUs
For almost everyone, the recommendation is identical: use 16x and never think about it again. The performance hit on an RTX-class card is negligible, often within margin-of-error frame rates, and the visual gain is consistent across every game you play.
If you are gaming on an older laptop GPU or an entry-level card and are chasing every last frame in a competitive shooter, 8x is a sensible compromise that keeps most of the visual benefit. Below 4x you start leaving obvious clarity on the table for almost no savings, so there is rarely a reason to go that low.
The one scenario where you might disable AF entirely is on extremely old integrated graphics, where even small costs matter. On any dedicated Nvidia card from recent years, 16x is the default that experienced players set and forget.
Pros, Cons, and Expert Tips for Anisotropic Filtering
No setting is completely free of trade-offs, but anisotropic filtering comes about as close as graphics options get. Understanding the small caveats helps you decide where to spend the rest of your performance budget and avoid the handful of mistakes that trip up newcomers.
The Pros and Cons of Anisotropic Filtering
On the upside, AF dramatically improves distant texture clarity, costs very little performance on modern hardware, and requires zero ongoing maintenance once forced in the driver. It also stacks cleanly with anti-aliasing and upscaling technologies, so it never fights your other settings.
The downsides are minor. On very old or very weak GPUs the cost is no longer trivial, and in rare titles a forced driver override can clash with a game’s custom rendering, producing flicker that disappears if you set it in-game instead. It also does nothing for blurry up-close textures, which are a function of texture resolution, not filtering.
Weighed together, the pros overwhelm the cons for the vast majority of gamers. The only people who should think twice are those on the weakest hardware, and even they usually find 8x worthwhile.
Pro Tips and Mistakes to Avoid
The most common mistake is confusing AF with anti-aliasing and expecting it to smooth jagged edges — it will not. Keep the two jobs separate in your mind: AF sharpens angled surfaces, anti-aliasing cleans up edges.
A second mistake is leaving it on “Application-controlled” and assuming the game picks the best value. Many games default to a low setting or none at all, so forcing 16x in the driver guarantees you actually get the clarity your hardware can deliver.
Finally, do not bother dropping AF to claw back frames when your real bottleneck is resolution or ray tracing; the savings are tiny and you will only make your image worse for no meaningful gain. Spend that effort tuning the heavy settings instead.
See More:
Is Anisotropic Filtering Worth It in 2026?
For any gamer on Nvidia hardware made in the last several years, the answer is an easy yes. It is one of the rare settings that improves image quality for essentially no cost, which is why experienced players force it globally and forget about it.
If your goal is the sharpest, most immersive picture your system can produce, the best long-term move is pairing this free setting with a GPU and monitor that can show it off. A capable card lets you run high textures and resolutions where AF has the most to work with, while a high-resolution display makes the extra clarity visible.
If you have been thinking about upgrading either one, it is worth checking the current deals on a capable graphics card and a high-resolution monitor before you build your next setup, so every free setting like this one actually reaches your eyes.
In short, anisotropic filtering is the closest thing PC gaming has to free image quality. Switch it to 16x in the Nvidia App, and your roads, floors, and distant landscapes will stay crisp instead of dissolving into blur. Pair that with the right hardware and the upgrade in clarity is immediate — explore the recommended graphics cards and monitors linked below to get the full benefit of every setting you enable.


Write Your Review
No reviews yet. Be the first to share your experience!