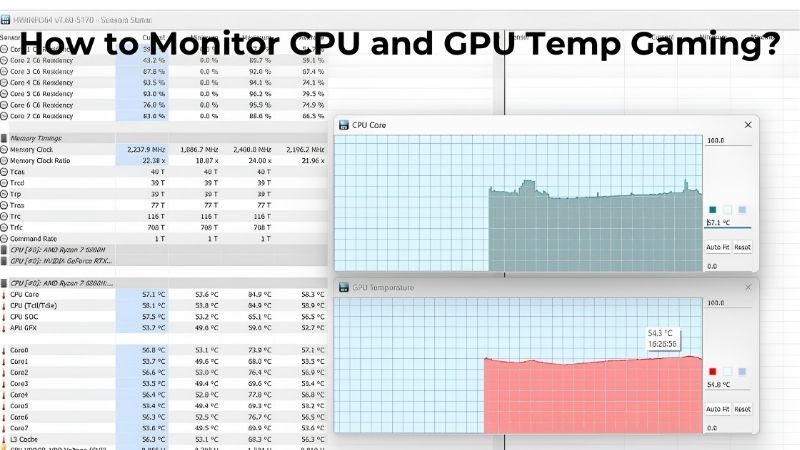
monitor GPU temp while gaming is the only way to know what your graphics card is really doing during the moments that matter, because a quick desktop check at idle tells you almost nothing about how hot it gets mid-firefight. A live on-screen overlay shows your temperature climbing in real time, so you can catch throttling and cooling problems as they happen. This guide explains why in-game monitoring matters, how to set up a free overlay step by step, and exactly what to do if your numbers climb too high.
Why Monitor Your GPU Temperature While Gaming
Games are when your graphics card works hardest, so they are also when it gets hottest and when overheating actually shows up. Checking temperatures only when the desktop is idle is like taking your car’s temperature while it is parked, which is why a live overlay during real gameplay is so much more useful. Understanding what you are watching for makes the readings genuinely actionable. The few minutes it takes to set up pay off every time the numbers tell you something useful about what your card is doing.
Why In-Game Temperature Monitoring Matters
When a graphics card gets too hot, it protects itself by lowering its clock speeds, a process called thermal throttling that quietly steals frames right when you need them most. Without a live overlay, you would never see this happening; you would only feel the stutter and wonder why performance dipped.
Monitoring while gaming lets you connect cause and effect directly, watching the temperature spike and the frame rate sag in the same moment. That makes diagnosing a cooling problem straightforward rather than guesswork, and it turns a vague sense that something is wrong into a clear, measurable signal.
It also reassures you when everything is fine, confirming that your card is holding a safe temperature through a long session rather than slowly cooking inside a dusty case. Either way, the live number is far more informative than anything you can read at the desktop.
What You Will Need
Everything you need to monitor temperature in-game is free and quick to set up.
The most popular choice is MSI Afterburner, which bundles RivaTuner Statistics Server, the component that actually draws the overlay on top of your game. Together they let you display temperature, usage, clock speed, and frame rate live in a corner of the screen, and they work regardless of which brand of card you own.
An alternative is HWiNFO, which is excellent for detailed sensor data and can also feed an overlay, though Afterburner is the simpler starting point for most people. Beyond the software, you need nothing else, since the readings come straight from sensors already built into your graphics card.
What a Safe In-Game Temperature Looks Like
Under gaming load, most modern Nvidia GPUs sit comfortably somewhere in the region of 65 to 80 degrees Celsius, which is perfectly normal and nothing to worry about. Readings into the low-to-mid eighties are still within spec for many cards, but they hint that better airflow or a cleaner case would help.
The figure that should prompt action is a card consistently reaching the high eighties or beyond during sustained play, since it is likely throttling and working harder than it should. Watching how your temperature behaves across a long session, rather than just glancing at the opening minutes, is what tells you whether your cooling is genuinely up to the job.
It also helps to learn your own card’s baseline, since the safe ceiling varies a little between models and some are designed to run hotter than others before they throttle. Once you have watched a few sessions and seen where your card normally settles, an unusual reading becomes immediately obvious, which makes the overlay far more useful than a single universal number ever could be.
How to Set Up an In-Game Temperature Overlay
Setting up a live overlay takes just a few minutes, and once it is done it works automatically in every game. The process is the same whether you want a single temperature readout or a full panel of statistics, so you can start simple and add more later.
Setting Up MSI Afterburner and RTSS
Begin by downloading and installing MSI Afterburner, accepting the bundled RivaTuner Statistics Server when prompted, since that companion program is what renders the overlay inside your games. Both install together in a single, straightforward process with no complicated configuration required up front.
Once installed, open Afterburner and head to its settings, then find the Monitoring tab, which is where you choose exactly which sensors appear on screen. This is the heart of the setup, and everything you display in-game is controlled from this one place, so it is worth getting familiar with it.
If the overlay does not appear in your first game, it is almost always because RivaTuner Statistics Server is not running, so check that it is open in the system tray alongside Afterburner. Both programs need to be active for the on-screen display to work, and setting them to start with Windows means your overlay is simply always there without any further effort.
Choosing What to Display in the Overlay
In the Monitoring tab, enable the readings you care about with these steps:
- Scroll to “GPU temperature” in the list of monitored sensors and click it to select it.
- Tick “Show in On-Screen Display”, which adds that sensor to the live overlay rather than just the graph.
- Repeat for other useful readings such as GPU usage, clock speed, and frame rate, so you see the full picture of how your card is behaving.
- Set an overlay hotkey in the On-Screen Display settings if you want to toggle the overlay on and off while playing.
Displaying temperature alongside usage and frame rate is especially valuable, because together they tell a complete story: whether the card is busy, how hot it is getting, and whether the heat is costing you frames. With just temperature alone you see the symptom, but with all three you see the cause.
Reading the Overlay During Gameplay
Launch any game and the overlay will appear in the corner you chose, updating several times a second as you play. Give the card a good fifteen minutes of demanding gameplay so heat has time to build, then watch the peak temperature rather than the cool opening minutes.
The pattern to look for is whether the temperature stabilises at a safe level or keeps creeping upward toward the high eighties. A reading that settles in the seventies and holds steady is exactly what you want, while one that climbs relentlessly is your cue to look at cooling, airflow, or dust before it starts throttling away your performance.
A practical routine is to glance at the overlay during the most demanding moments of a game, such as busy combat or sprawling outdoor scenes, since those are when the card works hardest and runs hottest. If the temperature stays composed even there, you can be confident your cooling is comfortably within its limits across everything else you play.
Tips, Pitfalls, and Pros and Cons of In-Game Monitoring
A live overlay is a powerful habit, but knowing how to act on the numbers and where the small annoyances lie makes it genuinely useful rather than just decorative. A little context turns the readout into a practical tool.
What to Do If Temps Climb Too High While Gaming
If your overlay shows the card consistently running too hot, start with the cheapest fixes before anything drastic. Clean dust from the card and case with compressed air, make sure your case has proper intake and exhaust airflow, and raise the fan curve so the card cools itself more aggressively under load.
If cleaning and airflow do not bring temperatures down on an older card, the thermal paste inside may have dried out and could be replaced to restore proper cooling. Improving case ventilation with a couple of quality fans is often the single most effective upgrade, so it is worth considering better airflow if your overlay keeps showing alarming numbers.
Pro Tips and Mistakes to Avoid
The most common mistake is judging temperature from the first minute of a game, before heat has had time to accumulate, which gives a falsely reassuring reading. Always assess the sustained peak after a proper stretch of demanding play, since that is the number that reflects reality.
A useful pro habit is to keep the overlay minimal, showing only the few readings you actually use, so it informs without cluttering your view or distracting you. Positioning it in a corner away from important on-screen information also keeps it from interfering with the game itself.
See More:
Pros and Cons of a Permanent Overlay
On the plus side, a live overlay catches throttling and cooling problems instantly, confirms your card is healthy, helps you diagnose performance dips, and costs nothing to run. For anyone who cares about performance, that real-time insight is genuinely valuable.
On the downside, a busy overlay can be mildly distracting or clutter the screen, and obsessing over a couple of degrees is unnecessary since modern cards are built to run warm. Keeping the display minimal, or toggling it on only when you want to check, captures all the benefit without the fuss.
To wrap up, learning how to monitor GPU temp while gaming gives you a real-time window into your card’s health exactly when it matters, and it takes only a few minutes to set up a free overlay. Watch the sustained peak under load, keep the display minimal, and act early if the numbers climb. To keep your card cool when they do, check the recommended case fans and cooling upgrades linked below.


Write Your Review
No reviews yet. Be the first to share your experience!