
- Top Pick: 64GB – Bootable USB Drive 3.2 for Windows 11/10 / 8.1/7, Install/Recovery, No TPM Required, Included Network Drives (WiFi & LAN),Supported UEFI and Legacy, Data Recovery, Repair Tool
- Best Value: 5-in-1 Win Repair & Reinstall Bootable USB Flash Drive – Fix, Recover, or Reinstall Windows 11 (amd64 + arm64) / 10/7 – Includes PE Tools, Driver Pack, Antivirus, Data Recovery & Password Reset | Legacy toolkit for Windows 11/10/7 repair, reinstall, WinPE tools, drivers, antivirus and password reset
- Premium Choice: Ashampoo UnInstaller 16
Uninstall Nvidia drivers and you are usually trying to solve something specific: a crash that will not go away, a switch to a new card, or a fresh start after a bad update. Doing it properly matters far more than most people expect, because a half-finished removal leaves behind the very files that cause the problems you were trying to fix. This review explains when uninstalling is the right move, the crucial difference between a partial and a complete removal, and how to reinstall or switch cards afterwards without inheriting old conflicts.
Why and When to Uninstall Nvidia Drivers
Removing a driver is a targeted fix rather than routine housekeeping, and the reason you are doing it decides how thoroughly you need to go. A quick tidy-up is very different from clearing out a corrupted install, and matching the approach to the situation is what prevents wasted effort. The situations that genuinely call for an uninstall fall into a few clear groups worth recognizing first. Recognizing your own situation among them is the quickest way to know how far you need to go, which saves both effort and the risk of doing too little to actually fix the problem.
Common Scenarios for Uninstalling
The most frequent reason is instability: crashes, black screens, flicker or artifacts that appeared after an update and point straight at the driver. Uninstalling and reinstalling is the fastest way to test and usually to fix such problems. Because the timing points so clearly at the driver, treating a new fault that appears right after an update as driver-related until proven otherwise usually saves a great deal of misdirected troubleshooting.
Switching graphics cards is another major trigger, especially when moving between Nvidia and a competing brand. Old drivers left in place are a classic source of conflicts on the new card, so a clean removal first is the smart order of operations.
The third common scenario is a corrupted install that no update will repair, where wiping the driver and starting fresh is the only reliable route back to a stable system. In these cases half-measures tend to fail, because the corruption you are trying to escape often lives in exactly the leftover files a light uninstall leaves untouched, which is why a full removal becomes necessary.
Partial Versus Complete Uninstall
A partial uninstall through Windows removes the main driver but usually leaves behind registry entries, profiles and cached files. For a simple refresh that is fine, but for stubborn problems those remnants are exactly what keep the issue alive.
A complete uninstall, typically done with a dedicated tool, strips out everything the driver left on the system. It is the thorough option and the right one whenever you are chasing crashes, switching card brands, or recovering from a corrupted driver.
The rule of thumb is simple: partial for routine changes, complete whenever stability or a brand switch is on the line, because a shallow removal on a broken system tends to leave the same problem behind. Getting this judgement right the first time is what stops a quick job from turning into a frustrating loop of reinstalls, so it pays to match the depth of the removal to the seriousness of the problem from the outset.
When You Should Not Bother
Uninstalling is not always the answer. If your only goal is newer features or support for a new game, a straightforward update over the top is quicker and perfectly adequate, with no need to remove anything first. In those cases a removal is simply wasted effort, so it is worth confirming a genuine fault exists before reaching for the more thorough tools.
The distinction to remember is that updates fix what is outdated, while uninstalls fix what is broken. If nothing is actually malfunctioning, a full removal is extra work for no benefit, so reserve it for the situations that genuinely call for a fresh start rather than reaching for it by default. Reserving the full removal for genuine faults keeps it as a reliable tool rather than a routine chore, and it means the times you do reach for it are the times it actually makes a difference.
How to Uninstall Nvidia Drivers Safely
Once you know a removal is warranted, the method you choose decides whether you end up with a clean system or a lingering mess. There are two practical routes, and the difference between them is thoroughness rather than difficulty. Understanding how each works, and where each falls short, lets you pick correctly rather than repeating the process.
The Windows Uninstall Route
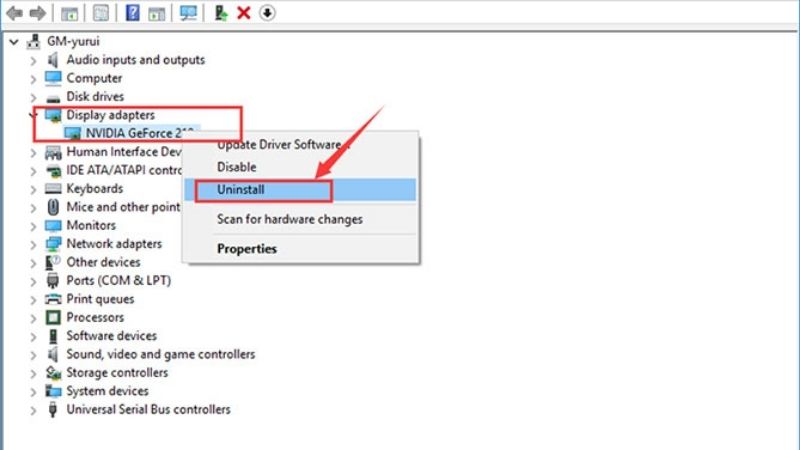
The simplest method is through Windows: open the apps or programs list, find the Nvidia graphics driver, uninstall it and restart. This handles the bulk of the driver and is enough for routine changes on a healthy system.
Its weakness is thoroughness, since it leaves behind profiles, registry keys and cached files. It is quick and needs no extra software, but it is not the method to trust when you are actively trying to cure instability, which is its main limitation. The mistake many people make is trusting this quick route to cure instability, then wondering why the problem returns, when the answer is simply that the leftover files causing it were never removed.
Treat this as the light-touch option: fine for a tidy, working system and insufficient for a genuinely broken one.
A Complete Uninstall With a Removal Tool
For a truly clean slate, a dedicated display driver removal utility run in safe mode is the thorough choice that experienced users rely on. It wipes the driver along with the registry entries and leftover files a normal uninstall misses.
The process is to boot into safe mode, run the tool, let it clear everything and restart, then install a fresh driver on a clean system. Doing it in safe mode is what prevents Windows from reloading parts of the driver mid-process, which is the single biggest factor in whether the removal actually sticks.
This extra care is exactly why it is the go-to method for crashes, corruption and brand switches, where a partial removal simply is not enough. The extra ten minutes the thorough method takes are almost always repaid, since they prevent the mismatched-file crashes that otherwise send people straight back to searching for a fix.
Uninstall Nvidia Drivers: Pros and Cons of the Methods
Here is the honest balance between the quick Windows route and the complete removal.
| Method | Pros | Cons |
|---|---|---|
| Windows uninstall | Fast, no tools, easy | Leaves files behind; poor for crashes |
| Complete removal tool | Truly clean; fixes stubborn issues | Needs a tool and safe mode; more steps |
The takeaway is to use the quick method for routine changes and the complete removal whenever the goal is genuinely fixing a problem or switching cards, where the extra effort pays for itself.
After Uninstalling: Next Steps
Removing the driver is only half the job; what you do next decides whether the system ends up stable. Whether you are reinstalling, switching brands, or upgrading entirely, a careful follow-through stops you from landing back where you started. This final stage is where a clean uninstall actually pays off. The care you took removing the driver only shows its value here, in a system that comes back stable rather than dragging the old problems straight into the new setup.
Reinstalling Cleanly
After a complete uninstall, install a fresh driver from Nvidia’s official source, matched to your exact card and operating system. Downloading straight from Nvidia avoids the wrong-version and bundled-software problems that plague third-party sites.
If you removed the driver to escape a buggy release, consider installing a slightly older, known-stable version rather than the very latest, and note the version so you can repeat or revert cleanly if needed.
Switching GPU Brands
If the uninstall is preparation for a card from a different brand, a complete removal before the swap is essential, because leftover Nvidia files can actively conflict with a new competing card’s drivers. Clearing them first is what makes the transition smooth.
With the old drivers gone, the new card installs onto a clean system and picks up its own driver without the mismatched-file crashes that catch out people who skip this step. It is the difference between a painless switch and a frustrating one. This step is the single most overlooked part of changing graphics brands, and skipping it is the most common reason a new card from a different manufacturer behaves badly on an otherwise healthy system.
See More:
Upgrading and Buying Tips
When the reason for uninstalling is a hardware upgrade, the driver work is the easy part; choosing the right card for your resolution and system is what matters most. Match the card to how you actually play rather than overspending on power you will not use.
Once you have removed the old drivers and confirmed your power supply and case are ready, you can compare current graphics cards that suit your budget through the links on this page and pick one that drops cleanly into your freshly prepared system.
In summary, the smart way to uninstall Nvidia drivers depends on why you are doing it: a quick Windows removal for routine changes, and a complete uninstall with a dedicated tool in safe mode whenever you are fixing crashes, recovering from corruption or switching card brands. Follow it with a fresh driver from Nvidia’s official source, and you avoid the leftover-file problems that send people in circles. Done properly, uninstalling your drivers is a reliable reset rather than a gamble. Approached with the right method for the situation, it is one of the most dependable ways to give a troubled system a genuinely clean start.
Frequently Asked Questions
Do I actually need Display Driver Uninstaller or is Windows enough?
Windows Add or Remove Programs handles routine driver swaps within the same brand acceptably well. Display Driver Uninstaller is the right tool when you are switching GPU vendors, chasing an unexplained crash, or cleaning up after a failed installation, because it removes registry entries, leftover services and driver store copies that the standard uninstaller deliberately leaves behind.
Should DDU be run in safe mode?
Safe mode is still the recommended environment because Windows cannot reinstall a driver mid-removal and no application holds the graphics files open. Boot into safe mode with networking disabled, run the removal, then restart normally. Running DDU on a live desktop usually works but occasionally leaves fragments that defeat the purpose of the exercise.
How do I stop Windows Update from reinstalling the old driver?
Temporarily disconnect from the internet before rebooting, or use the Windows group policy setting that excludes drivers from Windows Update. DDU also offers an option to prevent automatic driver downloads. Once you have installed the driver version you want from the NVIDIA site, you can safely re-enable updates since Windows will not downgrade a newer package.
What leftover folders should I check after removal?
Look for C:\Program Files\NVIDIA Corporation, C:\Program Files (x86)\NVIDIA Corporation, C:\ProgramData\NVIDIA Corporation and the C:\NVIDIA extraction folder. Deleting these reclaims several gigabytes and clears stale profile data. If you want to preserve your custom control panel and game profiles, back up the ProgramData folder before removing anything.
Will uninstalling the driver damage my display or GPU?
No. Removing the driver simply reverts Windows to the basic Microsoft display adapter, so your screen drops to a low resolution with no acceleration until you install a new driver. That is expected behaviour, not a fault. Download the replacement driver installer before you begin so you are not left hunting for it on a degraded desktop.
As an Amazon Associate we earn from qualifying purchases at no extra cost to you.



Write Your Review
No reviews yet. Be the first to share your experience!