
- Top Pick: ARCTIC MX-4 (4 g) – Premium Performance Thermal Paste for All Processors
- Best Value: ARCTIC MX-6 (4 g) – Ultimate Performance Thermal Paste for CPU, Consoles, Graphics Cards, laptops, Very high Thermal Conductivity, Long Durability, Non-Conductive
- Premium Choice: Thermal Grizzly TG Putty Basic 30 g Thermal Putty VRAM VRM PCB
stress test a GPU is how you find out whether your graphics card is truly stable before you trust it with a long gaming session, an important project, or your money on a second-hand purchase. By pushing the card to its absolute limit and watching how it responds, a stress test reveals cooling problems, instability, and hidden faults that normal use might hide for weeks. This guide explains what a stress test does, when to run one, and the exact steps to test your card safely with free tools.
- Verdict at a glance
- Understanding GPU Stress Testing
- The best GPU stress test tools in 2026
- How to Stress Test a GPU Step by Step
- Tips, Pitfalls, and Pros and Cons of Stress Testing
- Top-Rated Picks
- Related Guides
- How we compared
- More GPU stress test questions
- Frequently Asked Questions
- Fixes for a GPU that fails on temperature
- Related Articles
As an Amazon Associate we earn from qualifying purchases at no extra cost to you.
Verdict at a glance
Short answer (updated October 2026): run a free GPU stress test for 15–30 minutes with a monitoring overlay open. A pass means no crashes, no artifacts, a temperature that levels off below your card’s limit, and clocks that stay near their normal boost.
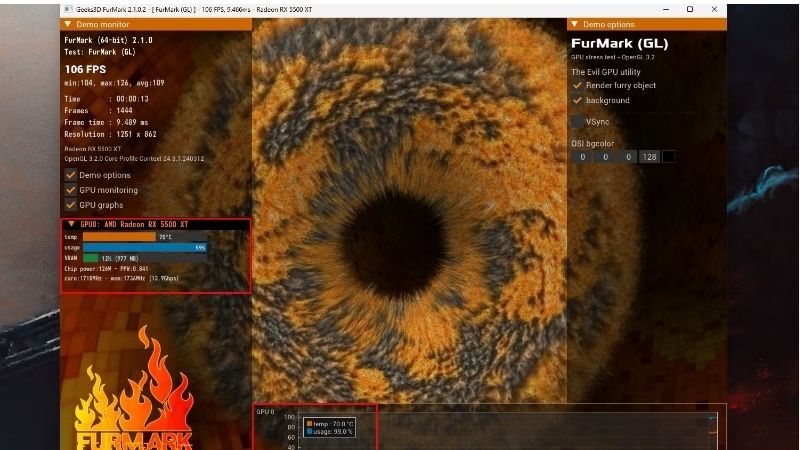
- Best quick thermal check: FurMark 2, the free OpenGL and Vulkan successor to FurMark, for a short worst-case heat test.
- Best for overclock and undervolt stability: OCCT, whose 3D Adaptive and VRAM tests catch errors other tools miss.
- Best game-like pass/fail test: 3DMark Steel Nomad Stress Test, which reports a frame-rate stability score; 97% or higher passes.
- Best fixes if it runs hot: fresh thermal paste such as ARCTIC MX-6, thermal putty for memory and VRM pads, and better case airflow with fans like the ARCTIC P12 PWM PST.
Understanding GPU Stress Testing
A stress test deliberately loads your graphics card far harder than most games ever will, holding it at maximum effort to see whether it stays stable and cool. The idea is simple: if a card survives the worst you can throw at it, it will handle everyday gaming with ease. Knowing what the test is doing helps you read its results with confidence. It also means you can trust a clean result as genuine proof of stability rather than wondering whether the test was hard enough.
What a GPU Stress Test Actually Does
A stress test runs a punishing, sustained workload that drives your GPU to full utilisation and keeps it there, generating maximum heat and power draw. This is intentionally harsher than real games, which vary their load from scene to scene, because the goal is to expose any weakness under the most demanding conditions possible.
While the card is pinned at its limit, you watch for three things: rising temperatures, visual glitches called artifacts, and outright crashes. A healthy card holds a stable, safe temperature and runs cleanly for the whole test, whereas a problem card reveals itself through overheating, artifacts, or a crash.
In short, a stress test compresses weeks of potential trouble into a focused half-hour, which is why it is the standard way to verify that a card is genuinely reliable rather than merely working for now.
When You Should Stress Test
There are several moments when a stress test is well worth running. After building a new PC or installing a new card, it confirms everything is stable before you rely on it; after buying a used graphics card, it is essential for verifying you did not inherit a hidden fault.
It is also the natural follow-up to overclocking, since the whole point is to prove your new settings hold up under sustained load. Finally, when you are troubleshooting crashes or artifacts, a stress test helps you reproduce the problem on demand instead of waiting for it to strike mid-game.
Some people also run a brief stress test after any change to their cooling or case airflow, to confirm the improvement actually helped under load. Treating a quick test as the natural way to verify any cooling or stability change turns it into a reliable habit rather than something you only reach for once trouble has already appeared.
What You Will Need
Stress testing is free, and the toolkit is small.
You will want a dedicated stress-testing tool such as FurMark, which pushes the card to extreme heat, or OCCT, which offers a range of stability tests; many people also use the looped benchmarks in 3DMark for a more game-like sustained load. Any of these will drive the card hard enough to reveal problems.
Alongside the test itself, you need a monitoring overlay like MSI Afterburner to watch temperature, clock speed, and usage in real time throughout. Without monitoring you only see whether the card crashes, but with it you can see a problem building before it does.
The best GPU stress test tools in 2026
The classic tools have all been updated in the last two years. Each one stresses the card differently, so the most reliable approach is to combine a heat test with a stability test.
| Tool | Type of load | Best for | Cost | Pass criteria |
|---|---|---|---|---|
| FurMark 2 | Extreme, constant power and heat (OpenGL or Vulkan) | Worst-case cooling and power-delivery check | Free | No crash or artifacts; temperature plateaus below limits |
| OCCT (3D Adaptive, 3D Standard, VRAM) | Variable load that sweeps clocks and voltages, plus memory error checking | Overclock and undervolt validation, VRAM faults | Free edition; paid tiers add features | Zero errors reported |
| 3DMark Steel Nomad Stress Test | Game-like DirectX 12 load looped 20 times | Detecting throttling and performance drift | Paid (3DMark) | Frame-rate stability of 97% or higher, all loops complete |
| Unigine Superposition | Game-like load with a looping benchmark | Simple free game-style stress and artifact check | Free basic edition | No crash or artifacts over 20–30 minutes |
| Real games | Varying load | Final confirmation of a tune | – | Hours of play with no crashes or driver resets |
FurMark 2
FurMark 2 replaced the original FurMark, which was first released in 2007. Geeks3D rebuilt it as a cross-platform tool for Windows and Linux with both OpenGL and Vulkan renderers, a command-line core with an optional graphical interface, built-in sensor readouts, and benchmark presets from 1080p to 4K. Recent versions support current GeForce RTX 50 and Radeon RX 9000 cards. FurMark pins the GPU at its power limit almost instantly, which makes it ideal for checking whether a cooler can cope with the worst case. Because the load is unrealistically constant, keep FurMark runs short, ideally 10–15 minutes, and do not treat a pass as proof that an overclock is game-stable.
OCCT
OCCT’s 3D Adaptive test, available in the free edition, ramps load up and down over time. That matters because many unstable overclocks and undervolts fail at mid-range clocks and voltages, not at full power. Owner guides commonly suggest a one-hour Variable-mode run that steps intensity from about 20% to 100%. OCCT’s VRAM test checks a high percentage of video memory for errors, which is the quickest way to validate a memory overclock or diagnose a faulty used card. Any error count above zero is a fail.
3DMark Steel Nomad Stress Test
Steel Nomad is UL’s DirectX 12 benchmark that superseded Time Spy as the mainstream standard, and it is considerably heavier. The Stress Test mode loops it 20 times and calculates frame-rate stability by comparing the worst loop with the best. UL treats 97% or higher, with all loops completed, as a pass. Results of 98–99% are normal for healthy systems; a score below 97% usually points to thermal throttling, a power limit, or background software interfering.
A combined testing routine
- Run FurMark 2 for 10–15 minutes at your monitor’s resolution to confirm temperatures plateau safely.
- Run the Steel Nomad Stress Test (or Superposition in a loop) to check for throttling and performance drift.
- Run OCCT’s VRAM test and 3D Adaptive test for 30–60 minutes if you have overclocked, undervolted or bought the card used.
- Finish with a few hours of your most demanding games, since some instability only appears under real, varying loads.
How to Stress Test a GPU Step by Step
Running a stress test is straightforward once your monitoring is ready, and the key is to watch carefully rather than just walk away. Follow these steps and you will get a clear, trustworthy verdict on your card’s stability. The discipline is simply to watch attentively for the full duration rather than starting the test and wandering off.
Preparing for the Test
Before you begin, close background applications and open your monitoring tool so you can see temperature, usage, and clock speed live. Make a note of your card’s idle temperature as a baseline, since the difference between idle and full load tells you how hard the cooling has to work.
It is also wise to ensure your case has decent airflow and is not choked with dust, because a stress test will mercilessly expose poor cooling. Starting with a clean, well-ventilated system means any failure you see points to a genuine fault rather than simply a dirty heatsink.
It is also worth deciding in advance what temperature you would consider alarming, so you can react calmly rather than panicking at the first high number. Having a clear threshold in mind, along with your baseline idle reading, means you are interpreting the test rather than just watching numbers climb and hoping for the best.
Running the Stress Test
With monitoring in place, run the test with these steps:
- Launch your stress-testing tool and choose a sustained test at your monitor’s resolution for a realistic load.
- Start the test and watch the overlay, keeping an eye on temperature as it climbs over the first few minutes.
- Let it run for around fifteen to thirty minutes, which is long enough for temperatures to stabilise and for any instability to reveal itself.
- Stop the test if anything alarming happens, such as a temperature spiking dangerously high, the screen showing artifacts, or the system becoming unresponsive.
Throughout the run, the temperature should rise and then level off at a steady plateau rather than climbing without end. A card that settles at a safe, stable temperature and runs the full duration cleanly has passed the most important part of the test.
If you are testing an overclock specifically, this is the moment of truth, since an unstable overclock usually reveals itself within the first several minutes as a crash or artifacts. A clean run at your overclocked settings, by contrast, is strong evidence that the tuning is safe to keep for daily use.
What to Watch For
Three warning signs matter most during a stress test. Temperatures pushing into the high eighties or beyond suggest a cooling problem; visual artifacts like flickering, strange colours, or odd shapes point to an unstable or failing card; and a crash or driver reset signals genuine instability.
You should also watch for heavy thermal throttling, where the card’s clock speeds drop sharply to control heat. A small amount of throttling under extreme load can be normal, but large, sustained drops mean the cooling cannot keep up and deserves attention before the card is trusted with serious work.
Keeping your monitoring overlay visible throughout lets you see the relationship between temperature and clock speed in real time. Watching the clocks hold steady while temperatures stay in a safe range is the clearest confirmation that the card is coping well, whereas clocks dropping as heat rises tells you the cooling is the limiting factor.
Tips, Pitfalls, and Pros and Cons of Stress Testing
A stress test gives a clear answer, but interpreting it correctly and avoiding a few common mistakes is what makes it reliable. A little judgement turns raw observations into a confident verdict. With a little experience, the difference between a healthy result and a worrying one becomes obvious at a glance.
Interpreting Your Results
A pass is simple to recognise: the card holds a safe, stable temperature, shows no artifacts, and runs the entire test without crashing. That result means you can trust it for gaming, creative work, or as proof that a used purchase is sound.
A fail is equally clear and always meaningful. Overheating points to cooling issues you can often fix with cleaning, better airflow, or fresh thermal paste, while artifacts or crashes that persist after those fixes suggest a deeper hardware fault that may make the card unwise to rely on or buy.
Pass/fail temperature guide
Every GPU has its own limits, so check your card maker’s specifications. The table below gives general guidance for modern NVIDIA and AMD desktop cards under a sustained stress test, based on manufacturer limits and typical results reported by reviewers and owners.
| Sensor | Pass (healthy) | Watch closely | Fail (investigate) |
|---|---|---|---|
| GPU core temperature | Up to about 80°C | About 80–85°C | Sustained above about 87°C, or hitting the card’s throttle limit |
| Hotspot / junction temperature | Up to about 95°C | About 95–105°C | Near or above about 105–110°C, or more than about 20–25°C above core |
| Memory junction temperature (GDDR6/GDDR6X/GDDR7) | Up to about 90°C | About 90–100°C | Near or above about 105°C |
| Clock speed behaviour | Small drop from peak boost that stabilises | Gradual drop as temperature rises | Sharp, sustained drop toward base clock |
| Fan speed | Levels off below maximum | Near maximum but stable | Pinned at 100% with temperatures still rising |
| Stability | No artifacts, crashes or errors | – | Any artifact, driver reset, OCCT error, or reboot |
Notes: NVIDIA GeForce RTX 50 series cards no longer report a hotspot reading, so rely on core and memory temperatures where hotspot is unavailable. A large gap between core and hotspot temperature often means poor thermal paste contact, which a repaste can fix. High memory junction temperatures usually point to worn thermal pads.
Pro Tips and Mistakes to Avoid
The biggest mistake is running a stress test without monitoring open, so you only learn that something went wrong after a crash rather than watching the warning signs build. Always keep an eye on live temperatures, since they tell the story long before a failure.
Another mistake is panicking at a single brief throttle or a high but stable temperature that is still within the card’s rated limits. Modern cards are designed to run warm under extreme load, so it is the sustained, alarming readings and the artifacts or crashes that matter, not every momentary dip.
See More:
Pros and Cons of Stress Testing
On the plus side, stress testing is free, quick, and the most reliable way to confirm a card is stable, verify a used purchase, validate an overclock, or reproduce a fault on demand. It gives you genuine peace of mind in well under an hour.
On the downside, a stress test deliberately runs the card hot, so it should be done with adequate cooling and supervised rather than left unattended for hours. Used sensibly for a reasonable duration, though, it poses no real risk and tells you exactly what you need to know.
To wrap up, knowing how to stress test a GPU is the surest way to confirm your card is stable and well cooled, and it comes down to running a demanding tool while watching temperatures, artifacts, and stability for fifteen to thirty minutes. A card that stays cool and clean throughout has passed; one that overheats or glitches needs attention. If a stress test reveals a card that simply cannot keep up, start with the cooling fixes below before considering a graphics card upgrade.
Top-Rated Picks


How we compared
Updated October 2026. This guide is based on the documentation and release notes for FurMark 2 (Geeks3D), OCCT (OCBASE) and 3DMark (UL), GPU manufacturers’ published temperature limits, and coverage from publications such as TechPowerUp, OC3D and PC Gamer, plus owner reports from enthusiast forums. We did not run our own lab tests for this guide. Temperature thresholds are general guidance; your card maker’s specifications take priority.
More GPU stress test questions
Is FurMark 2 safe for my graphics card?
For a healthy card with working cooling, yes. Modern GPUs enforce power and thermal limits and will throttle or shut down before damage. Keep runs short, monitor temperatures, and stop if you see artifacts or a temperature that keeps climbing. Be cautious with older cards or a 16-pin connector that already shows signs of heat damage.
What score should I get in the 3DMark Steel Nomad Stress Test?
A frame-rate stability of 97% or higher with all 20 loops completed is a pass. Most healthy systems land between 98% and 99%. A lower score points to throttling, power limits or background interference.
How do I stress test GPU memory (VRAM)?
Use OCCT’s VRAM test and set it to cover most of the available memory. Any error means the memory is unstable, usually due to a memory overclock or, on used cards, a hardware fault.
Should I stress test a used graphics card before buying?
Yes, whenever possible. Run FurMark 2 for 10 minutes and an OCCT VRAM test, and watch for artifacts, crashes and high memory temperatures. Also inspect the power connectors for discoloration or melting.
Frequently Asked Questions
Which stress test tool should I use?
FurMark pushes power draw to unrealistic extremes and is best for a short thermal worst case. 3DMark stress tests and Unigine Superposition better reflect real gaming loads and report a frame-rate stability percentage. OCCT includes a dedicated VRAM error check that catches memory faults the others miss.
How long should a stress test run?
Fifteen to thirty minutes exposes most thermal problems because the heatsink reaches saturation after roughly ten. For validating an overclock or undervolt, run a one-hour loop plus a few hours of real gameplay, since some instabilities only surface under varying rather than constant load.
What temperatures and behaviour should I expect?
Core temperatures in the seventies to mid-eighties are normal, hotspot ten to fifteen degrees higher, and memory junction under about one hundred and five degrees. Some clock reduction from the peak boost is expected and healthy; a hard drop to base clocks means power or thermal throttling.
Can stress testing damage my graphics card?
A healthy card protects itself with thermal and power limits, so a normal test is safe. The genuine risks are a marginal power supply shutting down, an already-degraded 12VHPWR connector overheating, and poor case airflow cooking neighbouring components. Monitor sensors throughout rather than leaving it unattended overnight.
What do crashes or artifacts during the test mean?
Artifacts usually indicate memory instability, so reduce any memory overclock first. A driver timeout points to core clock or voltage instability, while an instant system reboot or black screen more often implicates the power supply or the PCIe power connection than the GPU itself.
Fixes for a GPU that fails on temperature
If your card passes on stability but runs too hot, the fixes are usually cheap. Start with airflow and dust, then move to thermal paste and pads only if you are comfortable opening the card, and check whether doing so affects your warranty.
ARCTIC MX-6 Thermal Paste (4 g)

ARCTIC’s MX-6 is the successor to the MX-4 listed above, and ARCTIC rates it for higher thermal performance. It is non-conductive and non-capacitive, so accidental spills onto the board are not a short-circuit risk, and it is easy to spread. A 4 g tube covers several GPU or CPU applications.
Who it’s for: owners of older cards, typically three or more years old, whose core-to-hotspot temperature gap has grown, a common sign that the factory paste has dried or pumped out.
Strengths: safe non-conductive formula, consistent results, and good durability under the heat cycling of a GPU die.
Drawbacks: repasting requires disassembling the cooler, which can void some warranties, and it does not fix worn memory pads.
How it compares: a straightforward upgrade over the MX-4 for GPUs, where long-term pump-out resistance matters.
Thermal Grizzly TG Putty Basic (30 g)

Many modern GPUs use thick thermal pads on the memory chips and power stages. When those pads harden or lose contact, memory junction temperatures climb. Thermal putty replaces pads with a soft, conformable compound that fills gaps of varying thickness, so you do not need to match exact pad sizes. Thermal Grizzly’s TG Putty Basic comes in a 30 g tub, enough for a typical graphics card.
Who it’s for: users whose stress test shows high memory junction or VRM temperatures while the core runs normally.
Strengths: no need to measure pad thickness, conforms to uneven surfaces, and is non-conductive.
Drawbacks: it is messier to apply than pads and requires full cooler removal. The Basic version has lower thermal conductivity than Thermal Grizzly’s Advance and Pro putties.
How it compares: pair it with fresh paste on the GPU die for a full cooler refresh.
ARCTIC P12 PWM PST (5-pack)

Many stress test failures come from the case rather than the card. ARCTIC’s P12 PWM PST is a pressure-optimized 120mm fan that runs from about 200 to 1,800 RPM. PWM Sharing Technology lets you daisy-chain fans so several run from a single motherboard header, which makes it easy to add intake and exhaust fans to a cramped case.
Who it’s for: anyone whose GPU temperature drops noticeably with the side panel removed, which is a clear sign of poor case airflow.
Strengths: pressure-optimized blades that work well behind dust filters and radiators, quiet at low speeds, easy daisy-chaining, and good value in the five-pack.
Drawbacks: no RGB lighting, and the five-pack is more than small cases need.
How it compares: adding two front intake fans is often the cheapest way to lower GPU temperatures, before considering any repaste.
Write Your Review
No reviews yet. Be the first to share your experience!