clean install Nvidia drivers is the simplest fix for a graphics card that crashes, stutters, or shows odd glitches after months of updates piling on top of each other. Instead of layering a new driver over the old one, a clean install wipes the previous settings and files first, giving your GPU a fresh, stable foundation. This guide explains what a clean install actually does, when you need one, and the exact steps using both Nvidia’s built-in option and the DDU tool for the most thorough result.
Understanding a Clean Install of Nvidia Drivers
Every time you update a driver normally, the installer adds the new version over your existing one and keeps your old settings and files. That is convenient, but over many updates it can accumulate clutter and conflicting leftovers. A clean install removes that history and sets everything back to default, which is often exactly what a misbehaving card needs. Think of it as resetting the driver to its factory state without touching anything else on your PC.
What a Clean Install Actually Does
A clean install removes your existing Nvidia driver and its settings before installing the new one, rather than updating over the top. It resets your control panel preferences to default and clears out accumulated configuration files that can cause subtle problems.
The result is a driver that behaves as if it were freshly set up on a new PC, free of the quirks that build up over time. This is why a clean install so often resolves stutters, crashes, and glitches that ordinary updates leave untouched.
It is worth noting that you will lose your custom control panel settings in the process, so any per-game profiles or display tweaks will need to be reapplied afterwards, which is a small price for a stable system. You can always note down your important profiles first, but for most people the few minutes of reconfiguration are well worth a card that simply works again.
When You Need a Clean Install
Reach for a clean install when you are troubleshooting persistent stutters, crashes, black screens, or visual artefacts that normal updates have not fixed. It is also the right move after a long string of regular updates, or when an update has gone wrong and left the system unstable.
You do not need to clean install for every routine update; if your card is running well, a standard update is perfectly fine. The clean method is a fix-it and fresh-start tool, best used when something is actually wrong rather than as a habit. Updating normally over the top is faster and keeps your settings, so reserve the clean route for when it will genuinely earn its extra effort.
A good rule of thumb is to reach for a clean install after upgrading from a much older driver, after a failed or interrupted update, or whenever a problem has resisted simpler fixes. In those specific situations the fresh start is far more likely to pay off than yet another update layered on top.
What You Will Need
Everything required is free and quick to gather.
You will need the latest Nvidia driver package downloaded from Nvidia before you begin, so it is ready to install immediately. For the most thorough wipe, the free Display Driver Uninstaller, or DDU, removes leftovers that even the built-in clean option can miss, which is useful for the most stubborn problems.
A few minutes of uninterrupted time also helps, since the deepest method involves a restart into Safe Mode, during which your screen may briefly drop to a lower resolution before the fresh driver takes over. This momentary change is expected and harmless, and full resolution returns the instant the new driver finishes installing.
How to Clean Install Nvidia Drivers Step by Step
There are two levels of thoroughness: Nvidia’s own built-in clean install option, which is quick and handles most cases, and a full wipe with DDU first for the toughest problems. Start with the simpler route and escalate only if needed.
Method 1: Clean Install Option in the Installer
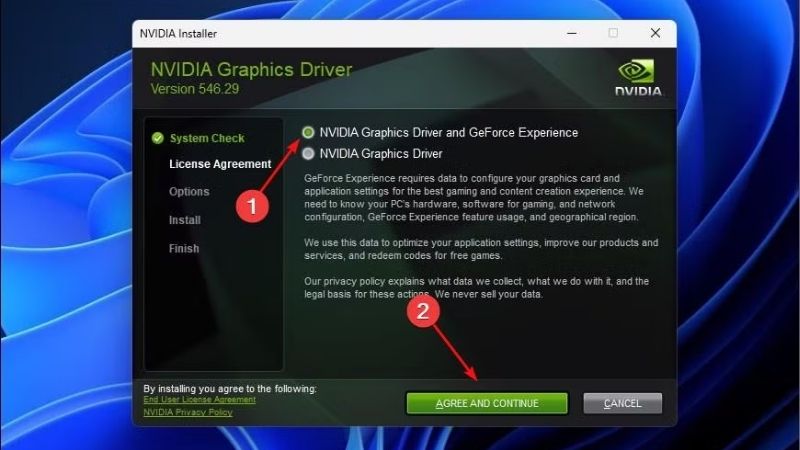
Run the Nvidia driver package you downloaded, and when the installer offers options, choose the custom or advanced installation rather than the express one. On the next screen, tick the box labelled “Perform a clean installation,” which tells the installer to remove existing settings before proceeding.
Let the installation complete and restart if prompted. This built-in option handles the majority of situations and is far less hassle than the full DDU method, so it is the right first attempt for most people facing minor instability. Only if this built-in option fails to resolve the issue do you need to escalate to the more thorough DDU process.
Because this option lives inside Nvidia’s own installer, it is by far the most convenient way to get most of the benefit of a clean start without any extra tools. For the majority of stutter and glitch complaints, ticking that single box is all the cleaning the system actually needs.
Method 2: Full Wipe with DDU First
For the most stubborn issues, do a complete wipe with these steps:
- Download the Nvidia driver and DDU first, then disconnect from the internet so Windows does not install a generic driver mid-process.
- Restart into Safe Mode through the Windows advanced startup options, which is where DDU works most reliably.
- Run DDU, select Nvidia, and choose “Clean and restart” to remove the driver and all its remnants, after which the PC reboots on its own.
- Install the fresh driver by running the downloaded package, using the clean install option again for good measure, then reconnect to the internet.
This combination leaves absolutely nothing of the old driver behind, which is why it is the most dependable cure when even the built-in clean option has not solved the problem. For the most persistent gremlins, this Safe Mode wipe is as close to a guaranteed fresh start as you can get without reinstalling Windows.
Verifying and Configuring After Install
After installing, restart once more and confirm the card is stable by running a demanding game or a benchmark for a while. Watch for the return of any stutters or artefacts, which should now be gone if a leftover driver was the cause.
Because a clean install resets your preferences, take a few minutes to reapply any control panel settings you rely on, such as your anisotropic filtering override or per-game profiles. With the fresh driver in place and your settings restored, your card is back to running at its best. From here, a final reboot and a few minutes of normal use confirm that whatever was causing the trouble is genuinely gone.
It is also a good moment to confirm the new driver version is the one you intended to install, which you can see in the Nvidia App or in Windows system information. A quick check here rules out the awkward case of an update that silently failed to apply the version you expected.
Pros, Cons, and Expert Tips for a Clean Install
A clean install is one of the most effective troubleshooting steps available, but knowing its trade-offs and a few expert habits makes it smoother and more reliable. Used at the right time, it solves problems updates cannot.
Mistakes to Avoid
The biggest mistake is starting the process without the new driver already downloaded, which can leave you on a basic fallback driver with no easy way to recover. Always have the replacement ready before you remove anything.
Another error is using the express install when you actually need the clean option, which simply layers the new driver over the old settings and may not fix the problem. Choosing the custom install and ticking the clean box is what makes the difference. Skipping that single checkbox is the most common reason a so-called clean install does not actually clean anything.
Pro Tips for a Smooth Clean Install
A good habit is to disconnect from the internet and pause automatic Windows updates during the process, so nothing installs itself before you are ready. Noting down your key control panel settings beforehand makes reapplying them afterwards quick and painless.
If the built-in clean option does not fully solve your issue, escalating to the DDU method in Safe Mode is the logical next step rather than giving up. Doing the whole job in one sitting keeps your system protected and avoids running on a fallback driver for long. Keeping the downloaded driver package handy also means you are never more than a couple of clicks from a working setup.
See More:
Pros and Cons of a Clean Install
On the plus side, a clean install reliably fixes many stutters, crashes, and glitches, gives your card a fresh and stable foundation, and is completely free. It is the single most effective driver-related troubleshooting step for most people.
On the downside, it resets your custom settings, takes a little longer than a normal update, and the deepest version requires Safe Mode and staying offline. These are minor costs, though, for a genuinely clean and stable result.
To wrap up, knowing how to clean install Nvidia drivers is the go-to fix for a card that crashes or stutters after too many layered updates, and it comes down to downloading the driver first, wiping the old one with the built-in option or DDU, and reapplying your settings afterwards. Start with the simple clean option and escalate to DDU if needed. If a clean install still leaves an aging card unable to keep up, it may be time to upgrade, and you can check the recommended graphics cards linked below.


Write Your Review
No reviews yet. Be the first to share your experience!