
- Top Pick: NVIDIA GeForce RTX 5080 Founders Edition
- Best Value: Nvidia RTX 2000 ADA 16GB Graphics Card
- Premium Choice: VIPERA NVIDIA GeForce RTX 4090 Founders Edition Graphic Card
How to Revert Nvidia Drivers is a skill every PC gamer should have, because a bad driver update can suddenly cause crashes, stutter, or black screens in games that ran perfectly the day before. The good news is that rolling back to a stable driver is quick and safe once you know the steps. Whether a new release broke your favourite game or introduced instability, this guide walks you through every method to get back to a working driver. Follow along and you will have your system stable again in minutes, without losing any of your settings.
Before You Start: What You Will Need
A little preparation makes reverting your drivers fast and painless, so it is worth a couple of minutes before you begin. This section covers when a rollback is the right fix, the simple tools you will want on hand, and how to prepare your system. Get these basics sorted and the actual process becomes very straightforward.
When You Should Revert Your Drivers
The clearest sign you need to revert is that problems started right after a driver update. If games began crashing, stuttering, or showing visual glitches immediately after you installed a new driver, an older version is very likely the fix. Timing is the biggest clue here.
Other symptoms include black screens, failure to reach the desktop, or specific games refusing to launch after an update. These issues often point to a driver that does not agree with your particular hardware or game. Reverting to a known-good version usually resolves them cleanly.
If your problems existed before any update, a driver rollback may not be the answer, and the issue could lie elsewhere. But when the trouble lines up with a recent driver change, reverting is the first and most effective thing to try.
The Tools You Will Need
For the simplest method, you need nothing extra at all, as Windows can roll back a driver on its own. This built-in option is the fastest route and works well for most straightforward cases. It should always be your first attempt.
For a deeper clean, download Display Driver Uninstaller, known as DDU, which is a free and widely trusted tool that removes every trace of a driver. It is the go-to utility when a simple rollback does not fully fix the problem. Having it ready saves time if you need it.
You will also want the specific older driver you intend to install, downloaded in advance from Nvidia’s official driver archive. Keeping the installer ready means you can reinstall cleanly straight after removing the problem driver, without hunting for it mid-process.
Prepare And Back Up First
Before making changes, it is wise to create a system restore point so you can undo everything if needed. This takes moments and gives you a safety net, which is always sensible when altering system software. A little caution here prevents bigger headaches later.
Close all your games and applications before starting, since driver changes require a clean state and usually a restart. Saving your work and shutting programs down avoids any interruative surprises during the process. A tidy starting point makes everything smoother.
Finally, make a note of which driver version currently causes problems so you can avoid reinstalling it by mistake. Knowing exactly which release to skip keeps your system stable once you have finished. With these preparations done, you are ready to begin.
Step-By-Step: How To Revert Nvidia Drivers
With preparation complete, here are three reliable methods to revert your Nvidia drivers, ordered from simplest to most thorough. Start with the first method, and only move to the next if the problem persists. Each one is written as clear numbered steps so you can follow along easily.
Method 1: Roll Back In Device Manager
This is the quickest method and uses only built-in Windows tools, making it the ideal first attempt for most driver problems.
- Open Device Manager. Right-click the Start button and select Device Manager from the menu that appears. This opens the list of all your hardware devices.
- Find your graphics card. Expand the Display adapters section, then right-click your Nvidia GPU and choose Properties. This opens the settings for that specific device.
- Open the Driver tab. In the Properties window, click the Driver tab to see the driver options for your graphics card.
- Roll back the driver. Click the Roll Back Driver button, choose a reason when prompted, and confirm. Windows will reinstall the previous driver automatically.
- Restart your PC. Reboot to finish the process, then test the games that were causing problems to confirm the fix worked.
If the Roll Back Driver button is greyed out, Windows has no previous version stored, and you should move on to the next method instead. Otherwise, this simple rollback resolves the majority of driver issues in just a few minutes.
Method 2: Clean Install With DDU
When a simple rollback is not enough, a clean install with DDU removes every trace of the problem driver for a fresh start.
- Download your target driver. Get the older, stable driver from Nvidia’s official archive and save it somewhere easy to find before you begin.
- Boot into Safe Mode. For the cleanest removal, restart Windows into Safe Mode, which prevents the driver from being in use during uninstallation.
- Run DDU. Open Display Driver Uninstaller, select GPU and then Nvidia, and choose Clean and restart. DDU will completely remove the current driver.
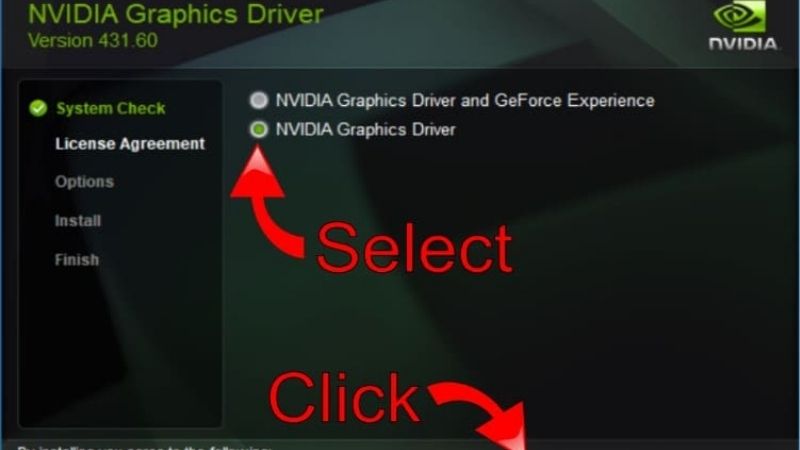
- Install the older driver. After your PC restarts, run the installer for the stable driver you downloaded earlier and follow the prompts.
- Restart and test. Reboot once more, then launch your games to confirm the instability is gone.
This thorough approach fixes problems that a simple rollback cannot, because it eliminates leftover files that may be causing conflicts. It is the most reliable method for stubborn driver issues, and it is why DDU is so widely recommended.
Method 3: Reinstall Through The Nvidia App
The Nvidia App also offers a straightforward way to manage and reinstall drivers if you prefer an official interface.
- Open the Nvidia App. Launch it and go to the Drivers section, where your current and available drivers are listed.
- Choose a driver version. If a previous version is offered, select it; otherwise, install a clean copy of your chosen driver.
- Select a clean installation. When prompted, pick the custom or clean install option to reset driver settings and remove conflicts.
- Complete and restart. Finish the installation, restart your PC, and test your games to confirm stability has returned.
This method is convenient and keeps everything within Nvidia’s official software, which many users prefer. If it does not fully resolve the issue, the DDU method above remains the most thorough fallback available.
Pro Tips And Common Mistakes
A few extra habits make driver management far less stressful and help you avoid repeating the same problems. This final section shares practical tips for a clean rollback, the mistakes to steer clear of, and what to do if reverting does not solve everything. These lessons save real time in the long run.
Pro Tips For A Clean Rollback
Always download drivers only from Nvidia’s official website or app, never from unofficial third-party sites. Official sources guarantee the file is genuine and safe, which protects both your system and your data. This single habit prevents a whole category of problems.
Once you find a driver version that is stable for your games, there is no need to update immediately every time a new one appears. Waiting a few days after a release lets any early issues surface for other users first. Stability often beats being on the very newest version.
Keep a copy of one known-good driver installer saved on your PC for emergencies. Having a reliable version ready means you can recover quickly if a future update misbehaves, without scrambling to find one. It is a small habit that pays off.
Common Mistakes To Avoid
The most common mistake is installing a new driver over a broken one without cleaning first, which often carries the problem forward. When issues are serious, a clean removal with DDU is far more effective than installing on top. Skipping that step wastes time.
Another frequent error is forgetting to restart between steps, since driver changes only fully take effect after a reboot. Testing before restarting can make a fix appear to have failed when it actually worked. Always reboot before judging the result.
Finally, avoid downloading drivers from random websites promising older versions, as these can be unsafe. Nvidia’s official archive holds every past release you might need, so there is never a reason to risk an unofficial source. Stick to the official channel every time.
See More:
- RTX 4060 vs RTX 5060
- M4 GPU benchmark
- RTX 5060 Ti benchmark
- 5060 Ti 16GB vs 9070 XT
- RTX 5050 vs RTX 5060
When Reverting Does Not Fix It
If a clean rollback does not solve your problem, the cause may lie elsewhere, such as an unstable overclock, a failing power supply, or another hardware issue. In that case, systematically testing other components is the logical next step. Drivers are only one possible culprit.
Persistent crashes across many driver versions can occasionally point to a graphics card that is genuinely failing or overheating. If you suspect the hardware itself, checking temperatures and considering a reliable replacement may be necessary. Sometimes the card, not the software, is the real problem.
Now you know how to revert Nvidia drivers using three reliable methods, from a quick Device Manager rollback to a thorough clean install with DDU. Keeping a known-good driver on hand and updating cautiously will spare you most future headaches entirely. And if reverting still does not bring stability and you suspect a failing GPU, browse current reliable graphics cards through the link below to plan your next upgrade with confidence.
Frequently Asked Questions
What is the fastest way to revert an Nvidia driver?
Open Device Manager, expand Display adapters, right-click your Nvidia GPU, choose Properties, open the Driver tab and click Roll Back Driver. Windows restores the previously installed package and asks for a reason. This only works if the old package is still cached and it takes you back exactly one version.
When should I use DDU instead of a simple rollback?
Use Display Driver Uninstaller when the rollback button is greyed out, when you want a version older than the immediately previous one, or when you are troubleshooting crashes, black screens and driver timeouts. DDU strips leftover files, services and registry keys that a normal uninstall leaves behind, giving you a genuinely clean base.
Do I need to disconnect from the internet during the process?
It helps. If Windows Update sees a GPU with no driver it may automatically install the newest available package before you can run your chosen installer. Disconnecting the network, or booting into Safe Mode where DDU runs best, prevents that race condition and ensures the version you want is the one installed.
Will reverting my driver affect saved game or app settings?
Your game settings and Windows configuration remain intact, but the Nvidia Control Panel and Nvidia App profiles are commonly reset, so custom per-game 3D settings, colour calibration adjustments and ShadowPlay recording preferences may need reconfiguring. Note them down beforehand, or export your Nvidia App settings if the version you use supports it.
How do I know which older version to install?
Check the release notes on the Nvidia driver archive for known issues, and identify the last branch that predates your problem. Community reports for your specific GPU and game are useful, but verify the version number on nvidia.com. Studio drivers are also worth trying if stability rather than day-one game performance is your priority.
As an Amazon Associate we earn from qualifying purchases at no extra cost to you.



Write Your Review
No reviews yet. Be the first to share your experience!