stress test a GPU is how you find out whether your graphics card is truly stable before you trust it with a long gaming session, an important project, or your money on a second-hand purchase. By pushing the card to its absolute limit and watching how it responds, a stress test reveals cooling problems, instability, and hidden faults that normal use might hide for weeks. This guide explains what a stress test does, when to run one, and the exact steps to test your card safely with free tools.
Understanding GPU Stress Testing
A stress test deliberately loads your graphics card far harder than most games ever will, holding it at maximum effort to see whether it stays stable and cool. The idea is simple: if a card survives the worst you can throw at it, it will handle everyday gaming with ease. Knowing what the test is doing helps you read its results with confidence. It also means you can trust a clean result as genuine proof of stability rather than wondering whether the test was hard enough.
What a GPU Stress Test Actually Does
A stress test runs a punishing, sustained workload that drives your GPU to full utilisation and keeps it there, generating maximum heat and power draw. This is intentionally harsher than real games, which vary their load from scene to scene, because the goal is to expose any weakness under the most demanding conditions possible.
While the card is pinned at its limit, you watch for three things: rising temperatures, visual glitches called artifacts, and outright crashes. A healthy card holds a stable, safe temperature and runs cleanly for the whole test, whereas a problem card reveals itself through overheating, artifacts, or a crash.
In short, a stress test compresses weeks of potential trouble into a focused half-hour, which is why it is the standard way to verify that a card is genuinely reliable rather than merely working for now.
When You Should Stress Test
There are several moments when a stress test is well worth running. After building a new PC or installing a new card, it confirms everything is stable before you rely on it; after buying a used graphics card, it is essential for verifying you did not inherit a hidden fault.
It is also the natural follow-up to overclocking, since the whole point is to prove your new settings hold up under sustained load. Finally, when you are troubleshooting crashes or artifacts, a stress test helps you reproduce the problem on demand instead of waiting for it to strike mid-game.
Some people also run a brief stress test after any change to their cooling or case airflow, to confirm the improvement actually helped under load. Treating a quick test as the natural way to verify any cooling or stability change turns it into a reliable habit rather than something you only reach for once trouble has already appeared.
What You Will Need
Stress testing is free, and the toolkit is small.
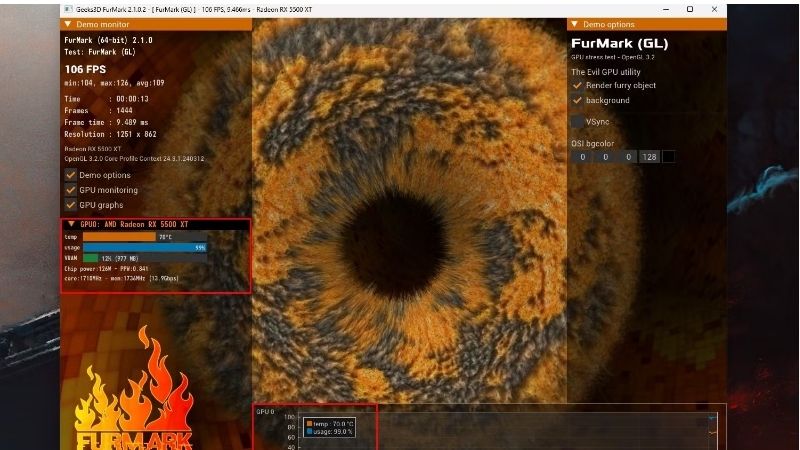
You will want a dedicated stress-testing tool such as FurMark, which pushes the card to extreme heat, or OCCT, which offers a range of stability tests; many people also use the looped benchmarks in 3DMark for a more game-like sustained load. Any of these will drive the card hard enough to reveal problems.
Alongside the test itself, you need a monitoring overlay like MSI Afterburner to watch temperature, clock speed, and usage in real time throughout. Without monitoring you only see whether the card crashes, but with it you can see a problem building before it does.
How to Stress Test a GPU Step by Step
Running a stress test is straightforward once your monitoring is ready, and the key is to watch carefully rather than just walk away. Follow these steps and you will get a clear, trustworthy verdict on your card’s stability. The discipline is simply to watch attentively for the full duration rather than starting the test and wandering off.
Preparing for the Test
Before you begin, close background applications and open your monitoring tool so you can see temperature, usage, and clock speed live. Make a note of your card’s idle temperature as a baseline, since the difference between idle and full load tells you how hard the cooling has to work.
It is also wise to ensure your case has decent airflow and is not choked with dust, because a stress test will mercilessly expose poor cooling. Starting with a clean, well-ventilated system means any failure you see points to a genuine fault rather than simply a dirty heatsink.
It is also worth deciding in advance what temperature you would consider alarming, so you can react calmly rather than panicking at the first high number. Having a clear threshold in mind, along with your baseline idle reading, means you are interpreting the test rather than just watching numbers climb and hoping for the best.
Running the Stress Test
With monitoring in place, run the test with these steps:
- Launch your stress-testing tool and choose a sustained test at your monitor’s resolution for a realistic load.
- Start the test and watch the overlay, keeping an eye on temperature as it climbs over the first few minutes.
- Let it run for around fifteen to thirty minutes, which is long enough for temperatures to stabilise and for any instability to reveal itself.
- Stop the test if anything alarming happens, such as a temperature spiking dangerously high, the screen showing artifacts, or the system becoming unresponsive.
Throughout the run, the temperature should rise and then level off at a steady plateau rather than climbing without end. A card that settles at a safe, stable temperature and runs the full duration cleanly has passed the most important part of the test.
If you are testing an overclock specifically, this is the moment of truth, since an unstable overclock usually reveals itself within the first several minutes as a crash or artifacts. A clean run at your overclocked settings, by contrast, is strong evidence that the tuning is safe to keep for daily use.
What to Watch For
Three warning signs matter most during a stress test. Temperatures pushing into the high eighties or beyond suggest a cooling problem; visual artifacts like flickering, strange colours, or odd shapes point to an unstable or failing card; and a crash or driver reset signals genuine instability.
You should also watch for heavy thermal throttling, where the card’s clock speeds drop sharply to control heat. A small amount of throttling under extreme load can be normal, but large, sustained drops mean the cooling cannot keep up and deserves attention before the card is trusted with serious work.
Keeping your monitoring overlay visible throughout lets you see the relationship between temperature and clock speed in real time. Watching the clocks hold steady while temperatures stay in a safe range is the clearest confirmation that the card is coping well, whereas clocks dropping as heat rises tells you the cooling is the limiting factor.
Tips, Pitfalls, and Pros and Cons of Stress Testing
A stress test gives a clear answer, but interpreting it correctly and avoiding a few common mistakes is what makes it reliable. A little judgement turns raw observations into a confident verdict. With a little experience, the difference between a healthy result and a worrying one becomes obvious at a glance.
Interpreting Your Results
A pass is simple to recognise: the card holds a safe, stable temperature, shows no artifacts, and runs the entire test without crashing. That result means you can trust it for gaming, creative work, or as proof that a used purchase is sound.
A fail is equally clear and always meaningful. Overheating points to cooling issues you can often fix with cleaning, better airflow, or fresh thermal paste, while artifacts or crashes that persist after those fixes suggest a deeper hardware fault that may make the card unwise to rely on or buy.
Pro Tips and Mistakes to Avoid
The biggest mistake is running a stress test without monitoring open, so you only learn that something went wrong after a crash rather than watching the warning signs build. Always keep an eye on live temperatures, since they tell the story long before a failure.
Another mistake is panicking at a single brief throttle or a high but stable temperature that is still within the card’s rated limits. Modern cards are designed to run warm under extreme load, so it is the sustained, alarming readings and the artifacts or crashes that matter, not every momentary dip.
See More:
Pros and Cons of Stress Testing
On the plus side, stress testing is free, quick, and the most reliable way to confirm a card is stable, verify a used purchase, validate an overclock, or reproduce a fault on demand. It gives you genuine peace of mind in well under an hour.
On the downside, a stress test deliberately runs the card hot, so it should be done with adequate cooling and supervised rather than left unattended for hours. Used sensibly for a reasonable duration, though, it poses no real risk and tells you exactly what you need to know.
To wrap up, knowing how to stress test a GPU is the surest way to confirm your card is stable and well cooled, and it comes down to running a demanding tool while watching temperatures, artifacts, and stability for fifteen to thirty minutes. A card that stays cool and clean throughout has passed; one that overheats or glitches needs attention. If a stress test reveals a card that simply cannot keep up, you can compare the recommended graphics cards and cooling upgrades linked below.


Write Your Review
No reviews yet. Be the first to share your experience!