
- Top Pick: 64GB – Bootable USB Drive 3.2 for Windows 11/10 / 8.1/7, Install/Recovery, No TPM Required, Included Network Drives (WiFi & LAN),Supported UEFI and Legacy, Data Recovery, Repair Tool
- Best Value: 5-in-1 Win Repair & Reinstall Bootable USB Flash Drive – Fix, Recover, or Reinstall Windows 11 (amd64 + arm64) / 10/7 – Includes PE Tools, Driver Pack, Antivirus, Data Recovery & Password Reset | Legacy toolkit for Windows 11/10/7 repair, reinstall, WinPE tools, drivers, antivirus and password reset
- Premium Choice: 13-in-1 Windows Repair & Reinstall Bootable USB Toolkit | 64GB USB-A/USB-C toolkit for Windows 11/10/7/XP/2000, UEFI/Legacy boot, WinPE, drivers and password reset, no TPM required
Clean Nvidia driver install is the fix experienced users reach for when a normal driver update is not enough — when crashes, stutters, or weird glitches survive every ordinary reinstall. A clean install wipes the old driver completely before putting on the new one, giving your graphics software a genuinely fresh start instead of layering a new version over old residue. This review explains exactly what a clean install does, when it is the right move, how to do it correctly without stranding your display, and where its limits are. The goal is a stable, predictable system, and knowing whether your problem is the kind a clean install actually solves.
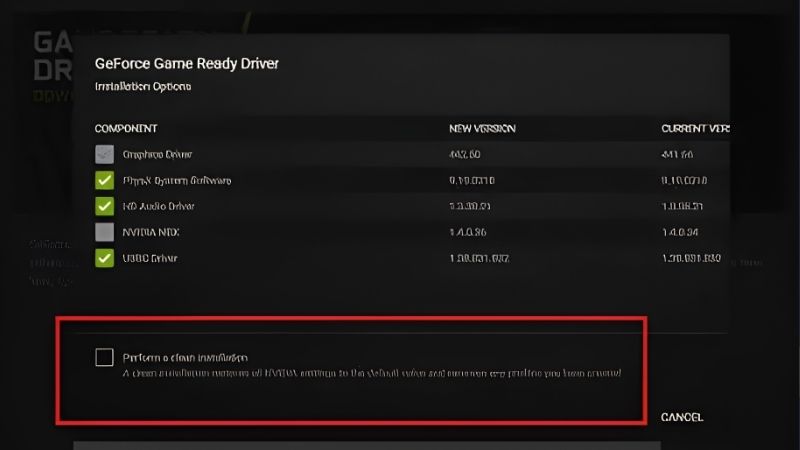
What a clean install is and when you need it
A clean install is not just reinstalling the driver — it is removing everything first so nothing old remains. Understanding that difference is what tells you when the extra effort is worthwhile and when a simple update would do. For a whole class of stubborn problems, the clean approach is the difference between a real fix and endless frustration.
Clean install versus a normal update
A normal driver update installs the new version on top of the existing one, keeping settings and leaving some old files in place. A clean install removes the current driver and its leftovers entirely, then installs fresh. The distinction matters because leftover files are the hidden cause of many problems that a normal update cannot fix.
The analytical point is that a normal update is fine for routine upgrades, while a clean install is the tool for trouble. When a problem persists through ordinary reinstalls, it is usually residue from an old driver conflicting with the new one, and only a clean wipe clears that conflict.
When a clean install is the right fix
You reach for a clean install in specific situations: persistent crashes or stutters that survive normal reinstalls, glitches after a failed or interrupted driver update, switching between graphics card brands, or unexplained instability that ordinary fixes have not resolved. In each case, a clean slate removes variables that a layered install leaves behind.
The practical rule is to escalate to it deliberately. Try a normal reinstall first for minor issues, and bring out the clean install when the ordinary path fails or when you are making a hardware change that demands a clean break from the old driver.
What “clean” really removes
A true clean install clears not just the driver but its registry entries, cached files, and associated control software. That thoroughness is the point, because modern graphics drivers are a full software suite — control panels, overlays, background services — any part of which can misbehave after a messy update.
The result is a system that behaves as if the graphics driver had never been installed, which is exactly the base you want. For anyone chasing a problem that keeps returning, that completeness is what finally breaks the cycle where a “fresh” install inherits the same old fault.
It is worth appreciating why this matters more than it used to. A graphics driver today is not a single file but a collection of interlocking components, each of which writes its own settings and can be left in an inconsistent state by a failed or interrupted update. When you install a new driver over that mess, the installer often preserves the broken pieces rather than replacing them, which is why the same glitch survives update after update. A clean install sidesteps the problem entirely by removing every component first, so there is nothing inconsistent left for the new driver to inherit. That is the whole reason it succeeds where repeated ordinary reinstalls fail — it addresses the residue itself rather than adding another layer on top of it.
Doing a clean install correctly
A clean install is powerful, which means doing it carelessly can leave you at a low-resolution or unstable desktop while you scramble. A little preparation and the right order turn it into a routine, low-stress task, and the sequence is what keeps you in control from start to finish.
Prepare and download first
The single most important step happens before you remove anything: download the driver you intend to install and save it locally. That way, the moment the old driver is gone, the replacement is already on your drive, ready to run, and you are never stranded without a working driver.
It also helps to note your current version if you are troubleshooting, so you can return to a known state if needed. This bit of preparation removes the only real risk in the process — being left without a driver mid-wipe — and takes only a couple of minutes.
Removing the old driver fully
The core of a clean install is a complete removal, clearing the driver, its dependencies, and the leftover files a normal uninstall ignores. Doing this while isolated from automatic updates prevents the system from installing a random driver the instant the old one disappears, which would reintroduce exactly the conflict you are trying to eliminate.
Performing the removal from a minimal boot state also stops background software from locking files and interfering with a complete wipe. This is the step that people skip and regret, because a half-finished removal leaves precisely the residue that a clean install is meant to clear.
Installing and configuring fresh
Once the wipe is complete and the system restarts, install the driver you saved earlier onto the now-clean base. Because you are writing onto a genuinely blank slate, the new install behaves predictably, and features that were previously glitchy tend to come back correctly configured.
After installing, take a moment to confirm your display settings and any features you use are set the way you want, since a clean install resets them. Once you have verified stability over a session or two, you can re-enable normal updates — the goal was a controlled, clean starting point, not permanently avoiding updates.
One habit makes future maintenance far easier: keep the installer for the version you just settled on. If a later update ever misbehaves, you already hold a known-good file and can return to a clean, stable state in minutes rather than repeating the entire process from scratch. Treating your working driver as something worth archiving turns what feels like a stressful recovery into a quick, repeatable step you fully control. Over the life of a system, that small discipline saves a surprising amount of time and worry, because you are never again at the mercy of tracking down the right file on a machine that is currently misbehaving.
Results, pitfalls, and when hardware is the answer
A clean install solves a specific class of problems extremely well, and it is honest to be clear about which ones. When the issue is software residue, the improvement is often dramatic; when it is physical, no clean install will help, and recognizing that boundary saves you from repeating a process that cannot fix your problem.
Pros and cons of a clean install
Because this is a review, here is the straight assessment of the clean-install approach.
| Pros | Cons |
|---|---|
| Removes leftovers a normal update ignores | More effort than a routine update |
| Fixes persistent crashes and glitches | Leaves you briefly without a driver |
| Essential before a card or brand switch | Needs care to avoid auto-installed drivers mid-wipe |
| Gives a truly predictable, fresh base | Cannot fix hardware, power, or thermal faults |
The verdict is that a clean install is one of the most effective tools for stubborn graphics-software problems, precisely because it eliminates the residue that ordinary fixes leave behind. Its only real limits are the modest extra effort and the fact that it cannot touch hardware faults.
When a clean install will not fix it
If instability persists even after a complete clean install, the evidence points firmly at hardware. Crashes that survive a spotless software reset usually trace to an aging or undersized power supply, overheating from tired cooling, or a card that is simply wearing out — none of which respond to software.
Reading this signal correctly is valuable. Once you have ruled out driver residue with a clean install and the problem remains, you can stop reinstalling and start looking at the physical parts that actually determine stability, which saves days of chasing the wrong cause.
When hardware is the answer
When a clean install confirms the software is not at fault, the durable fix is hardware. A power supply with real headroom, better cooling, or a newer graphics card ends the instability that no amount of driver work can, and it does so permanently rather than temporarily.
If your clean install has ruled out software and problems persist, or if the card is simply too old to keep up, it is worth comparing current, well-reviewed GPUs and power supplies on Amazon. Pairing a clean driver setup with hardware that actually keeps up is what turns a recurring headache into a lasting fix.
See More:
- Nvidia CEO LinkedIn
- Nvidia driver rollback
- Nvidia roll back driver
- RX 9070 XT vs 5060 Ti
- Nvidia driver uninstaller
Conclusion
A clean Nvidia driver install is the reliable way to resolve stubborn graphics problems that survive ordinary updates, because it clears the registry entries, cached files, and control-software leftovers that quietly sabotage a normal reinstall. Do it deliberately — download your driver first, remove the old one fully while isolated from automatic updates, then install onto a clean base — and it fixes a whole category of persistent issues. Just remember its boundary: a spotless software reset cannot fix power, heat, or a failing card. If a clean install still leaves you with crashes, that is your cue to look at hardware, and to compare trusted GPUs and power supplies on Amazon so your fresh install finally runs on parts worthy of it.
Frequently Asked Questions
What exactly does a clean install remove?
The Nvidia installer’s clean install option resets control panel settings, per game profiles and 3D settings, and removes previous driver files. Display Driver Uninstaller goes further, purging registry keys, leftover service entries, and remnants of GeForce Experience or the Nvidia app. Neither touches your games, saves, or shader caches stored by individual titles.
Do I have to use Safe Mode?
Safe Mode is strongly recommended for DDU because Windows cannot load the display driver there, so nothing is locked in memory and nothing can reinstall mid process. You can run DDU in normal mode, but leftover locked files are exactly the problem you are trying to solve, so the extra reboot is worth it.
How do I stop Windows reinstalling the driver automatically?
Disable automatic driver downloads in Device Installation Settings, and disconnect the network before running the uninstall. DDU also offers a switch to prevent Windows from installing drivers automatically. Reconnect only after your chosen driver package is installed, otherwise Windows Update can push an older WHQL build over your fresh install.
Will a clean install fix black screens and artifacting?
It fixes the software half of the problem: corrupted files, conflicting versions, and bad registry state. If black screens continue afterwards, the cause is more likely a failing power supply, an unstable factory overclock, a poorly seated 12VHPWR or 12V-2×6 connector, or genuine VRAM degradation. Test with the card at stock clocks before concluding anything.
Should I use NVCleanstall instead?
NVCleanstall is useful if you want to strip telemetry, the audio driver, or the Nvidia app from the package, and it is safe when used conservatively. It is not a replacement for DDU, which removes the old driver. A typical workflow is DDU in Safe Mode first, then either the official installer or a trimmed NVCleanstall package.
As an Amazon Associate we earn from qualifying purchases at no extra cost to you.





Write Your Review
No reviews yet. Be the first to share your experience!