install a GPU for the first time can feel nerve-wracking, but it is genuinely one of the easiest and most satisfying PC upgrades you can do, and it usually takes less than fifteen minutes. With the right preparation and a careful hand, anyone can do it safely. This guide walks you through exactly what you need, every step from powering down to first boot, and the small mistakes that catch beginners, so your new card goes in cleanly the first time.
Getting Ready to Install Your GPU
Most installation problems come from rushing the preparation rather than the install itself. A few minutes spent gathering tools, checking compatibility, and getting your case ready makes the actual fitting quick and stress-free. Good preparation is what separates a smooth ten-minute upgrade from a frustrating evening. Reading through the whole process once before you begin also means you will not be searching for a tool or a cable with the case already open and your hands occupied.
Why a Careful Install Matters
A graphics card is one of the most valuable components in your PC, and it connects to both a delicate slot and your power supply, so a careful install protects your investment. Done properly, it clicks into place securely and runs reliably for years.
The two things to respect are static electricity and a firm, even seating in the slot. Static can damage sensitive electronics, and a card that is not fully seated will fail to display anything, which is the single most common first-boot scare for beginners. Knowing that in advance removes most of the panic, because a black screen almost always means a simple reseat rather than a broken card.
What You Will Need Before You Start
The tools are simple, and having them ready before you open the case makes everything smoother.
You will want a single Phillips-head screwdriver for the case screws, ideally a magnetic one so you do not drop screws inside the case; a good magnetic precision screwdriver set is a worthwhile buy that you will use for every future upgrade. An anti-static wrist strap is cheap insurance against static damage and is strongly recommended for beginners, and because modern cards are heavy, a GPU support bracket is a smart companion purchase to prevent sag once the card is installed.
You also need to confirm your power supply has the correct PCIe power connectors and enough wattage for the new card, since a more powerful GPU may need additional cables or a higher-capacity unit than your old one. Checking this before you buy the card, not after, saves the disappointment of getting everything installed only to find your power supply cannot drive it.
Preparing Your PC and Case
Begin by shutting down the PC completely, switching off the power supply at its rear switch, and unplugging the power cable from the wall. This removes all power from the system and is a non-negotiable safety step.
Press the power button once with everything unplugged to discharge any residual electricity, then open the side panel of your case to expose the motherboard and expansion slots. Touch a bare metal part of the case, or wear your anti-static strap, to ground yourself before handling any components. It is also worth clearing a clean, well-lit workspace and laying the case on its side, which makes lowering the card straight into the slot far easier.
Take a moment to locate the top PCIe x16 slot on the motherboard, which is the long slot nearest the processor and the one your card should go into. Clearing any cables out of the way now, and making sure the slot’s rear latch is open, means the card will drop in without resistance when you reach that step.
How to Install a GPU Step by Step
With preparation done, the install itself is short and methodical. Follow these steps in order, take your time seating the card, and you will have a securely installed GPU ready to power on. Nothing here requires force, and anything that resists usually means something is not aligned.
Removing the Old Card (if any)
If you are replacing an existing graphics card, disconnect its power cables first, then unscrew the bracket screws that hold it to the back of the case. Locate the small plastic latch at the rear of the PCIe slot, which secures the card, and press or pull it to release.
Gently and evenly lift the old card straight out of the slot, taking care not to rock it side to side too aggressively. Set it aside on an anti-static surface, and if you are keeping it, an anti-static bag is the right place to store it. Resist the urge to stack the old card loose on a desk, where static and accidental knocks to its fans are a real risk.
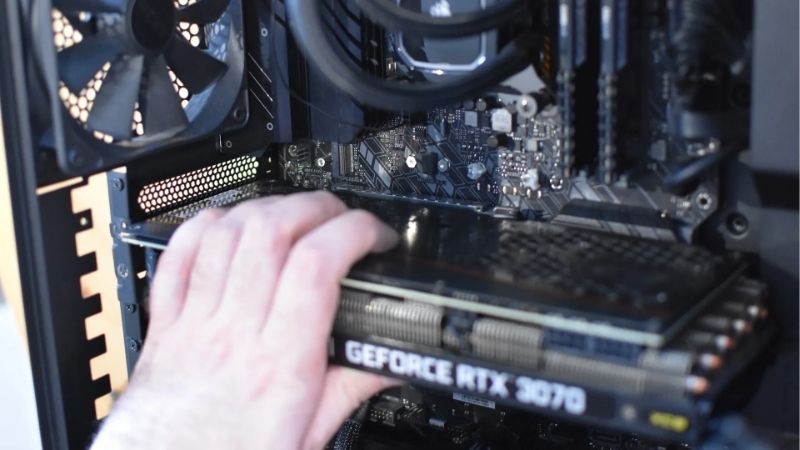
Seating the New GPU and Connecting Power
Now fit the new card with these steps:
- Remove the case slot covers behind the PCIe slot you will use, usually the top one, so the card’s display ports can poke through the back of the case.
- Align the card with the top PCIe x16 slot and lower it straight down, lining up the gold contacts with the slot.
- Press firmly and evenly until it clicks, with the rear latch snapping shut to lock the card; the bracket should sit flush against the case.
- Screw the bracket to the case and connect the required PCIe power cables from the power supply, pushing each connector in until it clicks.
Double-check that the card is fully seated, the power cables are firmly attached, and nothing is loose before closing up. A card that is not clicked all the way in is the usual reason a fresh install shows a black screen.
First Boot and Driver Setup
Reconnect your monitor cable to the new graphics card’s ports, not the motherboard’s, then plug the PC back in, switch the power supply on, and boot. You should see the screen come to life normally, which confirms the card is seated and powered correctly.
Once in Windows, download and install the latest Nvidia driver so the card runs at full performance and stability. For an upgrade from a different card, choosing the clean-install option during driver setup avoids leftover files causing conflicts, giving you the smoothest possible start. Once the driver is in, a quick test in a game confirms everything is seated and powered correctly before you put the side panel back on for good.
Pros, Cons, and Expert Tips for Installing a GPU
Installing a GPU yourself is rewarding and saves money, but it pays to know the common mistakes and the small habits that make the job foolproof. A little expert insight turns a careful first attempt into routine confidence.
Common Installation Mistakes to Avoid
The most frequent mistake is not seating the card fully, leaving it slightly tilted so it fails to display anything on first boot. Always press until the latch clicks and the bracket sits flush, and if you get a black screen, reseating the card is the first thing to try.
Another common error is forgetting to connect the PCIe power cables, or plugging the monitor into the motherboard instead of the card. Both produce no display and both are easy to fix once you know to check them, so they are worth verifying before you panic. Running through this short mental checklist of seating, power, and monitor cable solves the overwhelming majority of no-display situations in under a minute.
One more avoidable error is forcing the card in at a slight angle instead of lowering it straight down, which can make seating feel stiff and uneven. Always align the card squarely with the slot and apply gentle, even pressure across its length, and let the satisfying click of the latch confirm it is fully home.
Pro Tips for a Clean Install
A useful habit is to handle the card by its edges and bracket, never touching the gold contacts or the bare circuitry, which protects it from both static and finger oils. Working in a well-lit space with the case laid on its side also makes seating the card far easier.
Installing a support bracket immediately, before you even close the case, is a pro move that prevents sag from day one on a heavy modern card. And keeping the original packaging and anti-static bag gives you a safe place to store your old card or transport the new one later. These small habits cost nothing and make your next upgrade, sale, or troubleshooting session noticeably easier.
See More:
Pros and Cons of Installing It Yourself
On the plus side, installing a GPU yourself saves the cost of paying a shop, takes only minutes once you are prepared, and teaches you a valuable skill you will reuse for every future upgrade. It also lets you handle the whole process on your own schedule.
On the downside, it does carry a small risk of static damage or a fright from a black screen if you rush, and it requires basic care and a couple of cheap tools. For the vast majority of people, though, these are minor hurdles, and the confidence gained is well worth it.
To wrap up, learning how to install a GPU is a quick, beginner-friendly skill that comes down to careful preparation, a firm and even seating, and connecting power before you boot. Take your time, ground yourself, and reconnect your monitor to the new card, and you will be up and running in minutes. To make the job easier and protect your new card, check the recommended screwdriver sets, anti-static straps, and support brackets linked below.


Write Your Review
No reviews yet. Be the first to share your experience!