How to turn on Frame Generation is the question RTX 40-series owners should be asking, because this single toggle can nearly double the displayed frame rate in supported games. Frame Generation uses the Optical Flow Accelerator on RTX 40-series GPUs to create entirely new frames between the ones the card actually renders, boosting smoothness without the GPU doing extra rendering work. It pairs with DLSS and Nvidia Reflex for a combination that looks and feels remarkably good. This guide covers the hardware requirements, shows you exactly where the toggle lives, explains the best companion settings, and walks through the common issues so you can start collecting those extra frames today.
What You Will Need to Turn On Frame Generation
Frame Generation has stricter requirements than standard DLSS, so checking compatibility first prevents the frustration of searching for a toggle that does not exist on your hardware. The items below cover everything you need to confirm before launching a game.
Hardware Requirements
Frame Generation requires an Nvidia RTX 40-series GPU. It will not work on RTX 30-series or older cards because it relies on the dedicated Optical Flow Accelerator that only the Ada Lovelace architecture includes. Any RTX 4060 and above qualifies.
Your display should support a high refresh rate, ideally 120 Hz or more, since the feature generates frames that push the displayed rate well above what the GPU renders natively. On a 60 Hz panel the generated frames exceed what the monitor can show, wasting the benefit.
A high-refresh display also smooths the visual perception of the generated frames. At 120 Hz or above, each frame is on screen for a shorter time, which masks any small interpolation artifact and makes the overall image feel more fluid. On a slower panel the generated frames queue up and can introduce stutter, the opposite of the intended effect.
Driver and Game Support
Update to the latest Nvidia driver, since Frame Generation profiles and improvements ship in each release. The feature is part of the DLSS 3 framework, so the game must explicitly support DLSS 3, not just DLSS 2. The number of supported titles grows with each driver cycle.
Check Nvidia’s supported-games list or the game’s graphics menu before assuming the feature is available. If the game only offers DLSS Super Resolution without a separate Frame Generation toggle, it supports DLSS 2 but not 3.
What Frame Generation Does and Does Not Do
Frame Generation interpolates new frames by analyzing motion between rendered frames. The GPU still renders at its natural rate, and the generated frames fill the gaps so the display receives a much higher frame count. The visual result is a smoother image in motion.
Because the generated frames are not fully rendered, they do not reduce input latency the way higher native FPS would. That is why Nvidia Reflex is a critical companion: Reflex reduces the render queue so the GPU processes your input faster, compensating for the small latency the extra frames add.
Step-by-Step Guide to Turning On Frame Generation
Frame Generation lives inside each game’s settings alongside DLSS, so the process is per-title. The steps below apply to any supported game and will have you running in a few clicks.
Step 1 to 3: Enable DLSS and Frame Generation
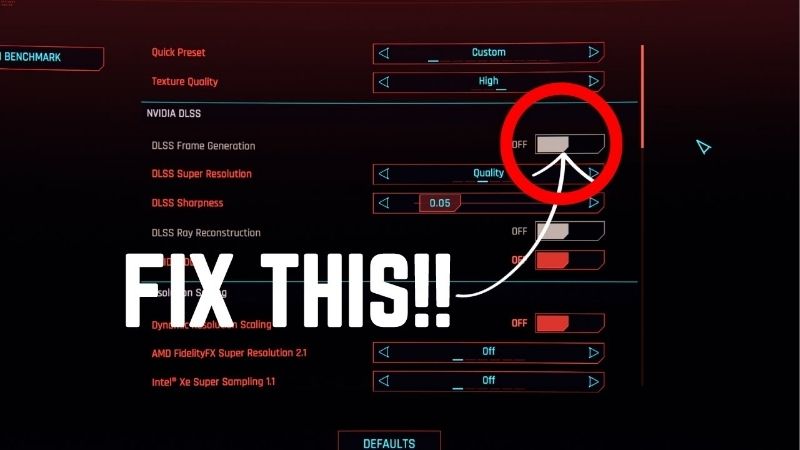
Step 1: Open the game’s graphics settings. Navigate to the section labeled DLSS, Upscaling, or Nvidia DLSS. Frame Generation is always in this area.
Step 2: Enable DLSS Super Resolution first. Frame Generation requires DLSS upscaling to be active. Set DLSS to Quality or Balanced as your base, since the card needs both features working together.
Step 3: Turn on Frame Generation. A separate toggle or checkbox labeled DLSS Frame Generation, FG, or Multi Frame Generation will appear below the DLSS mode selector. Enable it. Some newer games offer Multi Frame Generation, which creates more than one frame per interval for even higher rates.
Apply the settings and return to gameplay. Your FPS counter should show a large immediate jump.
Note both the base rendered FPS and the displayed FPS if the overlay separates them. The base rate represents your actual rendering performance, while the displayed rate includes generated frames. Keeping the base rate above roughly 40-50 FPS gives the interpolation engine good data and produces the cleanest results. If the base rate is very low, generated frames cannot mask the underlying roughness.
Step 4 to 6: Enable Reflex and Verify
Step 4: Enable Nvidia Reflex. In the same graphics menu, find the Nvidia Reflex or Low Latency toggle and set it to On or On + Boost. This is essential to keep input responsiveness tight when Frame Generation is active.
Step 5: Set an appropriate frame-rate cap. If the generated frame rate exceeds your monitor’s refresh rate, cap it at the monitor’s max using the in-game limiter or RTSS. Frames above the refresh rate waste GPU effort and can introduce microstutter.
Step 6: Check the result. Use the in-game FPS counter or Nvidia’s performance overlay to confirm both the base rendered FPS and the displayed FPS with Frame Generation. The difference between the two shows you exactly how many frames the feature is adding.
Troubleshooting Common Issues
If the Frame Generation toggle is greyed out, DLSS Super Resolution is probably not enabled yet. Turn on DLSS first, then the FG toggle should become available.
Occasional visual artifacts like flickering or brief ghosting can appear in fast-panning scenes. These typically improve with driver and game updates, and switching from Performance to Quality mode for the DLSS base often reduces them.
If the game feels laggy despite high displayed FPS, Reflex is likely not enabled. Turn it on, and the latency penalty of the generated frames should largely disappear. Without Reflex, Frame Generation can feel unresponsive in fast-paced titles.
Pro Tips, Mistakes, and Best Settings
Frame Generation is powerful but rewards the right settings combination. A few small choices make the difference between a showcase of smooth performance and a confusing experience with high FPS but odd feel. This section covers how to get it right.
Pro Tips for the Best Result
Always enable Reflex alongside Frame Generation. The two features are designed to work together, and skipping Reflex undermines the responsiveness that makes the high frame rate feel good.
In competitive titles where input latency matters most, test with and without Frame Generation to see which feels better. Some players find the boosted visual smoothness and Reflex compensation perfectly acceptable; others prefer raw rendered frames for the tightest possible feel. There is no wrong answer, and having both options lets you match the setting to the game.
Use DLSS Quality or Balanced as the base rather than Performance or Ultra Performance. A higher-quality base gives Frame Generation better data to interpolate from, producing cleaner generated frames.
Common Mistakes to Avoid
Do not judge responsiveness by the displayed FPS counter alone. Frame Generation boosts the display rate, but your actual input-to-screen latency depends on the base rendered FPS and Reflex. A displayed 200 FPS with a 60 FPS base and no Reflex will feel slower than 100 native FPS.
Avoid enabling Frame Generation without DLSS Super Resolution. The feature requires DLSS as a prerequisite, and attempting to force it without upscaling either disables it or produces poor results.
Pros and Cons of Frame Generation
The upside is dramatic: displayed frame rates that can nearly double, visibly smoother motion, and a feature that works alongside DLSS and Reflex for the best overall experience on RTX 40-series hardware. It makes demanding games and ray tracing playable at high visual settings.
The downside is the RTX 40-series exclusivity, a small latency addition that Reflex must compensate for, occasional interpolation artifacts, and a dependency on game-level support. For owners of supported hardware and games, the trade is overwhelmingly positive.
Looking ahead, the feature is likely to reach more games and improve as Nvidia refines the Optical Flow model. Multi Frame Generation, which creates more than one interpolated frame per interval, is already available in a handful of titles and hints at where the technology is heading. Owning an RTX 40-series card today means you have the hardware to benefit from those future improvements as they arrive.
Frame Generation is the biggest single FPS boost available on an RTX 40-series card, and enabling it takes less than a minute. Turn on DLSS, flip the FG toggle, enable Reflex, and enjoy dramatically smoother gameplay.
See More:
- How to lower GPU temperature
- How to lower GPU hotspot temp
- How to increase GPU performance
- How to enable G-Sync
Conclusion
Knowing how to turn on Frame Generation lets RTX 40-series owners unlock a massive displayed FPS boost in supported games. Enable DLSS Super Resolution first, flip the Frame Generation toggle, pair it with Nvidia Reflex, and cap the frame rate at your monitor’s refresh rate for the cleanest result. The feature nearly doubles smoothness in motion and makes the most demanding settings playable. Keep your driver current, your DLSS base at Quality or Balanced, and Reflex on to enjoy the full benefit with responsive, artifact-free gameplay.
For a card that already has the hardware, turning the feature on is free and takes less than a minute. Frame Generation is one of the clearest examples of extracting more value from hardware you already own, and keeping drivers current means every future improvement to the Optical Flow model applies automatically.
As a practical habit, note the base rendered FPS and the displayed FPS for each game you play with Frame Generation. This helps you distinguish between genuine rendering improvements and the interpolation layer, giving you a clear picture of where your real performance sits. If the base rate is healthy and the generated frames look clean, the feature is doing exactly what it should, and you can adjust the DLSS quality mode with confidence knowing how each change affects both figures.


Write Your Review
No reviews yet. Be the first to share your experience!