How to enable Resizable BAR is one of the easiest free performance boosts you can unlock on a compatible Nvidia card, yet many owners never turn it on because the setting is buried in BIOS. Resizable BAR lets your CPU access the full GPU framebuffer at once instead of in small 256 MB chunks, and on supported games it can lift frame rates by a few percent with no downside. The catch is that it needs support from your CPU, motherboard BIOS, and GPU driver all at the same time, so a quick compatibility check comes first. This guide walks you through confirming support, flipping the right BIOS settings, and verifying that the feature is active so you can collect those free frames.
What You Will Need to Enable Resizable BAR
Before you reboot into BIOS, make sure the three pieces of the chain are in place. Missing any one of them means the option either will not appear or will not stick, and checking up front is faster than troubleshooting after the fact. The requirements below cover what to verify and how.
Hardware and BIOS Requirements
Resizable BAR requires a compatible CPU, a motherboard with the feature exposed in its BIOS, and an Nvidia RTX 30-series or newer GPU. On the Intel side, 10th-gen and later processors support it; on AMD, Ryzen 3000-series and newer. Your motherboard BIOS must be updated to a version that includes the setting, which some older boards received as a later update.
Check your motherboard manufacturer’s support page for a BIOS version that lists Resizable BAR or Re-Size BAR support. If your current BIOS predates that release, a quick update unlocks the option. Updating BIOS is straightforward on modern boards but should be done carefully, following the manufacturer’s instructions and using a stable power source.
If you are on an older Intel platform like 10th-gen, support is board-dependent. Some manufacturers added Resizable BAR to 400-series boards via updates, while others did not. A quick search for your board model plus Resizable BAR in the manufacturer’s release notes confirms whether the option exists for your specific hardware.
GPU Driver and Software Check
On the Nvidia side, make sure your GPU driver is current. Nvidia enabled Resizable BAR support through a driver update, so an outdated driver may not recognize the BIOS setting even when everything else is correct. Open GeForce Experience or visit Nvidia’s driver page to confirm you are on the latest release.
You can also check Resizable BAR status in GPU-Z before and after. The tool shows whether the feature is currently active, which gives you a quick confirmation without guessing.
What Resizable BAR Actually Does
Without Resizable BAR, the CPU accesses GPU memory through a narrow window, requesting data in small pieces. With it enabled, the entire framebuffer is mapped at once, so the CPU can request any asset in a single transfer. This reduces overhead and can improve frame rates, especially in games that stream large textures or open-world assets.
The gain varies by title. Some games see a noticeable lift, others show no change, and a handful can run very slightly slower, though Nvidia’s driver profiles generally prevent that. The feature is safe to leave on globally and costs nothing beyond the setup.
Not every game benefits, but no game is harmed in a way that matters. Nvidia’s driver includes per-game profiles that manage how the feature interacts with each title, so in practice it either helps or sits inert. This profile-based approach is why leaving it enabled globally is the recommended setting rather than toggling it per game.
Step-by-Step Guide to Enabling Resizable BAR
Work through these steps in order, and confirm success at the end with GPU-Z. The process touches BIOS settings that can look intimidating but are simple toggles once you know which menu they live in. Take a photo of each screen if you want a safety net for reverting later.
Step 1 to 3: Enter BIOS and Enable the Setting
Step 1: Reboot into BIOS. Restart your PC and press the key your board uses to enter BIOS setup, typically Delete, F2, or F12. The correct key appears briefly on the splash screen.
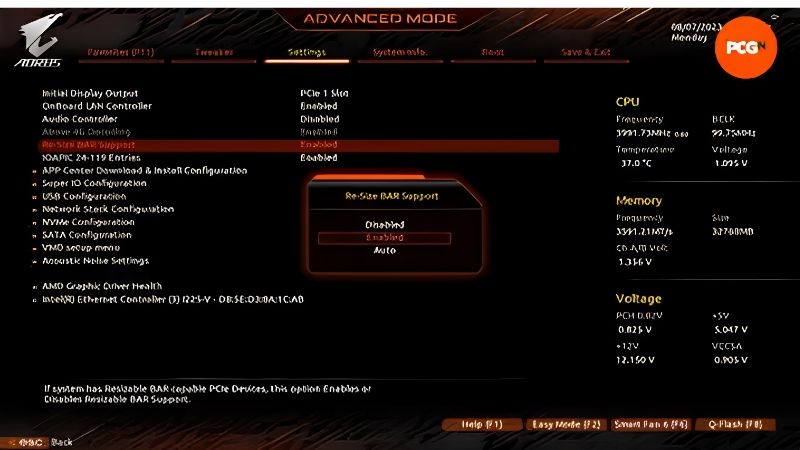
Step 2: Find the Resizable BAR or Above 4G Decoding setting. Navigate to the Advanced or PCI subsystem menu. Enable Above 4G Decoding first, since Resizable BAR depends on it. This setting allows the system to map large memory regions above the 4 GB boundary.
Step 3: Enable Resizable BAR or Re-Size BAR Support. Once Above 4G Decoding is on, the Resizable BAR toggle should appear in the same menu or nearby. Set it to Enabled. Some boards label it Re-Size BAR Support or simply ReBAR.
The exact menu path varies by manufacturer, but the two settings, Above 4G Decoding and Resizable BAR, are almost always on the same page. If you cannot find them, search your board model plus the term in your manufacturer’s FAQ.
Step 4 to 6: Save, Boot, and Verify
Step 4: Check CSM status. Compatibility Support Module should be Disabled for Resizable BAR to work on most boards. If CSM is enabled, switch it off. This means your Windows installation must be in UEFI mode, which most modern installs already are.
Step 5: Save and exit BIOS. Press the save-and-exit key, usually F10, and let the system boot into Windows. The first boot may take a few extra seconds as the system adjusts to the new memory mapping.
Step 6: Verify in GPU-Z. Open GPU-Z and check the Resizable BAR field. It should read Enabled. If it shows Disabled, revisit BIOS to confirm both Above 4G Decoding and the BAR toggle are on and that CSM is off.
Troubleshooting Common Issues
The most common failure is CSM still enabled, which silently blocks the feature. Disable it and retry. If your board does not show the Resizable BAR option at all, check for a BIOS update from the manufacturer that adds it.
On rare occasions a system may fail to boot after enabling the setting, usually because the Windows install is in Legacy BIOS mode rather than UEFI. Converting to UEFI with the built-in mbr2gpt tool resolves this, but back up first.
If GPU-Z still shows Disabled after everything checks out, update the Nvidia driver to the latest version and recheck. An outdated driver is the last common cause.
One final edge case: multi-GPU setups or certain docking stations can interfere with Resizable BAR. If you have an eGPU or a Thunderbolt dock in the chain, try connecting the display directly to the card and re-testing. Removing the extra layer often resolves the issue without any BIOS change.
Pro Tips, Mistakes, and Performance Expectations
Resizable BAR is a simple toggle, but a few details help you get the most from it and avoid the small mistakes that waste time. This section covers what to expect in real games, the errors beginners hit most, and how to pair the feature with other free optimizations for the best result.
Pro Tips for Getting the Most From Resizable BAR
Keep your GPU driver up to date, since Nvidia refines its per-game BAR profiles over time. Games that showed no improvement at launch may gain a boost with a later driver. Leaving the feature enabled globally is the simplest approach, because the driver handles per-title optimizations automatically.
Pair Resizable BAR with other free settings like hardware-accelerated GPU scheduling for the best overall responsiveness. Neither is dramatic on its own, but together they reduce overhead that adds up across a session.
Common Mistakes to Avoid
Do not skip Above 4G Decoding. It is the prerequisite, and without it the Resizable BAR toggle either will not appear or will not take effect. Do not leave CSM enabled, since it blocks the feature on most boards.
Avoid panicking if a specific game shows no improvement. Resizable BAR is not a universal uplift; it helps most in titles that stream large assets, and a game with small textures may see zero change. That is normal behavior, not a failed setup.
Pros and Cons of Resizable BAR
On the plus side, it is completely free, easy to enable, safe to leave on, and delivers a measurable frame-rate lift in supported games with no performance cost in others. It is one of the best no-spend optimizations available.
On the downside, the gain is modest and game-dependent, typically a few percent rather than a transformative jump. It also requires a compatible CPU, board, and BIOS, which means older systems may not qualify.
For any owner with compatible hardware, there is no reason not to enable it. The upside is free performance, and the downside is effectively zero.
If you are curious about the actual gain on your specific games, run a short benchmark before and after enabling the feature. A handful of titles show a clear lift, others show none, and the benchmark gives you a concrete number rather than a vague expectation. Either way, leaving it on is the right default for any compatible system.
Enabling Resizable BAR takes a few minutes in BIOS and costs nothing. If your hardware supports it, follow the steps above and start collecting free frames today.
See More:
Conclusion
Knowing how to enable Resizable BAR lets you unlock free GPU performance with a simple BIOS toggle. Confirm your CPU, board, and driver support the feature, enable Above 4G Decoding and the BAR setting, disable CSM, and verify in GPU-Z. The gain is modest but real in supported games, it costs nothing, and there is no reason not to leave it on. Pair it with up-to-date drivers and other free optimizations to get the most from your Nvidia card without spending a cent.


Write Your Review
No reviews yet. Be the first to share your experience!