
- Top Pick: CORSAIR 4000D RS ARGB Frame Modular Mid-Tower ATX PC Case, High Airflow, 3X Pre-Installed RS Fans, InfiniRail™ Mounting System, ASUS BTF, MSI Zero, Gigabyte Stealth, Black
- Best Value: Cooler Master Q300L V1 Micro-ATX PC Case, High Airflow, Transparent Panel
- Premium Choice: MONTECH TG3 High Airflow ATX Mid-Tower PC Case, Back-Connect Ready, Black
The best airflow PC case diagram is simpler than most illustrations suggest: cool air enters low at the front, crosses the components, and leaves at the rear and top. Everything else is a variation on that path, adjusted for radiators and unusual chassis layouts. Everything else is a variation on it.
As an Amazon Associate we earn from qualifying purchases at no extra cost to you. Product prices and availability are accurate as of the date shown and are subject to change.


As an Amazon Associate we earn from qualifying purchases at no extra cost to you. Product prices and availability are accurate as of the date shown and are subject to change.
By Ryan Cole
Quick answer: Fit two or three intake fans at the front, one exhaust at the rear, and optionally one or two at the top. Keep intake slightly greater than exhaust so the case runs at mild positive pressure, which pulls dust through filters rather than through gaps. That layout is the best airflow PC case diagram for most builds.
How the Best Airflow PC Case Diagram Actually Works
Every workable layout follows the same principle, because warm air rises and the components sit in a predictable order. Understanding why the standard arrangement works makes it easier to adapt when your case does not match the textbook drawing. Understanding why makes adapting it easier.
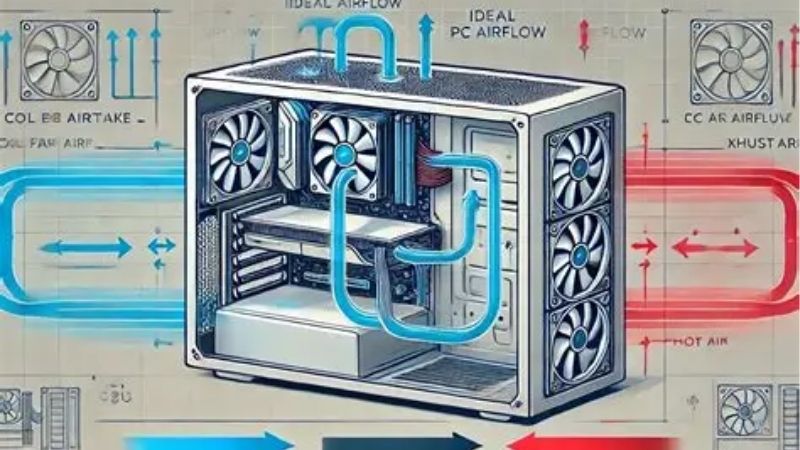
Front to back is the base path
Cool air enters through the front panel, passes across the graphics card and the motherboard, then exits at the rear near the processor cooler. That path exists because it moves air over the hottest components in the order they need it. Component order is what sets the direction.
Top exhaust supplements it rather than replacing it. Heat rises naturally, so a top fan removes the warm air that collects under the roof panel before it recirculates back down toward the graphics card sitting below. Recirculated heat is the thing to avoid.
Intake and exhaust counts
Two or three front intakes with one rear exhaust suits most mid-towers, and adding one or two top exhausts helps in warmer rooms. Beyond that point the returns diminish quickly and the noise increase becomes easier to hear than the benefit. Room temperature affects how much helps.
Fan quality matters more than quantity. A pair of good intakes with adequate static pressure usually outperforms four cheap fans, particularly when the front panel has a restrictive design or a dense dust filter behind it. Restrictive front panels change the maths.
Pressure balance and dust
Positive pressure means more air entering than leaving, so the excess escapes through gaps rather than pulling unfiltered air inward. That keeps dust concentrated on the filters you can clean rather than on the components you cannot. Filters are far easier to clean than fins.
Negative pressure can cool marginally better in some cases, but it drags dust through every seam in the chassis. For a system that will run for years without a full strip-down, mild positive pressure is the more practical choice. Seams are where unfiltered dust arrives.
Case Layouts: What the Best Airflow PC Case Diagram Looks Like
Not every chassis suits the standard arrangement, and radiators change the picture considerably. These three layouts cover most builds, and the table summarises where the fans go in each one. The best airflow PC case diagram changes once a radiator is involved.
| Case type | Intake | Exhaust | Notes |
|---|---|---|---|
| Standard mid-tower | 2-3 front | 1 rear, optional 1-2 top | Mild positive pressure |
| Front-mounted radiator | Radiator fans at front | 1 rear, 1-2 top | Warms the case slightly |
| Top-mounted radiator | 2-3 front | Radiator fans at top, 1 rear | Radiator receives warm air |
| Sandwich ITX | Side panel per chamber | Passive or single fan | Each chamber breathes separately |
The standard mid-tower
This is the layout every diagram illustrates: front intakes, rear exhaust, optional top exhaust. It works because the case was designed around it, and deviating usually costs more than it gains unless a radiator forces the issue. Deviating usually costs more than it gains.
If the front panel is solid glass with only side slots, expect lower intake performance regardless of the fans fitted. In that situation adding a bottom intake, where the case provides one, often helps more than another front fan. Bottom intakes are often the overlooked fix.
Radiator placement changes the diagram
A front-mounted radiator gives the coolant the coolest possible air but pushes warmed air into the case, which raises graphics card temperatures slightly. A top mount protects the rest of the components but feeds the radiator warmer air. Neither option is wrong on its own.
Neither is wrong. Front mounting favours processor temperatures and top mounting favours everything else, so the choice depends on which component you are trying to protect and how much clearance your case actually provides. Decide which component you are protecting.
Compact and sandwich layouts
Small form factor cases often split the graphics card and motherboard into separate chambers with vented side panels, which means each side breathes independently rather than sharing one front-to-back path across the whole interior. Each chamber breathes on its own here.
In those builds fan direction matters less than making sure both chambers receive outside air. A downdraft processor cooler drawing through a side vent usually beats a small tower fighting recirculated heat from the graphics card. Outside air matters more than direction.
Common Mistakes to Avoid
Most airflow problems come from a handful of repeated errors rather than from anything subtle. These three account for the majority of cases where a build runs hotter than its components should allow. None of them relate to the best airflow PC case diagram being wrong.
Fitting too many exhaust fans
Filling every exhaust mount while leaving two front intakes creates strong negative pressure, which pulls dust through every unfiltered gap in the chassis. It rarely lowers temperatures enough to justify the extra noise and cleaning. Cleaning frequency rises noticeably too.
Ignoring the front panel restriction
A solid front panel limits intake no matter how good the fans behind it are. Checking the actual opening, and cleaning the filter behind it regularly, does more than upgrading fans that are already starved of air to move. Check the opening rather than the fan count.
Fans fighting each other
A fan mounted backwards, or a top fan set as intake alongside a front intake, creates opposing flows that cancel each other out. Every fan should either pull air in at the front and bottom or push it out at the rear and top. Every fan should agree on one direction.
Frequently Asked Questions
Common questions from readers planning a layout around the best airflow PC case diagram for their chassis, covering fan counts, direction and filters. They assume a standard tower rather than a console-style case.
How many case fans do I actually need?
Three is enough for most builds: two front intakes and one rear exhaust. A fourth at the top helps in warm rooms or with a hot graphics card, but beyond that the noise usually arrives faster than the cooling does. Noise arrives faster than cooling does.
Should the top fan be intake or exhaust?
Exhaust in almost every case, because warm air collects under the roof. Top intake only makes sense in unusual layouts where the graphics card sits high and the case provides no other route for fresh air to reach it. Warm air collects under the roof panel.
Do dust filters hurt airflow much?
They cost some airflow, more so with low pressure fans. The trade is worth it, since a clogged heatsink harms cooling far more than a clean filter does, and filters can be washed in a couple of minutes. A clogged heatsink is the worse outcome.
Does fan direction matter on a radiator?
Yes. Pulling outside air through a front radiator gives the best coolant temperatures, while exhausting through a top radiator protects the rest of the components. Mixing directions on the same radiator achieves nothing useful. Mixing directions on one radiator helps nobody.
Read next: Best 200mm case fans | Best RGB fans Reddit recommends
Final Thoughts
The best airflow PC case diagram for your build is the standard front-to-back path adjusted for your radiator and chassis type. Keep intake slightly ahead of exhaust, avoid fans working against each other, and clean the filters more often than you replace hardware. Filters need attention more than hardware does.


Write Your Review
No reviews yet. Be the first to share your experience!