
- Top Pick: acer GPU Support Bracket, GPU Stand with Magnet Non-Slip Base,(L, 70-120mm)
- Best Value: Graphics Card GPU Brace Support, Video Card Sag Holder Bracket, GPU Stand (L, 74-120mm)
- Premium Choice: TGDGAMER GPU Support Bracket with ARGB, Temp Display & Height Adjustable | Adjustable graphics card holder, universal 5v 3pin GPU stand, ambient case temp monitor, fits most GPUs, black
For a heavy graphics card, the JOYJOM Dual Brace GPU Support Bracket is the strongest pick in this guide: it is aluminum, it is built for big cards, and its listing gives a 128mm reach and a fan-mount-friendly design that handles tall gaps between the card and the case floor. The runner-up is the acer GPU Support Bracket in the large size (70 to 120mm), a simple magnetic-base stand that is easy to set up and sits in the sweet spot for most triple-fan, 3-slot cards. Everything else here covers a specific need: an RGB look, a very small gap, a vertical mount or the lowest price.
- Top Picks at a Glance
- Comparison Table
- 1. JOYJOM GPU Support Bracket Dual Brace: Best Overall for Heavy GPUs
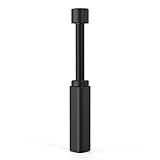
- 2. acer GPU Support Bracket (L, 70-120mm): Best Simple Magnetic Stand
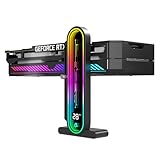
- 3. upHere 5V 3-Pin Addressable RGB GPU Brace (G276ARGB): Best for RGB Builds
- 4. TEAMOLA Tall GPU Support Bracket: Best Tall Metal Stand
- 5. GSCOLER Dual Mode GPU Support Bracket (35-120mm): Best for Vertical or Horizontal Mounts
- 6. nkomax Graphics Card GPU Brace Support (L, 74-120mm): Best Budget Pick
- 7. X-Protector Small GPU Support Bracket (1 to 2 inches): Best for Small Gaps
- Also Consider
- How We Chose
- Buying Guide
- How to Install a GPU Support Bracket Safely
- Common Mistakes to Avoid
- Frequently Asked Questions
- Which One Should You Buy?
- Sources
Modern graphics cards have grown. Many high-end models are three or more slots thick, have long heatsinks and heavy backplates, and hang off one PCIe slot by only a few millimeters of connector. Over time, that weight can cause the card to sag, bend slightly and place stress on the PCIe slot. A support bracket does one job: it holds the free end of the card up so the weight is shared between the slot and the stand. It is a cheap add-on, but only if you choose the right size and style.
All specifications below come from the product listings. Where a detail such as maximum load, material thickness or exact base dimension is not stated, we write “not listed” rather than guess.
As an Amazon Associate we earn from qualifying purchases at no extra cost to you.


Top Picks at a Glance
- Best Overall for Heavy GPUs: JOYJOM GPU Support Bracket Dual Brace (aluminum, 128mm)
- Best Simple Magnetic Stand: acer GPU Support Bracket, Large (70-120mm)
- Best for RGB Builds: upHere 5V 3-Pin Addressable RGB GPU Brace Support
- Best Tall Metal Stand: TEAMOLA Tall GPU Support Bracket
- Best for Vertical or Horizontal Mounts: GSCOLER Dual Mode GPU Support Bracket (35-120mm)
- Best Budget Pick: nkomax Graphics Card GPU Brace Support, Large (74-120mm)
- Best for Small Gaps: X-Protector Small GPU Support Bracket (1 to 2 inches)
Comparison Table
| Product | Best for | Key specs (from listing) | Watch for | Price tier |
|---|---|---|---|---|
| JOYJOM Dual Brace | Heaviest cards, tall gaps | Aluminum; dual brace; fan mounting; supports big GPUs; 128mm | Larger footprint in cramped cases | Mid-range |
| acer Large | Easy, tool-free setup | Magnet non-slip base; 70-120mm range | Needs a steel case floor for the magnet to bite | Budget |
| upHere ARGB (G276ARGB) | RGB builds | 5V 3-pin addressable RGB strip; adjustable length and height | Needs a free ARGB header | Mid-range |
| TEAMOLA Tall | Tall gaps, clean look | Black metal; hidden magnet; tool-free height adjustment | Check height range on the full page | Mid-range |
| GSCOLER Dual Mode | Vertical and horizontal mounts | 35-120mm; ABS body; anti-static sponge pads | Plastic body, not metal | Budget |
| nkomax Large | Lowest cost standard stand | L size 74-120mm; anti-sag holder | Material details not listed | Budget |
| X-Protector Small | Small gaps of 1 to 2 inches | Metal; rubber pad; 1-2 inch range | Too short for most tower cases with big gaps | Budget |
1. JOYJOM GPU Support Bracket Dual Brace: Best Overall for Heavy GPUs
- Adjustable aluminum GPU support with dual brace design
- Fan mounting capability per the listing
- Listed for big GPUs, with a 128mm figure in the title
- Black finish
- Maximum load rating and base dimensions: not listed in the title
Best for: triple-fan, 3 to 3.5 slot cards where the gap between the card and the case floor or PSU shroud is large. Skip if: you have a compact case with a tiny gap beneath the card.
A dual-brace layout gives the stand two contact points rather than one. In practice, that means the load is spread across a wider base, which helps resist tipping when the case is moved. For a heavy card, this is the main consideration: a single narrow post can lean under load or slide when the PC is bumped, while a broader base is more stable.
The aluminum construction matters too. Aluminum is lighter than steel but stiff, and it does not flex easily under a typical graphics card. The listing also mentions fan mounting, which suggests that the bracket can be adapted to sit beneath a case fan. For builders who use bottom-intake fans, that is a helpful detail because the bracket does not need to block the airflow path.
When you install any bracket, extend it until it touches the card’s underside lightly. Do not raise the card: the goal is to support, not to push the GPU upward and bend the PCB. If you see the card lift away from the slot’s retention clip, back the bracket down a little.
Pros: Aluminum build; wide dual support; designed for big GPUs; adjustable; fan-friendly layout.
Cons: Bigger footprint; load rating not listed; price is above basic stands.
2. acer GPU Support Bracket (L, 70-120mm): Best Simple Magnetic Stand
- Large size covering 70 to 120mm height range
- Magnet and non-slip base
- Adjustable graphics card holder
- Smaller 25-50mm version also sold
- Material and maximum load: not listed in the title
Best for: mainstream 2.5 to 3 slot cards in a typical ATX mid-tower with a steel case floor. Skip if: your case has a plastic or aluminum floor where the magnet will not hold.
The acer bracket is the easiest to understand: it is a stand with a magnet in the base. Place it on the steel floor of the case, adjust the height until it touches the card, and the magnet keeps it from sliding when you move the tower. The non-slip base is an added help for cases where the floor has a ridged surface.
The height range is the number to check. With 70 to 120mm of adjustment, this model suits cases where the card sits relatively high above the floor, as in many mid-towers with an exposed power supply cover. If your gap is below 70mm, the smaller 25 to 50mm version would be a better match.
A magnetic base does not work on every case, though. Aluminum cases and plastic floors will not hold a magnet. In that situation, choose a stand with an adhesive base or a clamp design, or one that is wide and heavy enough to hold position on its own.
Pros: Simple to place; magnet and non-slip base; wide adjustment range; recognizable brand.
Cons: Magnet needs steel; load rating not listed; limited visual flair.
3. upHere 5V 3-Pin Addressable RGB GPU Brace (G276ARGB): Best for RGB Builds
- Built-in 5V 3-pin addressable RGB strip
- Adjustable length and height support
- Sold in black and white versions
- Connects to a standard ARGB header or controller
- Maximum load rating: not listed in the title
Best for: glass-panel builds where you want the bracket to double as lighting. Skip if: your motherboard has no spare 5V ARGB header and you do not use a controller.
A support bracket in a glass-side case is visible. The upHere turns that into a feature by adding an addressable RGB strip to the brace itself, so it matches an ARGB fan and cooler setup. Because it uses the 5V 3-pin standard, it connects to most modern motherboards, but you must confirm that you have a free header. Do not plug a 5V 3-pin connector into a 12V 4-pin RGB header; the voltage and pinout are different and it can damage the strip.
The length and height are adjustable, which is helpful when you want to place it at the best point under the card. Place the brace near the end of the card, where the load is highest, but away from fans if you need the card’s airflow.
Pros: Integrated ARGB; adjustable; clean look; black and white versions.
Cons: Requires an ARGB header; more cabling; costs more than non-RGB braces.
4. TEAMOLA Tall GPU Support Bracket: Best Tall Metal Stand
- Tall adjustable anti-sag stand in black metal
- Hidden magnet
- Tool-free adjustment per the listing
- Fits most cases per the listing
- Height range and load rating: not listed in the title
Best for: cases with tall gaps and builders who want a stand that disappears behind the card. Skip if: you need a verified maximum load number before purchase.
The word “tall” in the name is deliberate. Many cases have a large gap between the GPU and the floor, especially when a vertical PSU shroud is absent. A stand that can extend high enough avoids stacking spacers or using a stand at the edge of its range. The hidden magnet suggests the base is meant to be discreet, which helps in a clean build.
Tool-free adjustment is practical when you need to fine tune the height with the case panel half closed. Just turn or slide to the right height and stop. Always check the stand has no contact with fan blades or heat pipes.
Pros: Tall; metal; hidden magnet; tool-free height.
Cons: Specific height and load numbers not in title; magnet requires steel floor.
5. GSCOLER Dual Mode GPU Support Bracket (35-120mm): Best for Vertical or Horizontal Mounts
- 35 to 120mm adjustable range
- Dual mode for vertical and horizontal mounting
- ABS brace with anti-static sponge pads
- Suited to universal video cards
- Load rating: not listed
Best for: builders who may switch between a standard horizontal GPU and a vertical mount kit, or who want a very wide adjustment range. Skip if: you want a metal stand for the heaviest cards.
The range of 35 to 120mm is the widest in this guide, which is useful if you rebuild often or swap cases. The dual mode language indicates the bracket can be oriented for a card mounted flat or one mounted vertically on a riser, which is a common mod. The anti-static sponge pads protect the card’s surface and reduce slip.
ABS plastic keeps the cost down and prevents contact with electronics from causing shorts, but it is less rigid than aluminum. For very heavy cards, we would lean toward a metal stand like the JOYJOM, and use this one for medium-weight cards or temporary support during transport.
Pros: Wide range; vertical and horizontal modes; soft pads; low cost.
Cons: Plastic body; load rating not listed; less suited to the heaviest cards.
6. nkomax Graphics Card GPU Brace Support (L, 74-120mm): Best Budget Pick
- Large size for 74 to 120mm gaps
- Video card sag holder bracket with adjustable stand
- Medium size (50-80mm) also sold
- Material and load: not listed in the title
Best for: a standard build on a tight budget where a simple stand does the job. Skip if: you want a magnet, RGB or a documented load limit.
A basic stand does the same essential job as a premium one: it fills the gap beneath the card. If your build is a normal 2 to 3 slot card in a mid-tower, a simple adjustable post is often enough. nkomax sells separate size options, which helps you match the stand to your gap instead of buying one oversized unit.
Make sure to measure the gap first. The L size covers 74 to 120mm, while the medium covers 50 to 80mm. If your gap is 70mm, neither is a perfect fit; consider the acer 70 to 120mm range or a smaller option.
Pros: Low price; sized options; simple design.
Cons: Few listed features; material not stated; plain look.
7. X-Protector Small GPU Support Bracket (1 to 2 inches): Best for Small Gaps
- Small sag bracket for 1 to 2 inch gaps
- Metal construction with rubber pad
- Premium stand for the most setups per the listing
- Load rating: not listed
Best for: compact cases or builds where the gap between the card and the PSU shroud is small. Skip if: your gap is larger than 2 inches.
Not all builds have a big gap. Small form factor cases and some mid-towers with raised PSU shrouds leave only an inch or two. In those cases, a tall stand will not fit, and a purpose-built small bracket is a better answer. The rubber pad protects the underside of the card and adds grip.
Because it is metal and short, it is also sturdy: the shorter a stand is, the less it flexes. For a card that is heavy but sits close to a shroud, this is a neat solution.
Pros: Fits small gaps; metal; rubber pad; low cost.
Cons: Narrow range; no magnet listed; not for tall gaps.
Also Consider
JOYJOM GPU Holder Stand for 12cm Fan Mount (CNC Aluminum, 0.63-6.3 inch)
A CNC aluminum model with a broad adjustment range that can mount to a 12cm fan position. Good for builders who want a solid, premium-feel brace.
upHere GL05 Anodized Aluminum GPU Brace
A simple anodized aluminum brace for single or dual slot cards. The listing carries a clear warning that it does not support the 3080 Ti, so check card dimensions before you buy.
TGDGAMER GPU Support Bracket with ARGB and Temperature Display
Combines ARGB lighting with an ambient case temperature display and height adjustment. For builders who want a monitoring gadget as well as support.
OwlTree Aluminum Magnetic GPU Support Bracket (0.6-7.5 inch)
An aluminum magnetic stand with a very wide adjustment range listed in the title, useful for oversized builds.
How We Chose
We did not physically install or load-test any bracket in this guide. The picks come from research: the information in each product listing, manufacturer descriptions, and the way hardware publications such as Tom’s Hardware, TechPowerUp and Gamers Nexus discuss GPU sag, card weight and bracket use. Our approach reflects that guidance on how supports should be positioned and why they should not lift the card.
We began with real, currently sold GPU support brackets and filtered for adjustability, build material, a stated height range and suitability for heavy, large cards. We covered magnetic, ARGB, dual-brace, plastic and small-gap designs, and limited each brand to two appearances. Specifications such as load ratings were quoted only when the listing states them, and are otherwise marked “not listed”.
Buying Guide
Measure the gap first
The most important number is the vertical distance from the bottom edge of the GPU to the surface where the stand will sit, which is usually the case floor or PSU shroud. Measure it with a ruler through the open panel. Pick a bracket whose range covers that distance with room to spare at both ends, so it is not fully extended or fully collapsed.
Metal versus plastic
Aluminum and steel stands resist flex and are better for heavy cards, especially triple-fan models with large backplates. ABS plastic is cheaper and avoids any risk of contact with electronics, but it can flex. For cards that weigh well over a kilogram, we recommend metal; for lighter cards, plastic can suffice.
Base type: magnet, adhesive, wide base or clamp
Magnetic bases keep the stand in place on steel floors, but not on aluminum or plastic. Adhesive bases hold on any clean flat surface but are semi-permanent. Wide bases are stable without fixing. Choose according to your case floor material.
Contact point and padding
A good stand touches the card at a strong point, ideally the backplate edge or a solid part of the shroud, not a fan or a delicate component. Rubber pads reduce slip and protect finishes. Avoid contact with fan blades, capacitors or heat pipes.
Height adjustment and reach
Tool-free adjustment is convenient. Threaded posts allow fine tuning. Sliding posts are fast but can slip. If your card extends far beyond the motherboard, place the support near the end of the card for the most benefit.
How to Install a GPU Support Bracket Safely
Power the PC off and unplug it before you touch anything inside the case. With the side panel removed, look at the card from the side and check whether the far end has dropped lower than the end at the bracket. Place the stand on the case floor, or on the PSU shroud if that is the lowest solid surface, and extend it until it just meets the underside of the card. A good test is the paper test: you should be able to slide a thin piece of paper between the pad and the card with a little resistance, which means the stand is touching without pushing.
Next, look at the PCIe slot. The retention clip at the end of the slot should still be fully closed, and the card should sit level in the slot rather than being tilted upward. If you see the rear bracket of the card pulling away from the case, lower the stand slightly. Position the stand near the end of the card, but away from fan hubs, and check that no fan blade can touch the arm or post when it spins. Close the case, power on, and listen for new rattles or vibrations. If you move the PC often, check the bracket again after the first transport, because magnets and pads can shift during a bump.
If your build has a vertical mount kit, follow the same idea but place the support where the card rests against a solid surface, and make sure the stand does not block the riser cable or the airflow path. For a heavy flagship card, it is also worth reading the manufacturer’s manual: some vendors specify where to place the included stick or recommend not using an extra support in certain positions.
Common Mistakes to Avoid
- Pushing the card upward and bending the PCB.
- Placing the stand under the fans and blocking airflow.
- Choosing a magnetic stand for an aluminum case floor.
- Plugging a 5V RGB brace into a 12V RGB header.
- Ignoring the manufacturer’s own bracket that may have shipped with the card.
Frequently Asked Questions
Do heavy GPUs need a support bracket?
Not always, but most builders with three-slot or heavy cards in a horizontally mounted case use one. A bracket reduces sag and stress on the PCIe slot over time, especially if you move the PC.
What size support bracket do I need for my GPU?
Measure the gap between the underside of the card and the case floor or PSU shroud, then choose a bracket whose listed range covers it. Large models cover roughly 70 to 120mm, and small ones about 25 to 50mm.
Are magnetic GPU brackets better?
Magnetic bases are easy to place and stay put, but only on steel surfaces. In aluminum or plastic cases, choose a wide base or an adhesive model.
Can a GPU bracket damage my graphics card?
Yes, if it pushes the card upward or touches fragile components. Adjust it so it just touches the card, and do not use force. Look at the card after installation to check it is level.
Should I use a bracket if my card came with one?
Yes, many high-end cards ship with a support stick or bracket. Use it if it fits your case; buy a separate stand if it does not.
Do GPU brackets work with vertical GPU mounts?
Some do. The GSCOLER lists both vertical and horizontal modes, but most standard stands are designed for horizontal use only. Check the listing for your mount style.
Does an RGB GPU bracket affect performance?
No. The lighting is cosmetic and uses an ARGB header or controller. Just be sure to use the correct 5V 3-pin connector.
Which One Should You Buy?
For a heavy, triple-fan card, buy the JOYJOM Dual Brace. For a simple magnetic stand that suits a standard ATX case, choose the acer large size. Pick the upHere ARGB if you want the stand to match your lighting, the TEAMOLA Tall for a high gap, the GSCOLER for vertical mounts and the nkomax if budget is the priority. For small gaps, go with the X-Protector. Measure your gap, check your case floor material and make sure the stand supports the card without lifting it.
Sources
- Manufacturer product pages and listing details for JOYJOM, acer, upHere, TEAMOLA, GSCOLER, nkomax, X-Protector, TGDGAMER and OwlTree
- Tom’s Hardware coverage of GPU sag and support brackets
- TechPowerUp graphics card cooler and weight reviews
- Gamers Nexus discussions of GPU weight and case clearance
- Graphics card vendor installation manuals for included support brackets
Last updated: October 2026
Ready to decide? Our #1 pick for 2026 is the JOYJOM Dual Brace.
Live price & availability on Amazon.

Write Your Review
No reviews yet. Be the first to share your experience!