
- Top Pick: NVIDIA GeForce RTX 5080 Founders Edition
- Best Value: NVIDIA GeForce RTX 3090 Founders Edition Graphics Card (Renewed)
- Premium Choice: NVIDIA – GeForce RTX 4080 16GB GDDR6X Graphics Card
How to update your NVIDIA drivers is one of those tasks that sounds intimidating and turns out to take about five minutes. If your games are stuttering, a new title just launched, or you are chasing a mysterious crash, an outdated driver is very often the culprit. This step-by-step guide walks you through the easy way, the manual way, and the clean-install method for stubborn problems, so you can pick the path that fits your situation with zero guesswork.


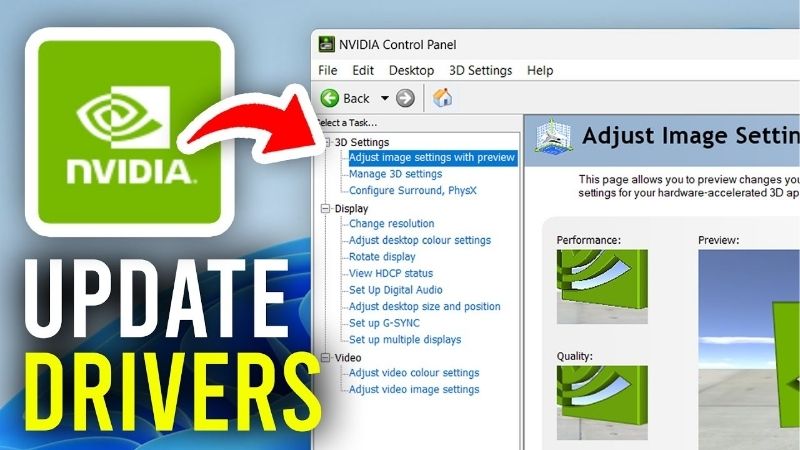
What You Will Need Before You Update
Updating drivers is free and mostly hands-off, but a little preparation prevents the two things that usually go wrong: a half-finished download and a bad install that leaves you staring at a black screen. Sort out this short checklist first and the rest of the process is smooth sailing.
As an Amazon Associate we earn from qualifying purchases at no extra cost to you.




A Stable Connection and a Little Free Space
NVIDIA driver packages are large, often 700MB or more, so a stable internet connection genuinely matters here. A dropped download is the single most common reason an update appears to “fail” partway through, and it is entirely avoidable.
If your desktop sits far from the router and keeps dropping out mid-download, a simple Wi-Fi adapter upgrade or a powerline networking kit pays for itself the first time it saves a corrupted install. You should also keep at least a couple of gigabytes free on your system drive so the installer has room to unpack. A reliable connection is the unglamorous foundation of every clean update.
If you game on a laptop, plug into wired Ethernet for the download when you can. Driver packages are large enough that a brief Wi-Fi hiccup can corrupt the file mid-transfer, and a wired connection sidesteps that risk entirely for the two minutes it takes to download.
The Right Tool: NVIDIA App vs Manual Download
You have two official routes, and both are completely free. The NVIDIA App (the successor to GeForce Experience) auto-detects your GPU and installs the correct driver in a couple of clicks. Manual download from NVIDIA’s website gives you full control over the exact version you install.
Beginners should start with the App because it removes any chance of picking the wrong file. Power users who want a specific version, or who are actively troubleshooting a regression, will prefer the manual method covered further down. Neither is “better” in a vacuum; they suit different goals.
A Quick Backup and a Restore Point
Before any driver change, create a Windows restore point so you can roll back instantly if something misbehaves. It takes about thirty seconds and has rescued countless late-night gaming sessions from a bad update.
If you like to keep known-good driver versions on hand, a small, reliable USB flash drive is worth having so you can store a working installer offline and reinstall without redownloading anything. Think of it as cheap insurance for a stable rig — the kind of thing you are grateful for exactly once, at the worst possible moment.
None of this takes long, and it is entirely optional for a routine update. But if you are updating specifically to chase down a crash or artifacting, these small safeguards are what let you experiment freely with different driver versions without any fear of making the situation worse.
Step-by-Step: Update Your NVIDIA Drivers the Right Way
There are three reliable methods, ordered from easiest to most thorough. Pick the one that matches your situation: the App for routine updates, manual for control, and a full clean install when you are actually fixing a problem rather than just staying current.
Method 1 — The NVIDIA App (Easiest)
This is the fastest path and the right default for the vast majority of users. Follow these steps in order and you cannot really go wrong:
- Download the NVIDIA App from NVIDIA’s official website and install it. Using the official source is what keeps you away from fake driver sites.
- Open the App and go to the Drivers tab. It automatically detects your GPU, so you never have to identify your card yourself.
- Click Check for Updates, then Download. Choose the Game Ready driver for gaming or the Studio driver for creative and professional work.
- Select Express Installation. This handles everything cleanly for a routine update and preserves your existing settings.
- Reboot when prompted. A restart lets the new driver load fully and prevents the odd display glitches that skipping it can cause.
That is the entire process for most people, start to finish. If an update ever refuses to apply this way, that is your signal to jump to Method 3 rather than trying again.
One small tip for the App route: enable automatic update notifications in its settings. It will quietly tell you when a new Game Ready driver drops for a title you actually play, so you get the performance boosts and bug fixes on day one without ever having to remember to check.
Method 2 — Manual Download From NVIDIA (Most Control)
Choose this route when you want a specific driver version — for example, rolling back to a known-stable release after a buggy one. The steps are just as straightforward as the App:
- Go to NVIDIA’s official Drivers page. Never download drivers from third-party mirrors or random links.
- Enter your exact GPU model and operating system. Accuracy here guarantees you get a fully compatible file.
- Download the driver you want, including an older version if you are deliberately troubleshooting a regression.
- Run the installer and pick Custom (Advanced). This unlocks the clean-install checkbox for a genuinely fresh start.
- Reboot to finish, then confirm the new version number in the NVIDIA App or Control Panel.
Manual installs give you a clear record of exactly which version is running, which is invaluable when you are isolating a bug that only appears in one game.
Keep a note of the last version that worked flawlessly for you. If a future driver introduces a problem, you will already know exactly which build to reinstall, turning a stressful rollback into a calm two-minute fix.
Method 3 — Clean Install With DDU (For Crashes and Artifacts)
When updates keep failing, or you are seeing visual artifacts, black screens, or repeated crashes, a normal update is not enough. A full clean removal clears out the corrupted files a standard installer leaves behind:
- Download the newest driver first so it is ready to reinstall offline immediately after cleanup.
- Download Display Driver Uninstaller (DDU), the standard free tool for a complete driver wipe.
- Boot into Safe Mode. DDU works most reliably with Windows running in its minimal state.
- Run DDU and choose “Clean and restart.” This removes every last trace of the old driver.
- Install the fresh driver you downloaded earlier, then reboot one final time.
A clean install resolves the large majority of persistent driver problems that a simple update can never touch, and it is the fix professionals reach for first when something is genuinely broken.
Pro Tips and Mistakes to Avoid When Updating
A few small habits separate a five-minute update from a frustrating afternoon of troubleshooting. These are the lessons that keep your system stable long after the driver is installed and running.
Pros and Cons of Auto vs Manual Updates
Deciding how to update your NVIDIA drivers going forward mostly comes down to convenience versus control, and each approach carries clear trade-offs worth knowing before you settle into a routine.
| Automatic (NVIDIA App) | Manual / Clean Install |
|---|---|
| Fast, foolproof, always the latest version | Pick the exact version you want |
| Great for casual and everyday gamers | Best for troubleshooting and rollbacks |
| Less control over what actually changes | Takes a few more steps and attention |
Most people are best served by the App day to day, keeping the manual method in their back pocket for the rare occasion something goes sideways.
Common Mistakes That Cause Black Screens
The number one mistake is skipping the reboot. A driver that has not fully loaded can leave you with flickering or a black screen that looks alarming but is almost always fixed by a simple restart.
The second mistake is installing over an already-corrupted driver instead of cleaning it out first. If two normal updates in a row misbehave, stop repeating the same step and go straight to the DDU clean install in Method 3 — you will save yourself a lot of wasted time.
A third quiet mistake is running badly outdated Windows updates alongside a fresh driver. NVIDIA drivers assume a reasonably current operating system, so keeping Windows patched removes a whole category of strange, hard-to-diagnose conflicts before they ever have a chance to start.
When a Driver Update Will Not Fix It
Sometimes the driver simply is not the problem. If your GPU is several generations old, new drivers bring smaller and smaller gains, and no update will make aging silicon keep pace with modern, demanding titles.
At that point the real fix is a hardware upgrade rather than more software tinkering. If you have been fighting stutters on an older card, a current mid-range GPU delivers a far bigger and more lasting improvement than any driver ever could — and that is the upgrade genuinely worth budgeting for when the time comes.
See More:
- TechPowerUp GPU
- Nvidia H200 GPU price
- RTX 5050 Mobile
- Nvidia competitors
- Nvidia Reflex low latency on or off
The Bottom Line
Now that you know how to update your NVIDIA drivers three different ways, keeping your system fast and stable becomes a quick five-minute habit rather than a mystery: use the NVIDIA App for routine updates, go manual when you need control over the version, and clean-install with DDU whenever you are fixing crashes. If your card turns out to be simply too old to benefit, tap the link on our site to check today’s price on a modern GPU upgrade and get back to smooth, reliable gaming for good.
Frequently Asked Questions
Should I use the NVIDIA App or download drivers manually?
The NVIDIA App replaced GeForce Experience and is the simplest route: it detects your GPU, lists the newest Game Ready or Studio branch, and installs without a login. Manual downloads from the NVIDIA driver page are still useful when you want an older, known-stable build or need the full DCH package for an offline machine.
What is the difference between Game Ready and Studio drivers?
Game Ready drivers ship close to major game launches and carry day-one optimisations and bug fixes for new titles. Studio drivers use the same code base but are validated over a longer window against creative applications such as Premiere Pro, Blender, DaVinci Resolve and Autodesk tools. Gamers should take Game Ready; content creators generally prefer Studio stability.
Do I need to uninstall the old driver first?
Normally no. The installer overwrites the previous version cleanly, and ticking the Perform a clean installation box inside the Custom option resets profiles and removes leftover files. Full removal with Display Driver Uninstaller in Safe Mode is only worth the effort when you are switching GPU vendors or chasing persistent crashes, black screens or code 43 errors.
Will updating reset my overclock or in-game settings?
A standard update keeps game settings, which live in each game folder, but a clean installation wipes NVIDIA Control Panel profiles such as custom resolutions, colour settings and per-game vertical sync overrides. Overclocks applied through MSI Afterburner survive because they are stored by that utility, though you should revalidate stability after any major driver branch change.
How often should I actually update?
Roughly every one to two months is plenty for most users, plus immediately before playing a freshly released title that lists driver support. Chasing every hotfix adds risk without benefit on older games. If your current build is stable and you are not hitting bugs, waiting a week after release lets early adopters surface regressions first.
Ready to decide? Our #1 pick for 2026 is the Fast, foolproof, always the latest version.
Live price & availability on Amazon.


Write Your Review
No reviews yet. Be the first to share your experience!