This MSI Afterburner overclock guide shows you how to squeeze free extra frames out of the graphics card you already own, no new hardware required. Tired of games running just below smooth, or a card that seems to have more in the tank? Overclocking unlocks that hidden performance in minutes. This guide keeps things simple and safe, walking you through every step, the tools that help, and the mistakes to dodge, so you get faster gaming without risking your card.
Before You Overclock: Basics and What You Need
Overclocking sounds intimidating, but modern tools make it safe and reversible. Before touching a slider, it helps to understand what you are actually doing and to gather a few things that keep the process smooth. Get this groundwork right and the rest is easy.
Is Overclocking Your GPU Actually Worth It?
Overclocking means running your graphics card slightly faster than its factory settings to gain extra performance for free. In real terms, most cards pick up a modest but useful frame-rate boost, often in the range of 5 to 12 percent, which can be the difference between choppy and smooth.
The gains are real but not magic. You will not turn a mid-range card into a flagship, yet a few extra frames in a demanding game genuinely improve the experience. Think of it as tuning an engine rather than replacing it.
The good news is that it is safe when done carefully. Modern cards protect themselves, and every change is reversible with one click, so you can experiment without fear as long as you follow the steps below.
It also helps to know where overclocking pays off most. If a game runs at, say, 55 frames and you want a smoother 60, a small overclock can push you over that line, and in memory-heavy titles the extra memory speed alone can smooth out stutters. On the other hand, if your card already runs a game at 120 frames, the gain is nice but far less noticeable. Knowing which of your games sit just below smooth tells you exactly where this free boost will feel the most worthwhile.
What You Will Need Before You Start
You need very little to begin, and most of it is free. MSI Afterburner itself costs nothing and is the tool that does the actual overclocking, paired with a free stress-test program to check stability.
Good cooling matters most for holding a stable overclock, since a faster card runs hotter. If your case runs warm, a set of quality case fans keeps temperatures in check and lets your overclock stay stable during long sessions. A dependable power supply with a little headroom also helps a pushed card draw the extra power it needs cleanly.
For older cards that run hot, fresh thermal paste can noticeably lower temperatures and unlock a better overclock. A small tube of quality thermal paste is an inexpensive upgrade that pays off in both stability and lifespan.
One optional extra is worth mentioning for anyone chasing the highest stable clocks: a well-ventilated case with good intake and exhaust. Overclocking generates more heat, and the case is what carries that heat away, so a chassis with room for extra fans gives your tuned card the breathing space it needs. You do not need any of this to start, but if your temperatures are already high at stock settings, improving airflow first will let your overclock climb much further before it hits the thermal ceiling.
MSI Afterburner Overclocking Safety Basics
Two numbers keep you safe: temperature and stability. Keep your card below roughly 83 degrees Celsius under load, and confirm it stays crash-free in a stress test before calling an overclock done.
Always change one setting at a time and in small steps. Big jumps cause crashes and make it hard to know what went wrong, while small, patient increments reveal your card’s true limit safely.
Remember that every card is different, even identical models. Your friend’s exact settings may not work on your card, so treat any online numbers as a starting hint, not a rule to copy blindly.
How to Overclock Your GPU with MSI Afterburner Step by Step
Here is the complete process, broken into clear numbered steps. Follow them in order, take your time on the stability checks, and you will end up with a faster, stable card. Each stage builds on the last, so do not skip ahead.
Steps 1 to 3: Set Up and Find Your Baseline
Start by getting your tools ready and recording where your card stands today:
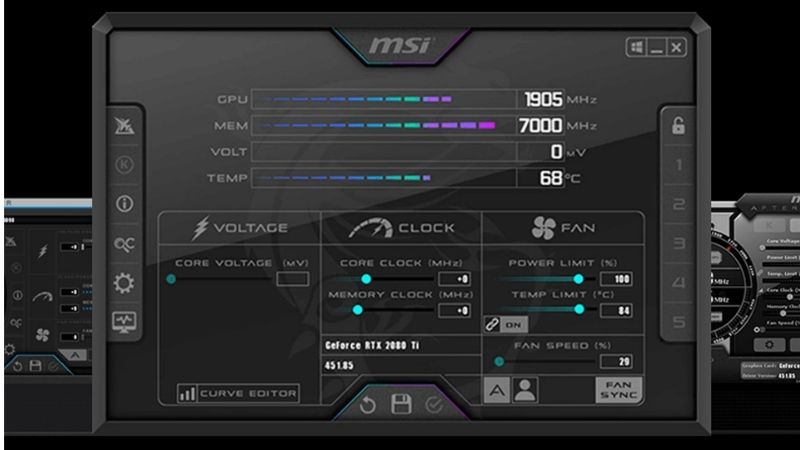
- Install and open MSI Afterburner. Download it, install it, and launch the main window where you will see the sliders you need.
- Raise the Power Limit and Temp Limit. Drag both sliders to their maximum and click apply. This simply gives your card permission to use more power and heat headroom, not an overclock yet.
- Run a benchmark to set a baseline. Note your current frame rate in a demanding game or benchmark so you can measure your gains later.
This baseline is your reference point. Without it you cannot tell whether your overclock is actually helping, so do not skip the measurement.
Steps 4 to 6: Push the Core and Memory Clocks
Now the actual overclocking begins, one slider at a time:
- Increase the Core Clock by small steps. Add around 20 to 30 MHz, apply, and test briefly. Repeat until you see a crash or visual glitch, then step back.
- Increase the Memory Clock next. Once the core is stable, raise memory in 50 to 100 MHz steps, testing after each change the same way.
- Back off at the first sign of trouble. Any crash, artifact, or driver reset means you have gone too far, so reduce that clock by one step to return to stability.
Patience here is everything. Finding the edge and stepping back one notch is exactly how you land on the maximum stable overclock your specific card can hold.
Steps 7 to 9: Stress Test and Save Your Profile
Finish by proving your overclock is rock solid and locking it in:
- Run a long stress test. Let a stress program or demanding game run for 30 minutes or more while watching temperature and stability.
- Confirm temperatures stay safe. Ensure the card holds below about 83 degrees Celsius throughout, backing off clocks slightly if it runs too hot.
- Save your profile and enable auto-apply. Store your stable settings and set them to load at startup, so your overclock is always active.
Once it passes a long test without a hitch, your overclock is finished. You now have free extra performance every time you game, with no ongoing effort.
Pro Tips, Mistakes and Final Setup
A stable overclock is mostly about patience and good habits. These final pointers help your tuned card stay fast and cool for the long run, and they steer you clear of the errors that trip up beginners. A few smart choices here make all the difference.
Pro Tips for a Stable Overclock
Test with the games you actually play, not just synthetic benchmarks. A setting that passes a benchmark can still crash in a specific title, so real-world testing is the true measure of stability.
Consider a custom fan curve for cooler, quieter running. Setting fans to spin up sooner keeps temperatures lower, which often lets you hold a slightly higher, more stable overclock during long sessions.
Undervolting is the advanced move worth exploring later. Done well, it can deliver similar performance at lower temperatures and power, and MSI Afterburner supports it once you are comfortable with the basics.
Common Mistakes to Avoid
The biggest mistake is changing too much at once. Raising core and memory together makes crashes impossible to diagnose, so always move one slider at a time.
Skipping the stress test is the second common error. An overclock that seems fine for five minutes can crash after an hour, so a long test is the only way to trust it.
Finally, do not chase someone else’s numbers. Copying a stranger’s settings ignores the fact that every card differs, and it often leads straight to instability on your own hardware.
Another mistake beginners make is forgetting about long-term heat. An overclock that is stable in a cool winter room can become unstable on a hot summer day, because the higher ambient temperature pushes the card past its limit. Leaving a small safety margin below your card’s absolute maximum, rather than running right at the edge, keeps your overclock reliable all year round instead of only when conditions are perfect.
MSI Afterburner Overclock Guide Pros and Cons
Here is the honest balance sheet on overclocking with this method:
Pros:
- Free extra performance from hardware you already own.
- Completely reversible, with safe, protected limits.
- Simple sliders make it beginner-friendly.
Cons:
- Gains are modest, not transformative.
- Requires good cooling to stay stable.
- Takes patience and careful testing to do right.
The takeaway is clear: for a little time and good cooling, you get free frames with minimal risk, which makes overclocking well worth trying. If your temperatures are the limiting factor, upgrading your cooling is the smartest next step to unlock more.
See More:
Conclusion
By following this MSI Afterburner overclock guide, you have turned free software and a little patience into real extra gaming performance, all from the card you already own. Move one slider at a time, keep temperatures in check, and always run a long stress test before trusting your settings. If heat is holding your overclock back, better cooling is the key to going further, so use the links above to grab quality case fans, thermal paste, or a dependable power supply and keep your tuned card fast and stable for years.


Write Your Review
No reviews yet. Be the first to share your experience!