How to enable G-Sync is a 30-second job once you know where the toggle lives, yet a surprising number of Nvidia owners game with it off because the setting is not enabled by default. G-Sync synchronizes your monitor’s refresh rate to your GPU’s frame output, eliminating screen tearing and reducing stutter without the input lag that traditional V-Sync adds. Whether you have a native G-Sync monitor or a G-Sync Compatible FreeSync display, the steps are the same. This guide walks you through the exact Nvidia Control Panel path, the Windows and monitor settings that must be right first, and a quick verification so you know the feature is actually running.
What You Will Need to Enable G-Sync
G-Sync is a software toggle, so there is nothing to buy. What you do need is a compatible monitor connected through the right cable and an up-to-date Nvidia driver. Missing any of these makes the option invisible in the control panel, so a quick check before you start saves troubleshooting later.
Monitor and Cable Requirements
G-Sync works on native G-Sync monitors and on FreeSync monitors that Nvidia has validated as G-Sync Compatible. If your display supports either, you qualify. Connect via DisplayPort for the widest compatibility, since HDMI support depends on the monitor and GPU generation.
Check that your monitor’s adaptive sync or FreeSync setting is turned on in its own OSD menu. Some displays ship with this off by default, and the Nvidia driver will not see the feature until the monitor advertises it.
Driver and Windows Settings
Update your Nvidia driver to the latest version through GeForce Experience or the Nvidia website. G-Sync Compatible support was added in a specific driver release, and older versions may not show the option for FreeSync monitors.
In Windows Display Settings, confirm your refresh rate is set to the monitor’s maximum. A display locked to 60 Hz when it supports 144 Hz will still show G-Sync as available, but you lose most of the benefit.
What G-Sync Actually Does for Your Gameplay
Without G-Sync, your monitor refreshes at a fixed rate while the GPU sends frames at a variable rate. When the two fall out of step you see tearing, where parts of two frames appear on screen at once. V-Sync fixes tearing but adds input lag by forcing the GPU to wait. G-Sync removes the lag penalty by letting the monitor follow the GPU instead.
The result is smooth, tear-free gameplay with the responsive feel of V-Sync off. It is most noticeable when frame rates dip below the monitor’s maximum refresh rate, which is exactly when tearing is worst.
Step-by-Step Guide to Enabling G-Sync
The process is quick but the menu path is specific, and a wrong turn sends you to the wrong panel. Follow these steps exactly and you will have G-Sync running in under a minute.
Step 1 to 3: Open Nvidia Control Panel and Enable
Step 1: Open Nvidia Control Panel. Right-click the desktop and select Nvidia Control Panel. If you only see the newer Nvidia App, switch to the classic control panel for the full G-Sync menu.
If the classic control panel does not appear in the right-click menu, search for it in the Start menu or run it from the Nvidia driver folder. Some recent driver setups install only the newer app by default, but the classic panel can be added from the optional components during install.
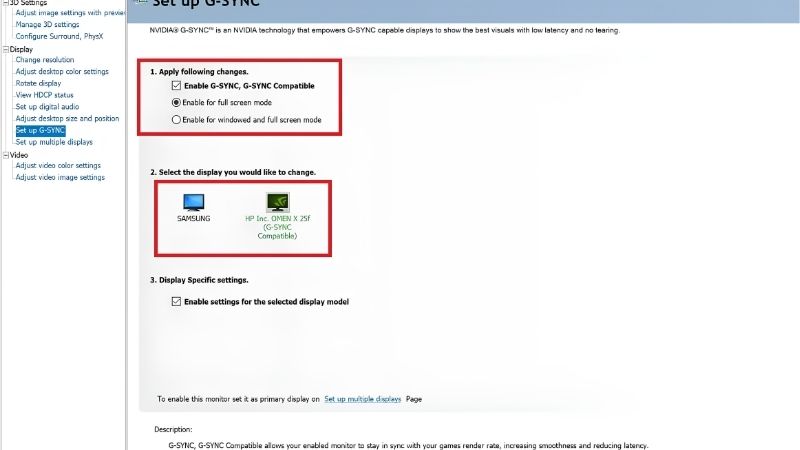
Step 2: Navigate to Set up G-SYNC. In the left sidebar, expand Display and click Set up G-SYNC. If this option does not appear, your monitor is not being recognized as compatible, so check the cable and monitor OSD first.
Step 3: Enable G-SYNC. Check the box labeled Enable G-SYNC, G-SYNC Compatible. Choose whether to apply it to Full screen mode only or Full screen and windowed mode. Full screen only is the safest default, while windowed mode is convenient for borderless gaming.
Select your monitor from the display list below the checkbox and make sure the correct panel is highlighted. If you run multiple monitors, only the one you game on needs the feature active.
Step 4 to 6: Configure In-Game V-Sync and Verify
Step 4: Set V-Sync to On in Nvidia Control Panel. Under Manage 3D Settings, find Vertical sync and set it to On globally or per game. This acts as a frame-rate cap at your monitor’s max refresh rate and prevents tearing above the G-Sync range.
Step 5: Turn off in-game V-Sync. In each game’s settings, disable V-Sync so the game defers to the driver-level setting. Running both can cause conflicts or added lag.
Step 6: Verify with the G-Sync indicator. In Nvidia Control Panel, go to Display and click G-SYNC Indicator. A green overlay will appear in the corner of your screen when G-Sync is active. Run a game and confirm the overlay shows. Once verified, you can turn the indicator off.
Troubleshooting Common Issues
If the Set up G-SYNC menu is missing, the most common cause is the monitor’s adaptive sync being off in its own OSD. Power-cycle the monitor after enabling it, then reopen the control panel.
Flickering at low frame rates sometimes appears on G-Sync Compatible monitors, because the adaptive range does not extend as low as native G-Sync panels. Setting a minimum frame-rate cap slightly above the monitor’s lower limit with a tool like RTSS can fix this.
If G-Sync works in some games but not others, check per-game 3D settings in the control panel for conflicting V-Sync or frame-rate entries. Consistency across the driver and in-game settings prevents most issues.
Another occasional cause is a display running at its non-native refresh rate. If your monitor supports 165 Hz but Windows is set to 60 Hz, the adaptive range may be too narrow, causing visible stuttering. Match the refresh rate in Windows Display Settings to the monitor’s maximum to give G-Sync the widest operating window.
Pro Tips, Mistakes, and Best Settings
G-Sync is simple to enable but a few details help you get the smoothest result and avoid the mistakes that cancel out its benefit. This section covers the habits that keep the experience clean and a quick look at how G-Sync interacts with other Nvidia features.
Pro Tips for the Smoothest Experience
Set a frame-rate cap a few FPS below your monitor’s maximum refresh rate using RTSS or the in-game limiter. This keeps the GPU inside the G-Sync range at all times and prevents the brief tear that can occur at the exact refresh-rate ceiling.
Pair G-Sync with Nvidia Reflex where supported. Reflex reduces render-queue latency, and together with G-Sync the result is both smooth and responsive, which is the ideal combination for competitive play.
Common Mistakes to Avoid
Do not leave in-game V-Sync on while running G-Sync through the driver. The double sync adds unnecessary input lag. Set V-Sync on in the Nvidia Control Panel and off inside the game for the correct behavior.
Do not connect via HDMI without checking support first. Many monitors and older GPU generations only expose adaptive sync over DisplayPort, and an HDMI connection may silently disable the feature.
A related mistake is assuming all DisplayPort cables are equal. A cable rated below the bandwidth your resolution and refresh rate demand can cause intermittent dropouts that look like G-Sync failing. Use a VESA-certified cable that matches your display’s needs, especially at 4K high refresh where bandwidth is critical.
Pros and Cons of G-Sync
G-Sync eliminates tearing, reduces stutter, and keeps input lag low, all for free with compatible hardware. It is one of the most impactful visual-quality settings available and works across virtually every game.
The downside is minor: native G-Sync monitors carry a price premium, and Compatible FreeSync panels occasionally show minor flickering at the edges of their adaptive range. For the vast majority of owners, the trade is overwhelmingly positive.
One honest caveat: competitive players who value raw input latency above all else sometimes prefer G-Sync off with uncapped frames, accepting tearing for the fastest response. For the majority of owners who want a clean, smooth image with good responsiveness, G-Sync with a frame cap and Reflex is the better package by a wide margin.
If your monitor supports it and your card is Nvidia, there is no reason to leave G-Sync off. The benefit is immediate and the cost is zero.
One practical note: if your monitor supports both G-Sync and a high refresh rate, confirm Windows is set to the panel’s maximum rather than a default 60 Hz. G-Sync operates within the monitor’s advertised range, so a wider range means better coverage of the frame rates you actually hit in games. Setting Windows to the panel’s maximum gives you the widest adaptive window and the smoothest result. Also consider running a short test in your favorite game with G-Sync off and on to see the tearing difference firsthand; most owners who do this never go back to the unsynced look.
Enabling G-Sync takes under a minute and transforms how your games look and feel. Follow the steps above, verify the indicator, and enjoy smooth, tear-free gameplay.
See More:
- How to lower GPU temperature
- How to lower GPU hotspot temp
- How to increase GPU performance
- How to enable G-Sync
Conclusion
Knowing how to enable G-Sync lets you eliminate screen tearing and stutter with a quick toggle in Nvidia Control Panel. Confirm your monitor’s adaptive sync is on, connect via DisplayPort, enable the setting, pair it with driver-level V-Sync, and verify with the on-screen indicator. The result is smoother, more responsive gameplay at no cost. Combine it with a frame-rate cap and Nvidia Reflex for the best experience, and enjoy tear-free gaming from the moment you flip the switch.


Write Your Review
No reviews yet. Be the first to share your experience!