ray reconstruction is one of the newest pieces of Nvidia’s RTX toolkit, and it quietly fixes a problem that has held ray tracing back for years: noisy, blurry, unstable lighting. Instead of the hand-tuned denoisers games used to rely on, it swaps in a single AI model trained to rebuild ray-traced detail more accurately. This guide explains what it is in plain terms, how the AI denoiser works, which cards and games support it, and the exact steps to switch it on.
Understanding Ray Reconstruction and Why It Matters
Ray tracing only fires a small number of light rays per pixel because firing more would be far too slow, so the raw image it produces is grainy and incomplete. A denoiser then fills in the gaps to make it look smooth. Ray reconstruction is Nvidia’s AI-powered replacement for that step, and it tends to produce a sharper, more stable result than the traditional approach it succeeds.
What Ray Reconstruction Actually Is
Ray reconstruction is an AI denoiser that turns the sparse, noisy output of ray tracing into a clean final image. It is part of the DLSS feature set and runs on the Tensor cores inside RTX graphics cards, using a neural network trained on enormous amounts of high-quality rendered data.
The key idea is replacement. Before this feature, each game shipped its own separate denoisers that were hand-tuned for specific effects like reflections or shadows, and they often disagreed with one another. Ray reconstruction unifies that work into one smarter model that handles all of those effects together.
Because it understands the whole lit scene rather than one effect at a time, it can keep detail that older denoisers smeared away, which is why reflections and lighting look noticeably crisper with it enabled. In side-by-side comparisons, the difference is most striking on mirror-like surfaces, where the old approach used to wash away the fine, sharp detail entirely.
How the AI Denoiser Works
A traditional denoiser essentially blurs and averages neighbouring pixels and frames to hide the noise, and that blurring is what historically softened ray-traced reflections and made them look slightly muddy. The trade-off was always clarity for stability.
Ray reconstruction was trained to recognise what a correctly lit scene should look like, so instead of blindly averaging, it reconstructs missing detail based on that learned understanding. This lets it preserve sharp edges in reflections, reduce the boiling shimmer in moving light, and recover fine detail the old method discarded.
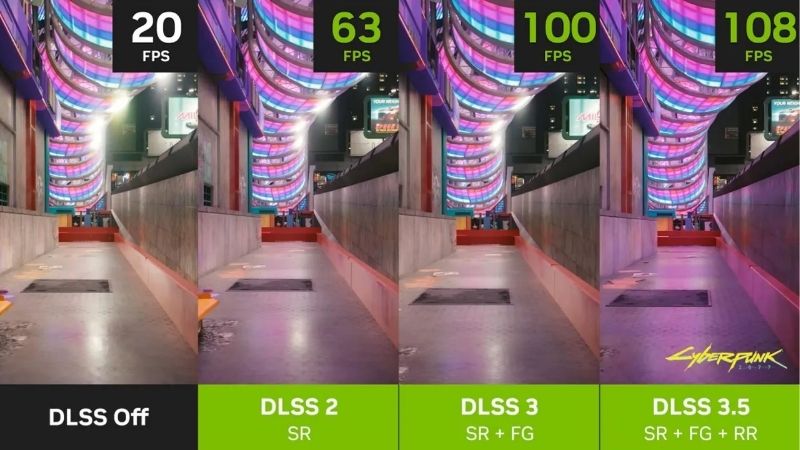
It also works hand in hand with DLSS upscaling and frame generation, since all three share the same underlying AI pipeline. That shared foundation is why enabling them together generally produces a cleaner and faster result than any of them alone. Rather than thinking of these features as competing options, it is more accurate to see them as three parts of one cooperative system working on the same frame.
Why It Improves Ray-Traced Visuals
The most visible wins are in reflections and global illumination. Wet roads, glass, and polished floors hold their detail instead of turning into a soft blur, and the gentle bounced lighting that fills a room looks more accurate and less noisy in motion.
You will also notice less of the distracting “ghosting” and shimmering that older denoisers left behind when the camera moved quickly. Scenes feel calmer and more solid, which matters most in path-traced games where lighting does almost all of the heavy visual lifting. In those titles, nearly every surface you see is being lit by traced rays, so a cleaner denoiser visibly improves the entire image at once rather than one effect in isolation.
How to Enable Ray Reconstruction
Ray reconstruction is turned on inside each supported game’s graphics menu, usually right next to the other DLSS options, rather than forced from the driver. The process is short and consistent once you know what to look for, and you can toggle it freely to compare the result.
What You Will Need First
This feature is free, but it has firm requirements that decide whether you can use it at all.
You need an Nvidia RTX graphics card, because ray reconstruction runs on RTX Tensor cores; if you are on an older GTX card or a non-RTX GPU, none of the modern ray-traced features are available, and a current RTX card is the upgrade that unlocks the entire set at once. You also need a game that both supports ray tracing and has added ray reconstruction, since it cannot be forced into titles that lack it.
Finally, keep the latest Nvidia driver installed. Driver and game updates frequently ship newer versions of the model, and those updates can improve clarity in titles you already own at no cost. It is genuinely worth re-checking your favourite ray-traced games after a big driver release, because the same scene can simply look better than it did before.
Step-by-Step to Turn It On
Use these steps to enable ray reconstruction in a supported game:
- Update your Nvidia driver to the newest version so you have the latest model and the broadest game support.
- Open the game’s graphics settings and make sure ray tracing (or “RT”, “path tracing”) is switched on first, since ray reconstruction only acts on ray-traced effects.
- Find the DLSS section and look for a separate “Ray Reconstruction” toggle, which usually sits just below the DLSS upscaling and frame-generation options.
- Enable it and compare in motion by looking at a reflective surface or a brightly lit room as you move the camera; reflections should look sharper and lighting should shimmer less.
If you do not see the option, the game either lacks ray tracing or has not added ray reconstruction yet. In that case, keeping drivers and the game updated is the most reliable way to gain access as support expands.
Which GPUs and Games Support It
Any RTX card can run ray reconstruction, but the heavier the ray tracing in a game, the more powerful a card you will want so that the overall experience stays smooth. Entry-level RTX cards can use the feature, yet they may need DLSS upscaling turned up to keep frame rates comfortable in demanding path-traced titles.
On the software side, support is concentrated in the most graphically ambitious games, especially those with full path tracing, and the list grows with each major DLSS update. Checking a game’s settings menu for a dedicated toggle is the quickest way to confirm it is available. If the toggle is greyed out, it usually means ray tracing itself has not been switched on yet, since the feature has nothing to act on without it. Switching ray tracing on first almost always makes the ray reconstruction option selectable straight away.
Pros, Cons, and Expert Tips for Ray Reconstruction
Ray reconstruction is one of the more clear-cut “turn it on” features, but it still has a few trade-offs and quirks worth knowing so you can judge when it helps and when it is optional.
The Pros and Cons of Ray Reconstruction
On the upside, it sharpens reflections and lighting, reduces noise and ghosting in motion, replaces several inconsistent denoisers with one better model, and keeps improving for free through driver updates. It also stacks neatly with the rest of the DLSS suite.
The downsides are modest. It only does anything when ray tracing is enabled, so it is irrelevant in games you play with RT off. It requires an RTX card and per-game support, and in rare scenes it can introduce its own minor artefacts on very specific effects, though these are usually outweighed by the overall gain.
For most players running ray tracing, the pros dominate decisively, which is why it has quickly become a default recommendation in supported titles.
Pro Tips and Mistakes to Avoid
The most common mistake is expecting ray reconstruction to do something with ray tracing switched off. It is a denoiser for ray-traced effects, so without RT enabled it has nothing to clean up and will appear to do nothing.
Another mistake is judging it from a static screenshot. Its biggest advantage is stability while the camera moves, so the honest test is to pan around a reflective, brightly lit scene and watch how steady the lighting stays.
A pro tip is to combine it with DLSS upscaling rather than viewing them as alternatives. Upscaling buys back the performance that heavy ray tracing costs, while ray reconstruction keeps the image clean, and together they let weaker cards run effects that would otherwise be out of reach.
See More:
Is It Worth Using? Who Benefits Most
If you play ray-traced or path-traced games on an RTX card, ray reconstruction is almost always worth enabling, since it improves image quality at little to no performance cost in supported titles. The benefit is largest in the most lighting-heavy games, where the old denoisers struggled the most.
Players who rarely use ray tracing will see little from it, and that is fine; it is a targeted upgrade, not a universal one. If you want to experience these effects at their best, the deciding factor is the strength of your RTX card, so it is worth comparing current ray-tracing-capable GPUs and a sharp monitor before your next upgrade.
In short, ray reconstruction is Nvidia’s AI answer to noisy, blurry ray tracing, swapping a patchwork of old denoisers for one model that keeps reflections and lighting sharp and stable. Enable ray tracing, switch on ray reconstruction in the DLSS menu, and keep your drivers current to get the best version of the feature. If you want the hardware to enjoy ray reconstruction at its fullest, check the recommended RTX graphics cards and monitors linked below.


Write Your Review
No reviews yet. Be the first to share your experience!