
- Top Pick: 64GB – Bootable USB Drive 3.2 for Windows 11/10 / 8.1/7, Install/Recovery, No TPM Required, Included Network Drives (WiFi & LAN),Supported UEFI and Legacy, Data Recovery, Repair Tool
- Best Value: 32GB – Bootable Windows 10&11, USB Driver 3.2 Gen for Install/Recovery Windows, No TPM Required, Network Drives (WiFi & LAN), Supported UEFI and Legacy, Compatible All Brands
- Premium Choice: Best Device Performance: Ultimate Cleaner & Speed Enhancer – CleanShark
Nvidia driver cleaner tools are the secret behind a stable, trouble-free graphics setup, yet many gamers have never used one. A driver cleaner completely removes every trace of your existing Nvidia drivers so you can install fresh ones without leftover files causing conflicts. When you are upgrading cards, fixing crashes, or switching between driver versions, a proper clean install often succeeds where a normal one fails. This guide explains what a driver cleaner does, why clean installs matter, how to do one safely, and the mistakes to avoid, so you can keep your system running smoothly.
What A Driver Cleaner Does And Why You Need One
Understanding what a driver cleaner actually does makes it clear why experienced users swear by them. A normal driver install leaves old files behind, while a cleaner wipes the slate completely, and that difference matters more than it sounds. Here is what these tools do and when they earn their place in your toolkit.
What A Driver Cleaner Is
A driver cleaner is a utility that removes all traces of a graphics driver from your system, including files and settings that a standard uninstall leaves behind. The most trusted example is a free tool called Display Driver Uninstaller, widely known as DDU. It is the go-to choice for a truly clean slate.
Unlike the basic uninstall option in Windows, a dedicated cleaner digs deeper and clears the remnants that commonly cause conflicts. Those leftover files are often the hidden reason a fresh driver still misbehaves. Removing them fully is what makes a cleaner so effective.
Because DDU is free and comes from a reputable source, it is safe to use when downloaded from its official page. Avoiding unofficial copies keeps your system secure. With the genuine tool in hand, you have everything needed for a proper clean install.
Why Clean Installs Matter
Clean installs matter because leftover driver files are a frequent cause of instability, crashes, and strange visual glitches. When these remnants conflict with a new driver, the result is problems that a standard install cannot fix. Wiping them clears the root cause rather than masking it.
This is especially important when switching between very different driver versions or moving from an old card to a new one. In those cases, old files are far more likely to clash with the new setup. A clean install prevents that clash before it starts.
For anyone chasing maximum stability, a clean install is simply the more reliable way to set up drivers. It removes uncertainty by ensuring nothing old is left to interfere. That reliability is why enthusiasts treat it as standard practice.
It is worth understanding why leftover files cause such disproportionate trouble. Modern drivers touch many parts of the system, and when fragments of an old version linger they can quietly contradict the new one in ways that are hard to trace, which is exactly why a deep clean so often succeeds where hours of other troubleshooting fail.
When You Should Use One
The clearest time to use a driver cleaner is when you are upgrading to a new graphics card, particularly if you are switching brands. Removing the old drivers completely avoids conflicts with the new hardware. It is the recommended first step of any card swap.
You should also reach for a cleaner when troubleshooting persistent crashes or glitches that a normal driver reinstall has failed to fix. In those stubborn cases, a deep clean often succeeds where simpler steps did not. It is the logical next move when basic fixes fall short.
Finally, a cleaner is worth using when rolling back to an older driver to solve a problem introduced by an update. Starting from a clean state gives the older driver the best chance to run properly. Matching the tool to these situations is the key to using it well.
A useful rule of thumb is to reach for a cleaner whenever a driver problem feels stubborn or a change is significant, and to rely on a normal update for routine, trouble-free upgrades. That way you get the thoroughness of a clean install when it genuinely helps, without adding extra steps to the everyday updates that do not need them.
How To Clean Nvidia Drivers Properly
Doing a clean install is simple once you know the steps, and a little preparation makes it foolproof. This section walks through getting ready, running the cleaner, and reinstalling your drivers. Follow it in order and you will have a fresh, stable setup in minutes.
Preparing For A Clean Install
Before you begin, download the driver you intend to install and save it locally, so it is ready immediately after cleaning. Having it on hand avoids being left without a graphics driver mid-process. A little preparation keeps everything smooth.
Also download the cleaner itself, DDU, from its official source, and consider creating a system restore point as a safety net. These small steps give you a way to recover if anything unexpected happens. Caution here is always sensible when changing system software.
For the cleanest possible removal, plan to run the tool in Windows Safe Mode, which prevents the driver from being in use during removal. Booting into Safe Mode is the single biggest factor in a flawless clean install. Preparing for it in advance makes the process seamless.
Running The Cleaner
With everything ready, boot into Safe Mode and launch DDU, then select GPU and Nvidia as the device to remove. This tells the tool exactly what to clean. The interface is straightforward and guides you through the options clearly.
Choose the clean-and-restart option, and DDU will completely remove the current driver along with its leftover files and settings. This thorough removal is the heart of the process. Letting it finish fully is essential for a genuinely clean result.
Once the tool completes its work, your system restarts automatically with the graphics driver fully removed. At this point Windows may load a basic display driver temporarily, which is normal. You are now ready to install the fresh driver.
Reinstalling And Verifying
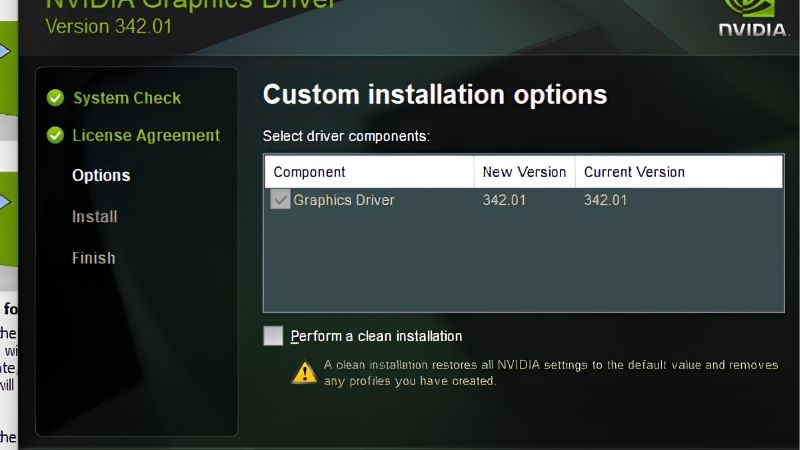
After the restart, run the installer for the driver you downloaded earlier and choose a clean installation when the option appears. This sets up the new driver from a truly fresh state. Following the prompts through to completion is all it takes.
Restart once more after installation to ensure the new driver is fully active, then test your games and applications. Rebooting before testing avoids false impressions that a fix has failed. A quick test confirms the clean install did its job.
Monitor stability over the next few days to be sure the problem is truly resolved, since some issues appear only intermittently. If everything runs smoothly, your clean install has succeeded. Noting the working driver version gives you a reliable reference for the future.
Tips, Mistakes, And Verdict
A few good habits make clean installs painless and keep your system stable long term. This final section covers practical tips, the common mistakes to avoid, and a clear verdict on the value of using a driver cleaner. These lessons save real frustration.
Pro Tips For A Clean Install
Always download both your driver and the cleaner from official sources only, never from unofficial sites. Genuine files protect your system and guarantee the tool works as intended. This habit prevents a whole class of problems before they start.
Disconnecting from the internet during the clean install stops Windows from automatically installing a generic driver mid-process. This gives you full control over which driver ends up on your system. It is a small trick that experienced users rely on.
Keep a copy of one known-good driver saved for emergencies, so you can recover quickly if a future update causes trouble. Having a reliable fallback ready turns a potential crisis into a quick fix. It is a habit that repeatedly proves its value.
Common Mistakes To Avoid
The most common mistake is skipping Safe Mode, which can leave the removal incomplete and undermine the whole point of a clean install. Taking the extra moment to boot into Safe Mode is well worth it. It is the difference between a thorough clean and a partial one.
Another frequent error is forgetting to download the new driver first, leaving you without graphics support after cleaning. Always have the installer ready before you begin. This simple oversight causes needless stress that is easily avoided.
Finally, avoid using unofficial or outdated cleaning tools, which can be unsafe or ineffective. The trusted, current version of DDU is all you need. Sticking to it keeps the process both safe and reliable every time.
See More:
- RTX 4060 vs RTX 5060
- M4 GPU benchmark
- RTX 5060 Ti benchmark
- 5060 Ti 16GB vs 9070 XT
- RTX 5050 vs RTX 5060
Final Verdict On Driver Cleaners
A driver cleaner is an essential tool for any serious PC gamer, offering the most reliable way to set up drivers and fix stubborn problems. It removes the leftover files that cause so many hard-to-diagnose issues, giving you a genuinely fresh start.
Used properly, with Safe Mode and official downloads, a clean install is quick, safe, and highly effective. Making it your standard practice whenever you upgrade cards or troubleshoot a stubborn issue will spare you countless headaches and keep your whole system running at its very best.
In short, an Nvidia driver cleaner like DDU is the most reliable way to remove old drivers completely and fix the conflicts that cause crashes and glitches. Done properly in Safe Mode with official files, a clean install keeps your graphics setup stable and trouble-free. And if a clean install still does not bring stability and you suspect failing hardware, browse current reliable graphics cards through the link below to plan your next step.
Frequently Asked Questions
What does a driver cleaner like DDU actually remove?
Display Driver Uninstaller removes the driver files, registry entries, services, control panel components and leftover folders that the standard Nvidia uninstaller leaves behind. Those remnants are a frequent cause of installation failures, black screens, driver timeouts and control panel errors, particularly after many successive upgrades on the same Windows installation.
When should I do a clean driver install?
Do it when you are troubleshooting crashes or graphical corruption, when switching between AMD, Intel and Nvidia hardware, when moving between the Game Ready and Studio branches, or when downgrading to an older version. Routine version-to-version updates do not require it, since the installer’s own clean installation checkbox is normally sufficient.
Do I need to run DDU in Safe Mode?
Safe Mode is the recommended environment because Windows will not automatically reload the display driver while DDU works, which produces the most reliable clean. DDU itself offers to reboot into Safe Mode for you. Running it in normal mode often works but leaves a greater chance of incomplete removal.
Should I disconnect from the internet during the process?
Yes. Once the driver is removed, Windows Update may immediately install its own generic Nvidia package, which conflicts with the version you intend to install. Disconnecting the network or disabling automatic device driver installation in the Device Installation Settings prevents this and keeps you in control of the version.
Will a clean install lose my settings?
Your game files and Windows configuration are unaffected, but Nvidia Control Panel and Nvidia App profiles are wiped, so per-game 3D settings, colour and digital vibrance adjustments, custom resolutions and recording preferences all reset to defaults. Note anything custom beforehand, since reconfiguring after the fact is otherwise guesswork.
As an Amazon Associate we earn from qualifying purchases at no extra cost to you.




Write Your Review
No reviews yet. Be the first to share your experience!