
How to update my GPU drivers is a question almost every PC owner asks eventually — usually right after a game starts stuttering or a new title runs badly. The good news is that it is simple, quick, and the fastest way to boost performance and fix bugs. Whether your card is Nvidia, AMD, or Intel, this guide walks you through finding your GPU, updating it the easy way, doing a clean install, and avoiding the mistakes that cause most headaches. Let’s get your system running its best.

Prime
Best Seller
QTHREE GeForce GT 210 Graphics Card,1024 MB DDR3 64 Bit,HDMI,VGA,Low Profile Video Card for PC,GPU,PCI Express 2.0 x16,SFF,Low Power


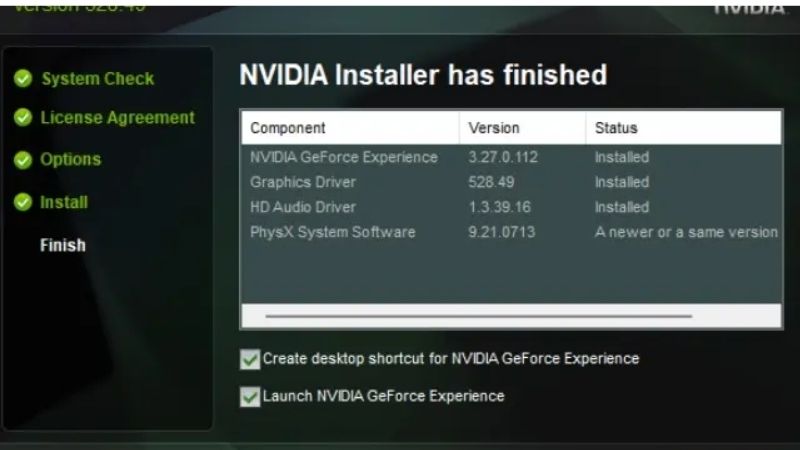
What You Need Before Updating My GPU Drivers
Updating your GPU drivers goes smoothly when you prepare first, so before starting, gather a few essentials and figure out exactly which card you have. This section covers the tools worth having, how to find your GPU, and why identifying it correctly is the crucial first step.
As an Amazon Associate we earn from qualifying purchases at no extra cost to you.


Tools and Preparation You Will Need
You do not need much to update your GPU drivers, but a little preparation helps. First, a stable internet connection, since driver files are sizable downloads. Second, a few minutes of uninterrupted time, as your screen may flicker or briefly go dark during installation.
For anyone who troubleshoots often or wants a safety net, a reliable external drive to back up your system before major changes is genuinely useful — a good portable SSD makes backups quick and gives you a way to restore if anything goes wrong.
Finally, if you are dealing with persistent problems, a dedicated driver-cleanup utility is worth keeping ready. It fully removes old driver files, which we will use in the clean-install steps whatever brand your card is.
None of this is strictly required for a simple update, but having these basics ready turns a potentially stressful task into a quick, confident routine. Good preparation is what separates a smooth update from a frantic troubleshooting session.
How to Find Out Which GPU You Have
Before updating, you must know which GPU is in your system, since the right driver depends on it. The quickest way is to open Windows Task Manager, go to the Performance tab, and check the GPU entry, which names your card and its brand.
Alternatively, open Device Manager and expand Display adapters to see the exact model. Many laptops and some desktops have two GPUs — an integrated one plus a dedicated card — so make a note of both if you see them.
This step is essential because you will download your driver from the matching brand’s source. Knowing your exact GPU is the difference between a smooth update and installing the wrong software.
Why Knowing Your Card Matters
Getting your GPU’s brand and model right is the foundation of a trouble-free update. Installing the wrong driver, or the wrong version for your card, is one of the most common causes of failures and glitches.
For laptop owners especially, the manufacturer sometimes provides customized drivers that work better than the generic ones, so knowing your precise system helps you pick the best source.
This laptop detail trips up many people. If a generic driver causes problems on a laptop, the manufacturer’s tailored version often fixes them, so it is always worth checking your laptop maker’s support page when issues appear.
The practical point is that a minute spent identifying your GPU saves potential hours of frustration. It is the single most important thing to do before you download anything, no matter which card you own.
Step-by-Step: How to Update My GPU Drivers
With preparation done, here is the actual process laid out as clear numbered steps that work for any GPU brand, covering both the easy app method and the thorough clean install. Follow these in order and updating your GPU drivers will go smoothly, whether it is routine maintenance or a fix for a stubborn problem.
The Easy Method Using Official Software
Each GPU brand offers official software that makes updating simple. Follow these numbered steps:
1. Download the official app for your brand — Nvidia’s app, AMD’s Adrenalin software, or Intel’s driver app. 2. Install and open it, letting it scan your system. 3. Go to the drivers or updates section. 4. Check for updates and select the latest driver. 5. Choose the express or automatic install option. 6. Restart your PC when prompted to finish.
This official software detects your card and installs the correct driver automatically, which is why it is the recommended path for the vast majority of users whatever GPU they own.
If you are new to updating drivers, this app method is the safest place to start. It removes almost all the ways a manual install can go wrong, and you can always turn to the manual route later if you ever need a specific driver version for a particular game.
Why use the official app? It removes guesswork, always matches the driver to your card, and makes future updates a simple, often automatic task. For most people, this is all they will ever need to do.
These apps also double as hubs for performance settings and features specific to your card, so once installed they are useful beyond just updating. Spending a few minutes exploring your brand’s software often reveals handy tuning options.
The Clean Install Method for Stubborn Problems
If you are fixing crashes, artifacts, or performance issues, a clean install removes every trace of the old driver first. Follow these steps, which work for any brand:
1. Download the latest driver installer from your brand’s official website. 2. Optionally use a driver-cleanup utility to fully remove old files. 3. Choose the clean installation or factory reset option in the installer, or uninstall the old driver first. 4. Complete the fresh installation. 5. Restart your PC when finished.
A clean install eliminates leftover settings and files that cause conflicts, which is why it so often resolves problems a normal update cannot. It is the universal go-to fix for driver-related instability.
Do this whenever you switch between very different driver versions or troubleshoot a persistent issue. Starting fresh eliminates the corrupted-file problems behind many mysterious display and performance glitches.
Confirming the Update Worked
After restarting, confirm the update succeeded. Open your brand’s app or Device Manager, find your GPU under Display adapters, and check the driver version and date to ensure the new one installed correctly.
Comparing the installed version to the latest available version confirms everything worked. A current driver date is a clear sign the update is active and applied.
This check takes seconds and gives peace of mind. If the version looks wrong, repeat the process, and use the clean-install method if a normal update refuses to stick. Testing a game or app afterward confirms the fix worked.
Pro Tips and Mistakes to Avoid
Now that you can update your GPU drivers confidently, a few expert pointers will keep the process smooth and help you avoid the errors that commonly cause trouble. This section shares practical tips, the mistakes to sidestep, and how staying current benefits your gaming and stability.
Pro Tips for Smooth GPU Driver Updates
First, update when a major new game launches, since all three brands release optimized drivers for big titles — installing these can noticeably improve performance and fix game-specific bugs.
Second, you do not need to install every update the moment it appears. If your system is stable and running well, updating every few weeks or when a game you play gets an optimized driver is perfectly fine.
Third, keep the installer file or a system backup before a major update. If a new driver ever causes issues, you can roll back to the previous stable version quickly and without stress, whatever your GPU brand.
Common Mistakes to Avoid
The most common mistake is downloading drivers from unofficial third-party sites, which risks installing outdated or unsafe software. Always use the official app or website for your brand, or your laptop maker’s support page — nowhere else.
Another frequent error is skipping the restart. Drivers are not fully active until you reboot, so bypassing that step can leave you with a half-updated, unstable system. Always restart when prompted.
Finally, people often skip a clean install when troubleshooting, then wonder why a simple update did not fix their problem. When issues persist, the clean-install method is the answer a standard update cannot provide.
How Updates Boost Gaming and Stability
Keeping your GPU drivers current delivers real benefits beyond bug fixes. Optimized drivers improve performance in the latest games and applications, fix glitches, and add support for new features at no cost to you.
Updates also patch security vulnerabilities and improve stability, which matters whether you game seriously or just want a reliable PC. A current driver is simply a faster, safer, more capable driver.
The practical payoff is that a two-minute update can transform how a game runs. Think of it as the cheapest performance upgrade available — no new hardware, no cost, just a quick download that keeps your system at its best all year.
Whatever GPU you own, building this into a light routine pays off over the life of your PC. A card kept current with drivers simply performs better and stays stable longer than one left neglected for months on end.
See More:
- 3060 Ti vs 9060 XT
- Nvidia Shield TV Pro
- RTX 5070 vs RX 9060 XT
- RTX 3090 24GB
- Nvidia price prediction
Conclusion
Learning how to update my GPU drivers is one of the simplest, highest-value skills for any PC owner: better performance, fixed bugs, new features, and improved stability in just a few minutes. Find your GPU brand first, use the official Nvidia, AMD, or Intel app for easy updates, and fall back on the clean-install method for stubborn problems. Avoid third-party download sites, always restart to finish, and update when big games launch. With the steps in this guide, you can keep any GPU running at its best all year. Grab a reliable backup drive to protect your system before your next major update and update with total confidence.
Frequently Asked Questions
How do I find out which GPU I actually have?
Press Windows and R, type dxdiag and open the Display tab, which names the adapter and current driver version. Device Manager under Display adapters gives the same answer, and GPU-Z adds memory type, BIOS revision and bus width. Laptops often list two adapters because an integrated Intel or AMD chip coexists with the discrete GPU.
Can I just let Windows Update handle drivers?
Windows Update supplies functional but usually older graphics drivers. They are fine for office machines and guarantee a working display, yet they lag behind on game optimisations and bug fixes, and they sometimes overwrite a newer manual install. Gamers should install from NVIDIA, AMD or Intel directly and treat Windows Update as a fallback.
On a laptop, should I use the OEM driver or the GPU vendor version?
Modern NVIDIA and AMD drivers generally install fine on laptops, and both vendors now support direct updates for most notebooks. However, OEM builds from Dell, HP, Lenovo or ASUS may include panel, hybrid graphics or power management customisations. If you hit display switching or battery bugs after a generic install, revert to the OEM package.
Why does the screen go black or flicker during installation?
That is normal. The installer unloads the current display driver, which drops the signal for several seconds before the new one initialises and resets the resolution. Do not power off the machine during this window. If the black screen persists beyond a minute or two, wait for a timeout, then reboot and retry with a clean install.
How do I roll back a driver that made things worse?
Open Device Manager, right-click the GPU, choose Properties, then the Driver tab and Roll Back Driver if the option is available. If it is greyed out, uninstall the current version, download the previous release from the vendor archive and install it. Disable automatic driver updates afterwards so Windows does not silently reinstall the problem version.






Write Your Review
No reviews yet. Be the first to share your experience!