
Arguments about the best thermal paste patterns have run for as long as people have been mounting coolers, and the practical answer is duller than the debate. Mounting pressure does most of the work, so the pattern mainly decides how evenly the compound starts out. The pattern only decides the starting point.
As an Amazon Associate we earn from qualifying purchases at no extra cost to you. Product prices and availability are accurate as of the date shown and are subject to change.




As an Amazon Associate we earn from qualifying purchases at no extra cost to you. Product prices and availability are accurate as of the date shown and are subject to change.
By Ryan Cole
Quick answer: A single pea-sized dot in the centre works for almost every desktop processor with a standard heat spreader. Use a thin line along the long axis for rectangular dies, and reserve manual spreading for bare dies and laptops where mounting pressure is uneven. That covers the best thermal paste patterns for nearly every build.
How the Best Thermal Paste Patterns Actually Behave
Compound fills microscopic gaps between the cold plate and the heat spreader rather than conducting heat in bulk. That single fact explains why the differences between patterns are smaller than most guides imply. It also explains why the debate persists.
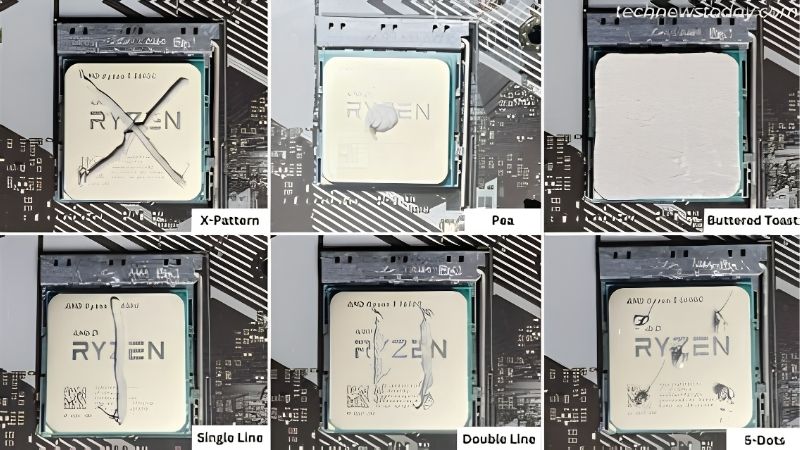
Mounting pressure does the spreading
When the cooler is tightened, the compound is squeezed outward from wherever you placed it. A centre dot becomes a circle that reaches the edges under normal pressure, which is why it works on the great majority of desktop processors. Normal pressure reaches the edges easily.
That is also why pattern choice matters more on hardware with low or uneven pressure. Laptop heatsinks and bare dies do not press as firmly or as evenly, so starting with better coverage genuinely improves the result. Low pressure mounts are the real exception.
Air pockets and why they form
Patterns with several separate blobs can trap air between them as they spread, and trapped air is a far worse conductor than any compound. This is the main argument against the five-dot and X patterns that circulate in build guides. Trapped air conducts heat very poorly.
A single mass avoids the problem entirely, because there is nothing for it to close around. If you do spread manually, work outward from the centre in one direction rather than dabbing at several points across the surface. Work outward in a single direction.
How much to use
A volume roughly the size of a pea suits a standard desktop heat spreader. Too little leaves dry areas at the edges, while too much simply squeezes out around the sides without improving contact or causing any harm with a non-conductive compound. Dry edges mean too little was applied.
The exception is electrically conductive compound, where excess is a genuine hazard. With those products the amount matters far more than the pattern, which is one reason most people are better served by a standard non-conductive paste. Conductive compound changes the calculation.
The Best Thermal Paste Patterns and When Each One Fits
Three approaches cover every realistic situation. The table below matches each to the hardware it suits, and the sections underneath explain the reasoning behind the match. These three cover the best thermal paste patterns in practice.
| Pattern | Best for | Main risk | Difficulty |
|---|---|---|---|
| Centre dot | Standard square heat spreaders | Too little on large surfaces | Easy |
| Thin line | Rectangular dies and heat spreaders | Uneven if placed off centre | Easy |
| Manual spread | Bare dies, laptops, low pressure mounts | Air bubbles if worked badly | Moderate |
| Multiple dots or X | Rarely the right choice | Trapped air between blobs | Easy but risky |
The centre dot
This is the default for a reason. It is quick, it wastes almost nothing, and under normal cooler pressure it produces even coverage across a standard heat spreader without any risk of trapping air beneath the cold plate. It wastes almost nothing in the process.
Scale the amount to the surface. A large heat spreader needs a slightly bigger dot than a compact one, and if you lift the cooler afterwards and see dry corners, the answer is more compound rather than a different pattern. More compound beats a different shape.
The thin line
Rectangular dies and elongated heat spreaders spread better from a line than from a dot, because the compound has further to travel along one axis than the other. A thin line down the long dimension matches that geometry directly. Geometry is the whole reason for it.
Keep the line central and thin. A thick line uses more compound than necessary and tends to squeeze out heavily along the sides, which is untidy without improving the contact area under the middle of the cold plate. A thick line just makes more mess.
Spreading it manually
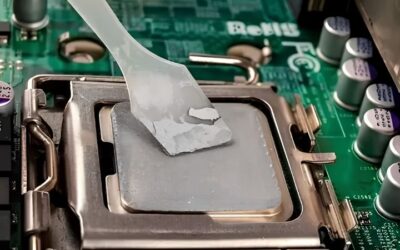
Spreading with a card or a gloved finger guarantees coverage before the cooler goes on, which is why it is standard practice on bare dies and laptop heatsinks where mounting pressure is lower and less even than on a desktop socket. Coverage is guaranteed before mounting.
Work in one direction and keep the layer thin. The risk is introducing bubbles by dabbing or reversing direction repeatedly, and on a desktop processor the technique offers no advantage over a dot for the extra effort involved. On a desktop it offers no advantage.
Common Mistakes to Avoid
The errors that actually cost temperatures are rarely about pattern choice. These three appear far more often than any of the debates about dots against lines. None of them involve the best thermal paste patterns debate at all.
Reusing old compound
Lifting a cooler and putting it straight back down leaves the previous layer disturbed and full of gaps. Once the cold plate has been removed, clean both surfaces with isopropyl alcohol and apply fresh compound before remounting. Fresh compound takes two minutes to apply.
Tightening one corner fully first
Seating one screw completely before the others tilts the cold plate and pushes compound to one side. Tighten in a diagonal sequence, a few turns at a time, so the plate lowers evenly onto the heat spreader. Small increments keep the plate level.
Using far too much
An enormous blob does not improve contact, it simply escapes around the edges and makes the next removal messier. With conductive compounds the excess can also reach components around the socket, which is a genuine risk rather than an inconvenience. Removal also becomes messier next time.
Frequently Asked Questions
Common questions about the best thermal paste patterns, covering coverage checks, curing, reapplication and the differences between hardware types. They assume a desktop processor with a heat spreader.
How do I know if coverage was good?
Remove the cooler after a few days and look at the imprint. Even coverage reaching close to the edges means the pattern and quantity were right, while dry corners or a thin centre point to too little compound. The imprint tells you everything you need.
Does thermal paste need to cure?
Most modern compounds work immediately, though some settle slightly over the first few heat cycles. Phase-change pads are the exception and genuinely need several cycles before they reach their full performance. Pads need several cycles to settle.
Is the pattern different on a graphics card?
Graphics processors usually have bare dies with lower mounting pressure, so a thin manual spread is the safer approach. The die is also smaller, so the quantity needed is considerably less than on a desktop processor. Quantity is much smaller on a bare die.
Should I use a spreader tool?
Only when spreading manually. The plastic spreaders included with some compounds are useful on bare dies and laptops, and unnecessary on a desktop heat spreader where the cooler does the work for you. The cooler does the spreading for you.
Read next: Which thermal paste is best | Best performance thermal paste
Final Thoughts
Among the best thermal paste patterns, a single centre dot handles almost every desktop build, with a line for rectangular surfaces and a manual spread reserved for bare dies. Get the quantity and the mounting sequence right and the pattern barely matters. Quantity and sequence matter far more.






Write Your Review
No reviews yet. Be the first to share your experience!