
- Top Pick: Ubuntu 24.04 LTS Made Easy: A Beginner's Step-by-Step Guide to Installing Ubuntu, Using the Linux Desktop, Getting Comfortable with the Terminal, and Switching from Windows
- Best Value: The Ubuntu Linux Companion: Install, Learn, and Use Ubuntu Linux on Any PC or Laptop, Step by Step (Linux Distribution Guides)
- Premium Choice: Ubuntu 26.04 LTS Beginner’s Guide: A Practical Step-by-Step Guide to Installing Ubuntu, Using the Desktop, Learning Essential Commands, Managing Apps, and Fixing Common Problems
Install NVIDIA drivers Ubuntu is a task that trips up many newcomers to Linux, yet it is far simpler than the intimidating forum threads suggest once you know the recommended path. Getting the proper drivers in place unlocks proper gaming, GPU acceleration, and stable performance, replacing the limited open-source default. This guide walks through why the drivers matter, how to check your hardware, the easy graphical and command-line methods to install them, and how to verify everything works, so you can set up your NVIDIA GPU on Ubuntu with confidence rather than frustration.
Why and When to Install NVIDIA Drivers on Ubuntu
Before installing anything, it helps to understand what you are replacing and why. Ubuntu ships with an open-source driver by default, which works but leaves significant performance and features unused on NVIDIA hardware. Knowing the difference clarifies why the proprietary driver is usually the right choice for most users.
Proprietary vs Open-Source Nouveau Drivers
By default, Ubuntu uses the open-source Nouveau driver, which provides basic display functionality but lacks the performance, power management, and features of NVIDIA’s official proprietary driver. For everyday desktop use it may seem adequate, but it falls short for gaming, GPU compute, and demanding graphics work.
The proprietary NVIDIA driver, by contrast, delivers full performance, proper power management, and support for technologies like CUDA and hardware acceleration. For anyone using their NVIDIA card for gaming, machine learning, video editing, or any GPU-intensive task, installing the proprietary driver is strongly recommended over sticking with Nouveau.
There is now also an official NVIDIA open-source kernel module option for newer GPUs, but for most users on typical hardware the standard proprietary driver remains the simplest, most reliable choice. Understanding this distinction is the foundation for choosing the right driver during installation.
Checking Your GPU and Current Driver
Before installing, it is worth confirming exactly which NVIDIA GPU you have and what is currently in use. Running the command lspci | grep -i nvidia in a terminal lists your NVIDIA hardware, while ubuntu-drivers devices shows the recommended driver versions for your card.
This step matters because it tells you which driver Ubuntu suggests and helps you avoid installing the wrong version. Taking a moment to identify your GPU and read the recommended driver saves time and prevents the confusion of guessing, setting you up for a clean installation on the first try.
These commands are safe to run and change nothing on their own; they simply report information. If the output looks unfamiliar, do not worry, since you only need to note your GPU name and the driver version Ubuntu marks as recommended. That recommended version is almost always the right choice, which is why this quick check is the single most useful thing you can do before installing.
What You Need Before You Start
The requirements are light. You need an internet connection to download the driver packages, administrator access to run installation commands, and a few minutes for the process and a reboot. It is also wise to back up important work first, since a graphics driver change briefly affects your display.
If your system uses Secure Boot, be aware that you may be prompted to enroll a key during installation, which is a normal part of the process. Knowing this in advance prevents alarm when the prompt appears, and having your details ready makes the whole installation smoother from start to finish.
It is also worth ensuring your system is fully updated before you begin, since an up-to-date system reduces the chance of conflicts during driver installation. Running your regular update routine first, then proceeding with the driver install, is a simple habit that heads off many of the problems people report, and it costs only a couple of minutes.
How to Install NVIDIA Drivers on Ubuntu
There are a couple of reliable ways to install the drivers, from a fully graphical approach to command-line methods that give more control. Choosing the one that suits your comfort level ensures a smooth installation, and both routes lead to the same working result.
The Easy Way: GUI and ubuntu-drivers
For most users, the simplest method requires no manual downloading at all. Follow these steps in order for a clean, reliable installation.
1. Open the Software and Updates application from your app menu.
2. Go to the Additional Drivers tab, where Ubuntu lists the available NVIDIA drivers for your card.
3. Select the recommended proprietary driver and click Apply Changes to install it automatically.
4. Alternatively, open a terminal and run sudo ubuntu-drivers autoinstall, which detects your GPU and installs the recommended driver for you.
5. Reboot your system when the installation finishes so the new driver loads.
This graphical and automated approach is the recommended path because Ubuntu chooses a driver known to work with your hardware, avoiding version mismatches. For the vast majority of users, it is all you need to get full NVIDIA performance.
Using the Command Line and PPA
If you want a specific driver version or the latest release, the command line offers more control. After running ubuntu-drivers devices to see the options, you can install a particular version with sudo apt install nvidia-driver-XXX, replacing XXX with the version number you want.
For the newest drivers beyond what the default repositories offer, adding the official graphics-drivers PPA gives access to more recent releases, after which you update your package list and install as normal. This route is best for users who need cutting-edge versions or specific releases, though it carries a slightly higher chance of instability than the recommended default, so it suits more experienced users.
If you do use the PPA route, remember that you can always fall back to the recommended driver if a newer version misbehaves. Removing the problematic driver and reinstalling the tested one restores stability, so experimenting with newer releases is not a permanent commitment. Knowing this safety net exists makes the more advanced path far less intimidating for the curious.
Pros and Cons of Each Method
Weighing the approaches helps you pick with confidence. The graphical and autoinstall methods are the easiest and safest, choosing a tested driver automatically, which makes them ideal for beginners and anyone who just wants things to work. Their only limitation is less control over the exact version installed.
The command-line and PPA methods offer more control and access to newer drivers, which benefits advanced users, gamers wanting the latest optimizations, or those with specific version needs. The trade-off is a slightly greater risk of instability and a bit more complexity. For most people, the easy method is the right call, with the manual routes reserved for when you have a clear reason to use them.
After Installation: Verify and Troubleshoot
Once the driver is installed and you have rebooted, a quick verification confirms everything is working, and knowing the common fixes handles the occasional hiccup. A little follow-up ensures your NVIDIA GPU is running properly on Ubuntu.
Verifying the Driver Works
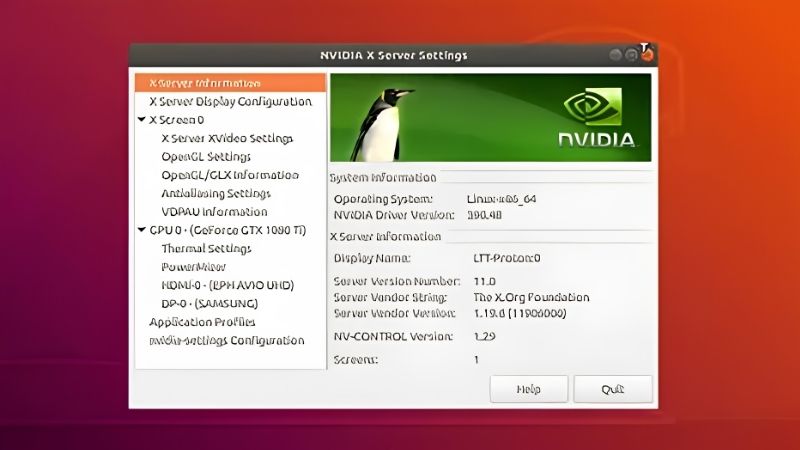
The standard way to confirm success is to open a terminal and run nvidia-smi, which displays your GPU model, driver version, and current usage if the proprietary driver is active. Seeing this output means the installation worked and your card is being used properly.
You can also check your system settings, where the graphics information should now report your NVIDIA GPU rather than a generic or Nouveau entry. If both of these confirm the NVIDIA driver is active, you are all set and can enjoy full performance for gaming, compute, or creative work.
It is a good idea to test something GPU-intensive afterward, such as launching a game or a graphics benchmark, to confirm the driver performs as expected under load, not just at idle. A smooth, high-performance result there is the final proof that everything installed correctly and your NVIDIA card is working to its full potential on Ubuntu.
Fixing Common Problems
The most common issues involve Secure Boot and black screens after installation. If you enabled Secure Boot, you may need to complete the key enrollment prompt during a reboot for the driver to load, which is a normal safeguard rather than an error.
If you encounter a black screen or login loop, booting into a recovery mode or an older kernel and reinstalling or purging and reinstalling the driver usually resolves it. Ensuring your system is fully updated before installing, and using the recommended driver version, prevents most of these problems in the first place, so the easy method remains the safest route for trouble-free results.
If you do run into trouble, the community documentation and forums are extensive, and the fix is often a single well-documented command away. Because Ubuntu and NVIDIA drivers are so widely used together, almost any error message you encounter has a known solution, so a calm search usually turns up the exact steps to get back to a working desktop.
Frequently Asked Questions About Installing on Ubuntu
These quick answers resolve the questions that most often come up when installing NVIDIA drivers on Ubuntu.
Do I need to remove Nouveau first? No. The recommended installation methods handle switching from Nouveau automatically, so you do not need to remove it manually.
Which method should a beginner use? The Additional Drivers tool or sudo ubuntu-drivers autoinstall is easiest and safest, choosing a tested driver for your card automatically.
See More:
- NVIDIA
- NVIDIA DeepStream
- NVIDIA GPU driver update
- NVIDIA GeForce NOW download
- NVIDIA RTX A2000 12GB driver
Final Thoughts on Installing NVIDIA Drivers on Ubuntu
Choosing to install NVIDIA drivers on Ubuntu unlocks the full performance and features of your graphics card, replacing the limited default with proper acceleration for gaming, compute, and creative work. For most users the graphical Additional Drivers tool or a single autoinstall command is all it takes, while advanced users can reach for the command line and PPA when they need specific or newer versions. Verify with nvidia-smi, handle Secure Boot if prompted, and start with the recommended graphical method, verify the result, and reach for the command line only when you have a clear reason. Do that and you will have a stable, high-performance NVIDIA setup on Ubuntu with far less hassle than the intimidating forum threads suggest, ready for gaming, compute, or creative work.
As an Amazon Associate we earn from qualifying purchases at no extra cost to you.



Write Your Review
No reviews yet. Be the first to share your experience!