
how to update Nvidia app is one of those small tasks that quietly decides whether your games run smoothly or stutter through the next big release. An out-of-date Nvidia app means missing Game Ready drivers, skipped bug fixes, and no access to the newest DLSS 4 features on your RTX card. The good news is that updating takes only a few minutes once you know the correct order to do it in. Most people who run into trouble simply do the steps out of sequence or update while a game is still running, and both are easy to avoid. This step-by-step guide walks you through the whole process cleanly, flags the mistakes that trip people up, and gets you back to gaming fast — no video scrubbing required.
What You Need Before You Update The Nvidia App
Updating is simple, but a little preparation prevents the two or three snags that cause most failed updates. Gather these basics first and the rest of the process becomes friction-free, whether you are on a fresh install or a machine that has not been touched in months.
Confirm Your GPU And A Stable Setup
First, make sure you actually have an Nvidia GeForce GPU. The Nvidia app manages GeForce RTX and GTX cards; if your system uses only integrated graphics from Intel or AMD, this guide will not apply to you.
A stable internet connection matters more than people expect, since driver packages are large and a dropped download is the single most common cause of a stalled update. If your Wi-Fi is unreliable, a wired connection for the duration of the update is worth the minor hassle.
Close your games and any GPU-heavy apps before you start. Updating while a game or a rendering app is running can lock driver files, which forces the installer to fail and makes you start the whole process over.
Tools And Extras Worth Having On Hand
For a routine update you need nothing beyond the Nvidia app itself. But two optional tools make the process smoother if something ever goes wrong, and both are cheap insurance for any PC owner.
A reliable USB flash drive is handy for keeping a copy of your current working driver, so you can roll back quickly if a new release misbehaves in your favourite game. A dependable USB 3.2 drive is inexpensive and endlessly useful beyond just drivers.
If you are troubleshooting a stubborn driver rather than doing a routine update, a clean-uninstall utility can help strip out old files completely — more on that later. For a normal update, though, you will not need it, so do not over-complicate things.
Back Up Your Current Driver Version
Before any update, note your current driver version. Open the Nvidia app, go to the Drivers tab, and record the version number shown there in case you need to return to it.
This takes ten seconds and saves real frustration. If a new driver causes issues, you will know exactly which version was stable and can reinstall it deliberately rather than guessing.
Owners who game competitively should be especially diligent here, since a driver regression in a fast-paced title can cost you frames at the worst possible moment. A recorded baseline turns a scary problem into a quick fix.
Step-By-Step Guide To Update The Nvidia App And Drivers
Here is the full process as a clear numbered sequence. Follow it in order — app first, drivers second, verification last — and you will have the latest software installed without any guesswork or trial and error.
Updating The Nvidia App Itself
Start with the application before the drivers, because the app is the tool that fetches and installs everything else. These four short steps take under a minute and set up a clean driver install.
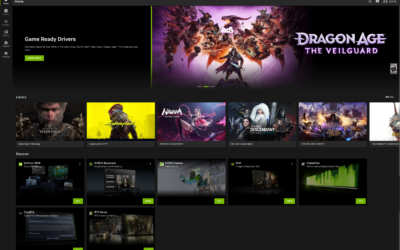
- Open the Nvidia app. Launch it from the Start menu or the system-tray icon near the clock. Keeping the app itself current is what ensures the driver-update tools actually work.
- Open Settings. Click the gear icon in the bottom-left corner of the window. This is where the app version and its update controls live.
- Check the About section. Scroll to About; if a newer app version is available, an Update button appears. Click it and let the app update itself completely before you touch any drivers.
- Restart the app if prompted. Some app updates need a quick relaunch to finish applying. Allow it — this clears the way for a clean driver install in the next stage.
Updating the app first matters because an outdated app can fail to detect or install the newest drivers, producing a confusing “no update found” message. Always complete this step before the driver step below.
Downloading And Installing The Latest Game Ready Driver
With the app itself current, the driver update is the part that actually boosts your gaming performance. Work through these five steps in order and do not rush the final one.
- Go to the Drivers tab. With the app current, open the Drivers tab at the top of the window. The app will check for the newest release automatically.
- Choose Game Ready or Studio. Gamers should pick the Game Ready Driver; creators doing serious video and 3D work may prefer the Studio Driver for its stability focus. Pick the one that matches how you use your PC.
- Click Download. The package downloads in the background. Do not launch a game while this runs, as it can interrupt the download and force a restart.
- Select Express Installation. Express keeps your existing settings and is the right choice for almost everyone. It handles the entire install cleanly with a single click.
- Let your screen flicker and wait. The display may go black briefly as the new driver loads — this is completely normal. Do not touch anything until the app confirms the install has finished.
Once it reports success, you are done. Your RTX card now has the newest optimisations and full DLSS 4 support for the latest games, and any recent stability fixes are applied.
Verifying The Update Worked
Return to the Drivers tab and confirm the version number now matches the newest release. This quick check ensures the install actually applied rather than silently failing partway through, which occasionally happens after an interrupted download.
For peace of mind, launch a game and confirm everything runs normally. If performance looks right and there are no visual glitches or crashes, your update is complete and healthy.
If something does look off, this is the moment your recorded baseline version earns its keep — you can roll back immediately instead of troubleshooting blind.
Pro Tips And Mistakes To Avoid When Updating
A few simple habits separate a smooth two-minute update from a frustrating afternoon of troubleshooting. These are the tips experienced RTX owners rely on and the errors that newcomers make most often, so read them before your next update.
Expert Tips For A Clean Update Every Time
Update after a major game launches, not right before you sit down to play it. Game Ready drivers are frequently released alongside big titles, and installing them ahead of a play session avoids launch-night stutter and last-minute surprises.
Use Express Installation unless you have a specific reason not to. It preserves your custom settings and avoids the misconfigurations that a manual “clean install” can introduce for users who do not need one.
Keep one known-good driver saved on that USB drive mentioned earlier. Having a working version physically on hand turns a bad update into a five-minute fix rather than a stressful search for the right file later.
Finally, restart your PC once after a driver update even when the installer does not force it. A clean reboot clears any lingering processes from the old driver and is the simplest way to make sure the new version is fully active before you start a demanding game.
Common Mistakes That Break The Update
The biggest error is updating with a game or GPU-heavy app still running in the background. Locked files cause failed installs and, occasionally, a driver that must be fully removed and reinstalled from scratch.
Another frequent mistake is ignoring the app update and jumping straight to drivers. An outdated app is a leading cause of the “no new driver found” message even when a new driver clearly exists on Nvidia’s servers.
Finally, do not force-quit the installer when the screen flickers and goes dark. That flicker is simply the driver loading; interrupting it is the fastest way to corrupt the install and create the very problem you were trying to avoid.
See More:
- RTX 4060 vs RTX 5060
- M4 GPU benchmark
- RTX 5060 Ti benchmark
- 5060 Ti 16GB vs 9070 XT
- RTX 5050 vs RTX 5060
When You Should Skip Or Delay A Driver Update
Not every update is urgent, and chasing every release is unnecessary. If your current driver is stable and you are not playing any newly launched games, there is no harm in waiting a week for early-adopter reports to surface any issues.
Occasionally a fresh driver introduces a regression in one specific game. Checking community feedback for a day or two before updating can spare you from a buggy release, which is exactly why keeping that backup driver on hand is so valuable.
Use judgment rather than habit: update promptly when a game you play adds DLSS 4 support or a performance fix, and hold off when the changelog does not affect anything in your library.
Now that you know how to update Nvidia app software and its Game Ready drivers from start to finish, you can keep your RTX card running at peak performance with just a few minutes of routine maintenance. A current driver means smoother frame rates, fewer bugs, and full DLSS 4 support for every new release. To make future updates and rollbacks completely painless, grab a dependable USB drive to store your working drivers — check the recommended option through the link below.
Frequently Asked Questions
How do I update the Nvidia App itself?
The Nvidia App checks for its own updates automatically and prompts you when a new client build is available. You can force it by opening the app, going to Settings, then About, and selecting the check for updates option. Alternatively download the latest installer directly from nvidia.com and run it over the existing installation.
What is the difference between updating the app and updating drivers?
They are separate things. The Nvidia App is the client software that manages settings, game optimisation and recording, while the display driver is the low-level GPU software. Updating the app does not update your driver. Use the Drivers tab within the app to download and install new Game Ready or Studio driver releases.
Should I choose Game Ready or Studio drivers in the app?
Choose Game Ready if you primarily play games, as it delivers day-one optimisation for new releases. Choose Studio if you rely on video editing, 3D rendering or AI applications, since that branch updates less frequently and prioritises application stability and certification. You can switch branches within the app’s driver settings.
Why is the Nvidia App failing to install or update?
The most common causes are a leftover GeForce Experience installation conflicting with the new client, insufficient permissions, or antivirus software blocking the installer. Try uninstalling GeForce Experience, running the installer as administrator, and temporarily pausing third-party security software. A pending Windows update can also block driver package installation.
Does the Nvidia App replace the Nvidia Control Panel?
It largely does. The Nvidia App consolidates GeForce Experience features with most Control Panel 3D settings, display configuration and video options into a single modern interface. A few legacy options still live in the classic Control Panel, but Nvidia has been migrating them steadily into the app.
As an Amazon Associate we earn from qualifying purchases at no extra cost to you.




Write Your Review
No reviews yet. Be the first to share your experience!