Top Overclock Gpu Safely Complete Step Picks for 2026
Here are our current top overclock gpu safely complete step picks, compared on real Amazon owner reviews, price, and features. Live prices update below.


GPU Sag Holder Bracket, Graphics Card Brace Support, Universal VGA/ Video Card Stand, All Aluminum Alloy with Magnetic Base (S, Black)


How to overclock gpu is the ultimate question for gamers who want to squeeze maximum performance out of their rigs without spending a dime. Are you tired of stuttering gameplay, low frame rates, and lag during intensive battles? You don’t need to purchase an expensive new graphics card just yet. This complete guide will walk you through the entire process safely, easily, and efficiently. By following our clear instructions, you will unlock hidden power in your hardware, elevate your gaming experience, and master the art of fine-tuning your system like a professional. Let’s dive in and transform your gaming setup today.
Why You Should Learn How to Overclock GPU in Today’s Market
Before diving into the technical steps, it is essential to understand why optimizing your hardware is more critical now than ever before. The global tech landscape is shifting rapidly, directly influencing how we purchase, maintain, and upgrade our systems. By understanding the broader economics of computer hardware, you can make smarter decisions about your gaming setup. Overclocking is no longer just a hobby for hardcore tech enthusiasts; it has become a necessary skill for mainstream gamers looking to extend the lifespan of their current components while dodging market inflation and global supply chain challenges.
How to Overclock GPU to Beat Rising Hardware Prices
Recent market intelligence highlights a worrying trend: the prices of gaming laptops and desktop components are expected to continue rising. Global inflation, supply chain bottlenecks, and increased manufacturing costs mean that buying a brand-new graphics card is becoming financially unrealistic for many everyday gamers. When a mid-range upgrade costs a small fortune, finding alternative ways to boost your system’s performance becomes an absolute priority for budget-conscious PC builders.
This is exactly where learning how to overclock gpu comes in as a game-changing financial strategy. By safely pushing your existing graphics processor beyond its factory settings, you can achieve a performance boost equivalent to moving up a tier in GPU models. Instead of spending hundreds of dollars on a hardware upgrade, you can unlock up to fifteen percent more frames per second entirely for free.
The Global Chip Market and Nvidia Availability Shifts
Another massive factor influencing the PC gaming market is the geopolitical shift in semiconductor distribution, notably the news that China is allowed to buy Nvidia chips again. This policy shift has massive implications because when a massive market like China gains access to high-demand graphics processors, global demand spikes instantly. This surge in demand creates a ripple effect, reducing stock availability and driving up retail prices for gamers in North America, Europe, and Asia.
Because global supply is being stretched across massive international markets, getting your hands on a premium graphics card at recommended retail price is becoming incredibly difficult. Since you cannot easily buy a replacement card without facing scalper prices, optimizing the hardware currently sitting in your PC case is the most logical path forward. Overclocking allows you to bridge the performance gap and keep playing the latest modern games without competing in a chaotic global market.
The Essential Pros and Cons of Overclocking Your Graphics Card
Before modifying your hardware settings, you must weigh the clear advantages against the potential risks involved in the process. The primary benefit of learning how to overclock gpu is a direct, noticeable increase in gaming performance and smoother rendering in creative applications. You will experience higher frame rates, reduced input lag, and a much more fluid visual experience in fast-paced competitive titles.
On the flip side, running your graphics card at higher speeds generates more thermal output and increases overall power consumption. If you do not have adequate cooling or a reliable power supply, your system may experience crashes, visual artifacts, or thermal throttling. It is important to realize that while modern GPUs have built-in safety mechanisms to prevent physical damage, reckless adjustments can still cause system instability.
What You Will Need to Prepare Before You Begin
Achieving a successful and stable system modification requires a combination of reliable software utilities and robust hardware foundations. You should never attempt to adjust your graphics card parameters without preparing the proper environment first. Having the right tools on hand not only makes the process smoother but also protects your computer from unexpected power surges or thermal issues. Let’s look at the essential software packages and physical upgrades you need to secure before adjusting any sliders on your control panel.
Essential Software to Learn How to Overclock GPU Safely
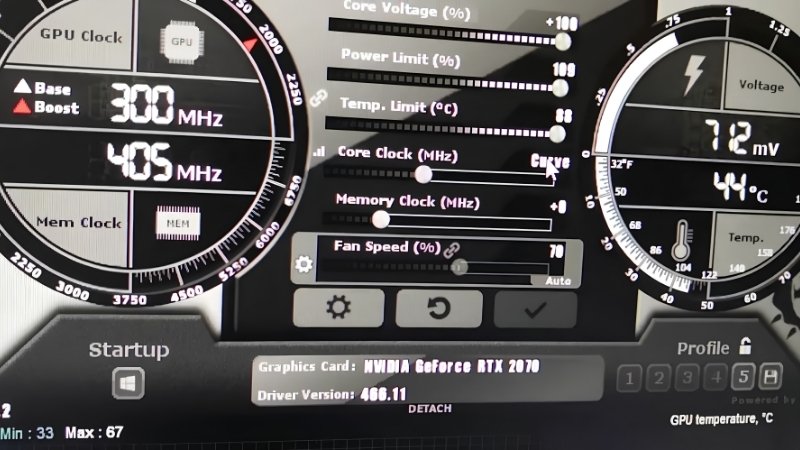
The most critical tool in your arsenal is a reliable hardware monitoring and utility software, with MSI Afterburner being the industry gold standard. This free application allows you to adjust voltage, power limits, fan speeds, and core frequencies with absolute precision while tracking real-time statistics. To monitor these stats while gaming, you will also want to install the RivaTuner Statistics Server, which displays on-screen frames per second and temperatures.
Additionally, you will need demanding benchmark software to stress-test your graphics card and verify stability under heavy workloads. Applications like Unigine Heaven, Unigine Superposition, or 3DMark are perfect for pushing your GPU to its absolute limits in a controlled environment. Before downloading these tools, ensure your operating system and graphics drivers are fully updated to prevent software conflicts during your testing phase.
Critical Hardware Upgrades for Thermal Management
When you push your graphics processor to run faster, it naturally generates a significant amount of additional heat that must be dissipated quickly. High-quality thermal paste is the most affordable and impactful upgrade you can make to improve heat transfer between the GPU chip and its heatsink. Over time, factory-applied thermal paste dries out and loses its effectiveness, making it highly beneficial to replace it with a premium compound. You should browse Amazon for top-tier thermal compounds to lower your operating temperatures instantly.
In addition to thermal paste, maintaining excellent airflow inside your computer case is vital for preventing heat buildup around your components. Adding extra high-performance intake and exhaust fans to your PC chassis will create a continuous stream of cool air that directly benefits your graphics card. If you want to optimize your case’s thermal dynamics, take a look at the quietest high-airflow PWM fans on Amazon to keep your system whispering quiet.
Power Supply Considerations for Demanding Overclocks
Driving your graphics card beyond its default limits requires a steady, clean supply of electrical power from your system’s power supply unit. If your power supply is rated too low or lacks high-quality internal components, your computer will shut down or reboot when the GPU demands extra wattage. You must check your power supply’s total wattage capacity and its efficiency rating to ensure it can handle the extra thermal and electrical load.
A reliable, gold-rated power supply is the unsung hero of any high-performance PC setup, protecting your expensive components from power fluctuations. If your current power supply is outdated or running close to its maximum capacity, upgrading is a highly recommended safety measure. We suggest exploring highly rated modular power supplies on Amazon to guarantee clean, efficient energy delivery for your newly boosted gaming system.
Step-by-Step Instructions on How to Overclock GPU Safely
Now that your hardware is properly cooled and your software toolkit is ready, it is time to begin the actual step-by-step optimization process. This phase requires patience, precision, and close attention to detail to ensure you do not push your system past its stable limits. Always remember to take small steps and test your settings thoroughly at every stage of the process. By following this structured sequence, you will safely find the perfect balance between high performance and reliable system stability.
Step 1 and Step 2: Establish Your Baseline and Set Power Limits
- Step 1: Run a baseline benchmark to record stock performance. Launch your benchmark software, such as Unigine Heaven, and let it run at your native resolution for fifteen minutes. Note down your average frame rate, minimum frame rate, and maximum GPU temperature during the run to serve as a reference point. This benchmark acts as your safety net, allowing you to measure exactly how much performance you gain later.
- Step 2: Increase power and temperature limits in your tuning software. Open MSI Afterburner and locate the “Power Limit” and “Temp Limit” sliders, which are typically linked together by default. Slide both of them to their maximum values to allow your graphics card to draw more power and run slightly warmer before throttling. This step is completely safe because modern cards have hardcoded internal limits that prevent them from reaching dangerous levels.
Step 3 and Step 4: Increment Core Clock and Test Stability
- Step 3: Adjust the core clock slider in small, controlled increments. Increase your core clock frequency by +50MHz, click the checkmark to apply the settings, and immediately launch your benchmark software again. Let the benchmark run for a few minutes while carefully watching the screen for any visual glitches, stuttering, or crashes. If the benchmark runs smoothly without any issues, you are ready to push the clock speed a bit further.
- Step 4: Continue increasing core clock by +10MHz and testing. If your system is stable, close the benchmark, increase the core clock by another +10MHz, and run the test again. Repeat this iterative process until you experience a benchmark crash, a system freeze, or see visual anomalies like flashing lights or weird shapes. Once this happens, reduce your core clock by -20MHz to find your safe, stable operating zone.
Step 5 and Step 6: Adjust Memory Clock and Save Profiles
- Step 5: Overclock your video memory clock speed using a similar process. Once your core clock is stable, you can begin adjusting the memory clock slider in larger increments of +100MHz. Run your benchmark after each adjustment to check for performance scaling, as memory overclocks can sometimes cause performance drops before crashing. Continue increasing this value until you spot artifacts or experience instability, then back down by -50MHz for safety.
- Step 6: Save your stable settings to a profile and configure startup options. Click the floppy disk icon in MSI Afterburner, select a profile slot, and save your customized settings so you do not lose them. You can also toggle the startup button to apply these optimized settings automatically every time your computer boots up. This ensures your system is always running at its maximum potential without requiring manual adjustments.
To guarantee that your system is truly stable for daily use, it is highly recommended to perform a long-term stress test. Run your favorite demanding modern games for at least two hours while keeping your monitoring software open to watch for unexpected behavior. If your system passes this extended gaming session without a single crash or graphical glitch, you have successfully unlocked free performance.
Pro Tips for Achieving Maximum Stability
To get the absolute most out of your system, always customize your GPU fan curve in MSI Afterburner to keep temperatures below seventy-five degrees Celsius. Running your fans slightly louder is always preferable to letting your expensive graphics processor run hot. Additionally, keep a written log of your stable offset values so you can easily restore them after updating your graphics drivers. Finally, remember to clean the dust out of your PC case regularly, as accumulated dust acts as an insulator and can quickly undo all your thermal management efforts.
Common Overclocking Mistakes to Avoid
One of the most frequent mistakes beginners make is rushing through the process by increasing clock speeds in massive jumps instead of small increments. This impatient approach makes it incredibly difficult to isolate the exact frequency that caused your system to crash. Another common pitfall is ignoring VRM (Voltage Regulator Module) and memory temperatures, as these components can overheat even if the main core temperature looks fine. Lastly, never apply your overclock settings to apply on startup until you have thoroughly tested them for several days across multiple demanding games.
Conclusion
Mastering how to overclock gpu is an incredibly rewarding skill that empowers you to take full control of your gaming experience. By following this guide, you have successfully bypassed expensive hardware upgrades and squeezed incredible value out of your current computer rig. As global component prices continue to rise and availability fluctuates, taking care of your existing hardware becomes your most valuable defense. To ensure your newly optimized graphics card enjoys a long, stable life, head over to Amazon to pick up high-quality thermal pastes, powerful case fans, or premium cooling pads today. Taking action now to protect your hardware investment will keep your system running beautifully for years to come.
Recommended Products

PNY GeForce RTX™ 4060 8GB XLR8 Gaming Verto™ Dual Fan OC Graphics Card DLSS 3 (128-bit, PCIe 4.0, GDDR6, HDMI/DisplayPort, Supports 4k, 2 Slot)

ASUS ROG Strix GeForce RTX 4080 Super OC Edition Gaming Graphics Card (PCIe 4.0, 16GB GDDR6X, DLSS 3, HDMI 2.1a, DisplayPort 1.4a, Vapor Chamber, Massive Vented Backplate, Power Sensing, Aura Sync)

Prime GIGABYTE AORUS GeForce RTX 4080 Super Master 16G Graphics Card, 3X WINDFORCE Fans, 16GB 256-bit GDDR6X, GV-N408SAORUS M-16GD Video Card
As an Amazon Associate we earn from qualifying purchases. Product prices and availability are accurate as of the date/time indicated.
Related Reviews
- GPU Sag Bracket Review: Do You Really Need One in 2026?
- How to Update Graphics Card: Ultimate Step-by-Step Guide
- How to Turn Off Nvidia Overlay A Complete Step-by-Step Guide
Frequently Asked Questions
What is the best how overclock gpu in 2026?
The best how overclock gpu depends on your budget and how you plan to use it. The options compared above are our top-rated picks based on real customer ratings, build quality, and overall value — start with the highest-rated model that fits your budget.
How much should I expect to spend on a how overclock gpu?
Prices vary by brand and features. Budget options cover the essentials, while mid-range and premium models add durability, performance, and extra features. Compare the prices in the list above to find the best value for your needs.
What should I look for when buying a how overclock gpu?
Focus on what matters most for your use case — build quality, compatibility, performance, warranty, and verified customer reviews. Every pick above is selected to balance these factors.
Are budget how overclock gpu options worth it?
Yes. For most people a well-reviewed budget or mid-range how overclock gpu delivers excellent value. You only need to spend more if you specifically require premium materials or top-tier performance.
How did we choose these how overclock gpu picks?
We compare current Amazon ratings, review counts, key features, and price to surface the options with the best real-world value. The list is refreshed as ratings and availability change.
Top picks from this guide
ASUS ROG Strix GeForce RTX 4080 Super OC Edition Gaming…$1,860 \xc2\xb7 98/100 nkomaxGraphics Card GPU Brace Support, Video Card Sag Holder Bracket,…$9 \xc2\xb7 98/100PNYPNY GeForce RTX™ 4060 8GB XLR8 Gaming Verto™ Dual Fan…$425 \xc2\xb7 98/100AVERZELLAGPU Sag Holder Bracket, Graphics Card Brace Support, Universal VGA/…$9 \xc2\xb7 97/100


Write Your Review
No reviews yet. Be the first to share your experience!