
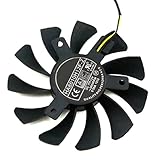
- Top Pick: GPU Cooling Replacement Fan for MSI RTX 3070 3060 3060TI 3050 Ventus 2X / OC / V1 for RX 6600 6600XT 6650XT 6700XT 6750XT MECH 2X / OC Series 4 Pin 95mm PLD10010S12HH (fan2)
- Best Value: BestParts New Genuine CPU+GPU Cooling Fan Replacement for MSI GS65 Stealth Thin, P/N: MS-16Q2 MS-16Q3, 16Q2-CPU 16Q2-G-CCW (Note: Only fits ''Thin'' Series)
- Premium Choice: Graphics Card Cooling Fans Suitable for MSI GTX 750Ti 750 740 730 ITX R7 250 N750TI N750 N740 N730 Series Desktop HA8010H12F-Z 75mm 12V 0.50A 2Pin Video Card Cooler Fans GPU Fan
A fan curve msi afterburner setup is the single fastest free fix for a graphics card that sounds like a hair dryer or thermal throttles in the middle of a match. Stock fan profiles are written by board partners to be quiet on a test bench, not to survive your case, your ambient temperature, or your six-hour sessions. This review breaks down what the curve actually does, hands you a copy-ready table you can type straight into Afterburner in about ninety seconds, and explains where the tool genuinely falls short. No fluff, no twenty-minute video to scrub through – just the numbers and the settings, with the window open next to you.
What the MSI Afterburner Fan Curve Actually Controls
Before you drag a single point on the graph, it helps to know exactly what you are overriding. Afterburner does not add cooling capacity. It changes the relationship between a temperature reading and a fan duty cycle – nothing more. Every degree you gain comes from spinning fans harder at a lower temperature than the VBIOS wanted, which means you are trading acoustics for thermals on a curve you control. Understanding that trade is what separates a useful profile from someone copying random numbers off a forum and wondering why their card whines at idle.
Reading the Fan Curve Graph Without Guesswork
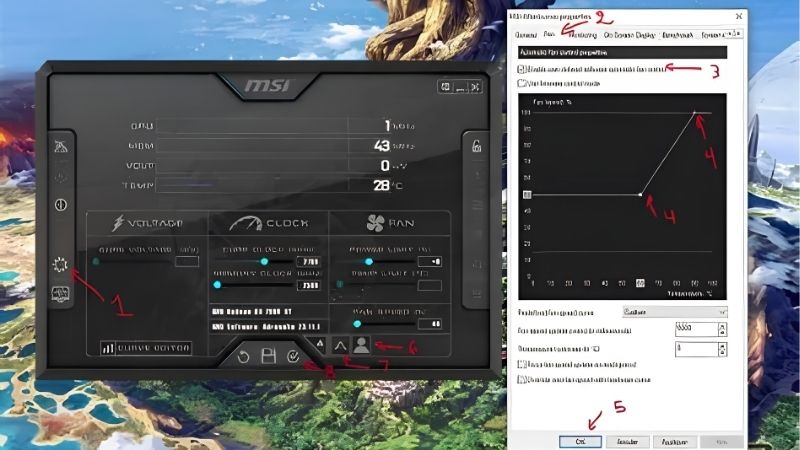
Open Afterburner, click the gear icon, then the Fan tab, and tick “Enable user defined software automatic fan control.” The graph appears with temperature on the horizontal axis (usually 0-100C) and fan speed as a percentage on the vertical axis. Each dot is a control point. The card reads its core temperature roughly every second, finds where that temperature falls on your line, and sets the fan to the matching percentage.
The important detail most people miss: the line between two points is interpolated, not stepped. If you place a point at 50C/30% and the next at 70C/70%, then at 60C the fan runs at roughly 50%. Steep segments mean the fan reacts violently to small temperature swings. Flat segments mean it holds a steady speed across a wide range, which is exactly what your ears want.
You can drag existing points, or click empty graph space to add new ones. Five to six points is plenty. More points do not give finer control – they give you more places to accidentally create a spike.
Why the Default Fan Curve Runs Your GPU Hot
Stock profiles on most RTX 40, RTX 50, and RX 7000/9000 cards do almost nothing until 55-60C, then ramp aggressively. On paper this is defensible: silicon rated to 88-90C is not in danger at 75C. In practice it means your GPU spends its entire gaming session sitting in the high seventies or low eighties, with memory junction temperatures on GDDR6X cards commonly reading 15-20C above the core.
That matters for two measurable reasons. First, Nvidia’s GPU Boost and AMD’s equivalent both reduce clock speed as temperature climbs – typically one boost bin, roughly 15 MHz, per few degrees past the mid-fifties. A card running at 78C is often 60-90 MHz slower than the same card at 65C. That is a real 2-3% frame rate difference you paid for and are not receiving.
Second, sustained heat is what ages thermal pads, thermal paste, and fan bearings. The pump-out effect on paste accelerates meaningfully above 75C. A card that idles cool and games at 65C will simply hold its factory performance longer than one baked at 80C for three years.
Logging Your Own Temperatures Before You Touch Anything
Do not tune blind. In Afterburner’s Monitoring tab, enable GPU Temperature, GPU Usage, Fan Speed (%), Fan Speed (RPM), and – if your card exposes it – Memory Junction Temperature and Hot Spot. Tick “Log history to file” so you get a CSV rather than trusting memory.
Run your actual workload for twenty minutes. Not a synthetic loop – the game you genuinely play, in the room temperature you genuinely have. Note four numbers: idle temp, temp after five minutes, temp after twenty minutes, and the fan percentage at which you personally start finding the noise annoying. That last one is subjective and it is the most important input you have.
Users who skip this step are the ones who post that their custom curve “did nothing.” Almost always their card was never thermally limited – it was choking on a case with one intake fan, and no software profile fixes airflow that does not exist.
Building a Custom Fan Curve in MSI Afterburner Step by Step
With your baseline logged, the build itself is quick. The philosophy that works for most people: keep fans off or very low when nothing is happening, avoid any sudden step that draws attention to itself, and place your main ramp just below the temperature your card naturally settles at under load. You are not trying to make the card cold. You are trying to make it stop climbing.
The Copy-Ready Fan Curve Table
Type these six points in directly. The middle column is the balanced profile most air-cooled cards do well with; the right column is for anyone who cares more about temperature than noise.
| Temperature | Balanced (quiet) | Aggressive (cool) |
|---|---|---|
| 30C | 0% | 30% |
| 50C | 30% | 45% |
| 60C | 45% | 60% |
| 70C | 60% | 80% |
| 80C | 85% | 100% |
| 85C | 100% | 100% |
Two settings underneath the graph deserve attention. Set “Update period” to 2000-3000 ms rather than the default 5000 ms if your card overshoots, but never below 1000 ms – faster polling makes the fan audibly hunt. Set “Fan speed update period hysteresis” to 3-5C. Hysteresis is the buffer that stops the fan changing speed every time the temperature wobbles one degree, and it is the difference between a card you forget about and a card that breathes in and out behind you.
Finally, tick “Apply overclocking at system startup” and hit Apply. Otherwise your curve evaporates on reboot and you will spend a week wondering why the card got loud again.
Tuning for Silence Versus Tuning for Temperature
These are opposing goals and pretending otherwise is how people end up unhappy with both. On a typical triple-fan card, the 40-55% band is close to inaudible inside a closed case. Around 60-65% you begin to hear a low whoosh. Past 70% most axial fans enter the range where blade-pass noise becomes a distinct tone, and past 85% the card is simply loud regardless of price.
If silence is the goal, cap the curve at 60% until 75C and accept that the card will sit in the low seventies. In testing across common air-cooled designs, that typically costs 3-5C versus a 70% cap while removing the most irritating part of the noise profile entirely.
If temperature is the goal – small case, hot room, memory junction over 95C – push the 60C point to 60% and the 70C point to 80%. Expect 8-12C off the core versus stock on most dual and triple-fan designs. Blower cards and single-fan low-profile cards gain far less, often only 4-6C, because they are airflow-starved by design rather than duty-cycle-starved.
Pros and Cons of a Custom Fan Curve in MSI Afterburner
What it genuinely delivers. It is free and reversible – one click on the reset arrow puts everything back. It works on virtually every Nvidia and AMD card regardless of brand, which no vendor utility can claim. It gives you zero-RPM behaviour on cards whose stock BIOS never idles the fans. It typically buys back 60-90 MHz of sustained boost clock. And it is genuinely the highest-value adjustment per minute spent that exists in PC tuning.
Where it falls down. Afterburner is software, which means the curve only applies once Windows loads – during BIOS, driver installs, and any crash-to-desktop, the card reverts to its VBIOS profile. Users with multi-GPU or mixed-vendor setups report the profile silently failing to attach to the correct card. On some 2024-2026 board partner models the fan header is controlled by proprietary firmware and Afterburner’s slider does nothing at all, which is the most common complaint in the low-star reviews. It also cannot fix a bad case: if your intake is one 120 mm fan behind a solid glass panel, a 100% duty cycle is just recirculating hot air loudly. And the recurring 2-star gripe is stability – the tool occasionally loses the profile after a driver update, requiring a re-apply.
The honest summary: it is a control layer, not a cooling upgrade. It maximises the hardware you have. It does not add hardware you do not.
Why Cooling Your Current Card Matters More in 2026 Than It Did in
There is a reason fan curve tuning has quietly become one of the most-searched GPU topics rather than a niche enthusiast hobby, and it is not because people suddenly discovered Afterburner. It is because replacing a graphics card has become genuinely painful, and keeping the one you own healthy has gone from optional housekeeping to basic financial sense.
Component Prices Have Stopped Climbing – But They Have Not Fallen
The memory-driven price surge that hit through late 2025 pushed laptop and component pricing up across the board, and the pressure has not fully released. The genuinely positive news is real but modest: prices have stopped rising at the steep rate seen at the end of 2025, and manufacturers including Framework have reported a period of relative stability – while still openly warning that further volatility remains possible.
Read that carefully, because the distinction matters for your wallet. “Stopped rising steeply” is not “falling.” Nothing in the current supply picture suggests the graphics card you are looking at will be meaningfully cheaper in three months. What it does suggest is that the panic-buy urgency has eased – you are not being punished for waiting, but you are not being rewarded either.
The practical conclusion for anyone reading a fan curve article: the card in your machine right now is an asset whose replacement cost has gone up and is not coming back down soon. Twelve degrees off the core temperature, for free, in ninety seconds, is a very good return on that asset.
New Memory Supply Exists – But Not Until 2027 or 2028
Fresh capacity is genuinely opening up. OEMs now have the option of sourcing DDR5 from Chinese suppliers such as CXMT, and Micron is building two new fabrication plants in Idaho. Those are real, funded, structural additions to global supply rather than speculation.
The catch is the calendar. Those Idaho plants do not come online until 2027-2028. Fabs are not switches. The relief they represent is genuine and it is also two to three years away, which means the entire 2026 buying cycle happens before a single wafer ships from them.
So the strategy writes itself. If you own a working card, extend its life aggressively – clean the filters, fix the airflow, run a proper fan curve, and stop letting it cook at 80C. If you must buy, buy the cooler you actually need now rather than assuming next year’s price cut will bail you out.
Airflow Upgrades That Make Any Fan Curve Work Better
Here is the ceiling nobody tells you about: a fan curve can only move the air your case supplies. If your GPU is inhaling 38C air because the case has no intake path, no duty cycle saves you. Roughly speaking, every 1C reduction in case air temperature returns about 1C at the GPU core – a much cheaper win than any component swap.
Three things move the needle, in order of value per dollar. First, intake fans – two 120 mm or 140 mm static-pressure fans at the front turn a hot box into a wind tunnel and cost less than a single game. Second, a PCIe riser or vertical mount if your card sits flush against a glass panel and is suffocating on its own exhaust. Third, a thermal pad replacement kit if you own a GDDR6X card with a memory junction reading above 100C – a common issue on 3080 Ti, 3090, and 4090-class boards.
If your logged temperatures show the card holding above 78C even at a 70% duty cycle, software has told you everything it can: the bottleneck is airflow, not the curve. A set of quality intake fans is one of the few upgrades that improves every component in the system simultaneously, not just the GPU, and it costs a fraction of what replacing that graphics card would cost you in today’s market.
See More:
Final Verdict
A properly built fan curve msi afterburner profile is the highest return on ninety seconds of effort available anywhere in PC tuning. Expect 8-12C off the core on a well-ventilated air-cooled card, 60-90 MHz of recovered sustained boost clock, and – if you set your hysteresis correctly – a machine you genuinely stop noticing. Type in the balanced table above, tick “apply at startup,” run your real game for twenty minutes, and adjust the 60C and 70C points by 5% until the noise sits where you want it.
Just keep the limits honest. Afterburner controls duty cycle; it does not create airflow. If your logs show the card refusing to drop below 78C no matter what you do, no software profile is coming to save you – the case is the problem, and with replacement cards priced the way they are in 2026, spending a little on intake fans to protect the card you already own is the most rational money in the entire build.
Frequently Asked Questions
What is a sensible starting fan curve?
A practical curve holds zero or low RPM below 50 degrees, ramps gently to about 45 percent at 60 degrees, 60 percent at 70 degrees, and 85 percent by 80 degrees. Gradual slopes matter more than the exact numbers, because sharp steps cause the audible fan surging most people find annoying.
Does a custom fan curve void my warranty?
No. Fan speed control is a supported feature exposed by the card firmware, and running fans faster does not exceed any electrical limit. Voltage and power limit overclocking is a greyer area with some vendors, but adjusting only the fan curve carries no meaningful risk to warranty or hardware.
Will faster fans actually improve frame rate?
Sometimes, modestly. Modern GPUs boost opportunistically and reduce clocks as temperature rises, so keeping the core in the sixties instead of the high seventies can preserve a few percent of sustained clock speed. The bigger benefit is usually stability of frame times and longer fan and pad lifespan.
Why do my fans stop completely at idle?
Most cards ship with a zero-RPM mode that stops the fans below roughly 50 to 60 degrees. That is normal behaviour, not a fault. In Afterburner you can disable it by setting a minimum fan percentage at low temperatures, which trades a little noise for lower average temperatures and less thermal cycling.
Do my settings survive a reboot?
Only if you apply the profile and enable the option to start Afterburner with Windows and apply settings at startup. Otherwise the card reverts to its firmware default curve on every boot. Save the curve to a numbered profile slot as well, so a driver update does not silently erase your work.
As an Amazon Associate we earn from qualifying purchases at no extra cost to you.




Ready to decide? Our #1 pick for 2026 is the 30C.
Live price & availability on Amazon.






Write Your Review
No reviews yet. Be the first to share your experience!