GPU fan rattling is one of the most irritating noises a PC can make, and it usually means one of three things: dust or debris in the blades, a worn bearing, or a fan that has slipped on its mount. The good news is that most rattles are cheap and quick to fix once you identify the source, and many do not require a replacement part at all. The trick is diagnosing correctly before you spend money, since a clean and reseat solves a surprising number of cases. This guide walks through why GPU fans rattle, how to pinpoint the culprit, and how to silence it for good, whether that means a quick clean or a simple fan swap.
Why Is Your GPU Fan Rattling?
A rattle is a mechanical noise, which narrows the cause to the moving parts of the cooler. Before reaching for a replacement, it helps to understand the handful of things that actually produce that sound, because the fix depends entirely on which one you are dealing with. This section covers the common causes and how to recognize each.
Dust and Debris in the Blades
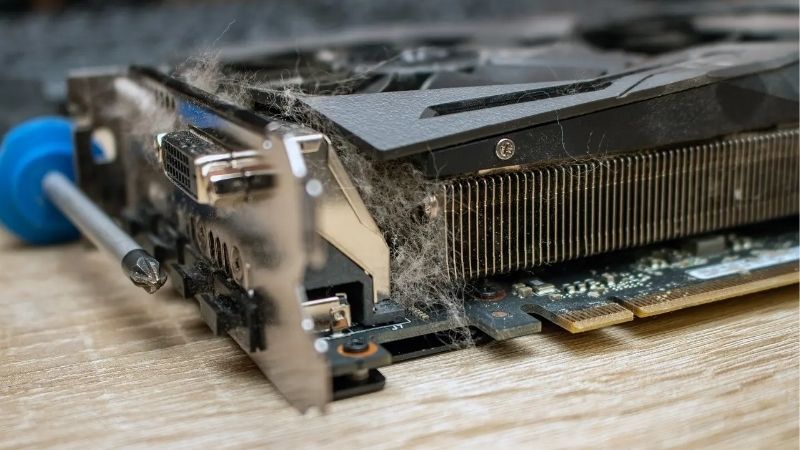
The simplest and most common cause is dust buildup or a stray cable or zip tie catching the blades. Accumulated grime unbalances the fan, while anything physically touching the blades produces an obvious clicking rattle that comes and goes with fan speed.
This cause is the best-case scenario because it costs nothing to fix. A careful clean with compressed air and a check that no cable is fouling the blades resolves a large share of rattles, which is why it is always the first thing to rule out.
Worn or Failing Bearings
If the fan is clean and nothing touches the blades, a worn bearing is the likely cause. Bearings degrade over years of heat and continuous spinning, producing a grinding or rattling noise that worsens over time and is often loudest at startup or low speed.
A failing bearing cannot be reliably repaired and points to a fan replacement. Owners commonly report that a rattle which returns shortly after cleaning, or that grinds rather than clicks, is the bearing rather than debris.
Coil Whine vs Fan Rattle
It is worth ruling out coil whine, which is a different problem with a different fix. Coil whine is a high-pitched electrical buzz from the card’s components, not the fans, and it changes with frame rate rather than fan speed.
The quick test is to watch the relationship to load. A noise that tracks fan RPM is mechanical and points to the fan; a noise that tracks frame rate and persists even when fans are slow is coil whine, which a fan replacement will not cure.
Getting this distinction right before you act saves real money. Owners sometimes buy and fit a replacement fan only to find the noise persists, because the actual source was coil whine all along. Thirty seconds spent checking whether the sound follows fan speed or frame rate prevents that wasted purchase and points you at the correct fix.
How to Diagnose the Rattle
Pinpointing the exact source before acting saves both money and effort. A few minutes of careful observation tells you whether you are facing a free clean, a simple reseat, or a fan replacement. The steps below isolate the cause methodically rather than by guesswork.
Isolate Which Fan Is the Culprit
Most cards have two or three fans, and the rattle usually comes from one. With the case open and proper care, you can briefly stop each fan in turn with a soft tool to hear which one silences the noise, identifying the offender without disassembly.
Knowing the specific fan matters because it tells you exactly which part to clean, reseat, or replace. It also confirms the noise is a fan at all rather than another component, focusing your effort where it counts.
This isolation step is quick but valuable, because it prevents you from cleaning or replacing the wrong fan and being puzzled when the rattle continues. On a triple-fan card especially, the offending fan is not always the one you would guess by ear, so a few seconds of testing each in turn removes the doubt before you commit to any fix.
Clean and Reseat First
Once you know the culprit, clean it thoroughly with compressed air and check that no cable, sticker, or zip tie is catching the blades. Then confirm the fan is seated properly on its mount, since a fan that has worked loose can rattle against the shroud.
This free step resolves dust and debris cases entirely and is always worth doing before spending anything. If the rattle disappears after a clean and reseat, you are done at no cost.
Be thorough rather than quick about it. Hold each fan still while you blast it so the air cleans the blades rather than just spinning them, check the gap between the blades and the shroud for trapped debris, and run a finger gently around the mount to feel for looseness. A rushed clean that misses a lodged particle is the reason some owners wrongly conclude the bearing has failed.
Pros and Cons of Replacing vs Servicing
Servicing first, by cleaning and reseating, costs nothing, carries no risk, and fixes the most common causes, which makes it the obvious starting point. The downside is that it does nothing for a genuinely worn bearing, so a rattle that returns is simply delayed.
Replacing the fan, by contrast, permanently cures a bearing fault and restores quiet operation for years. The trade-offs are the small cost of the part, the need to source the correct fan, and opening the shroud to fit it.
The sensible sequence is to service first and replace only if the noise persists. That order avoids spending on a part you may not need while still committing to a real fix when the bearing has failed.
There is a simple decision rule. If cleaning and reseating silence the rattle, you are done at no cost. If the noise returns within days, or grinds rather than clicks from the moment the fan spins, the bearing is gone and a replacement is the only lasting answer. Following that rule keeps you from either overspending or living with avoidable noise.
Fixing and Preventing a Rattling Fan
When cleaning and reseating do not silence the rattle, a fan replacement is the lasting cure, and choosing the right part is the only tricky step. This section covers how to replace a failed fan, pick a durable one, and keep future noise at bay. The aim is a quiet card that stays quiet.
Replacing a Failed Fan
Swapping a GPU fan is among the easier hardware repairs once you have the correct part. It involves removing a few tiny screws on the shroud, unplugging the old fan, and fitting the new one, all on the cooler rather than near the die, so there is no paste to manage.
The work itself takes under an hour. The real effort is in buying the right fan, matching its diameter, mounting hole spacing, connector type, and blade direction to the original, ideally by reading the part number off the fan sticker.
Choosing a Quality Replacement
Bearing type predicts how long the replacement will stay quiet. Sleeve-bearing fans are cheapest but wear faster, while dual ball-bearing and fluid-dynamic bearing fans hold up far better under the heat and continuous duty inside a GPU shroud.
Owner reviews consistently link the better bearing types to noise that stays gone, whereas the cheapest sleeve fans appear repeatedly in complaints about a rattle returning within a year. Paying a little more for a quality bearing is the difference between a one-time fix and a repeat job.
Match the replacement to the surviving fans where you can. Fitting one quiet, high-quality fan next to two tired originals can leave the card sounding uneven, and the older fans may rattle next. On an aging card, replacing the set at once keeps the noise profile consistent and spares you a second teardown only months later.
Preventing Future Noise
Prevention is mostly about keeping the fans clean. Periodic dusting with compressed air stops the buildup that unbalances blades, and a quick check that no cable can drift into the fan path avoids the easiest rattle of all.
A sensible fan curve also helps, since running fans at lower speeds when temperatures allow reduces wear over time. Combined, these habits keep a healthy fan quiet for years and delay the day a bearing finally wears out.
None of this prevention requires tools or expense, which is what makes it worthwhile. A quick dust every few months and a glance to confirm no cable can drift into the blades cost nothing and address the two most common rattles before they start. For the price of a minute now and then, you keep a quiet card quiet for years.
If your card is rattling, start with a free clean and reseat, then fit a quality replacement fan if a worn bearing is the cause. Match the part carefully and choose a durable bearing for lasting quiet.
See More:
- How to lower GPU temperature
- How to lower GPU hotspot temp
- How to increase GPU performance
- How to enable G-Sync
Conclusion
A GPU fan rattling almost always comes down to dust, a loose mount, or a worn bearing, and diagnosing which one before acting saves both money and effort. Clean and reseat first to cure the easy cases for free, rule out coil whine by checking whether the noise tracks fan speed or frame rate, and replace the fan with a quality ball-bearing or fluid-dynamic part when a bearing has failed. Match the replacement carefully by size, connector, and direction, then keep the fans dusted to prevent a repeat. Silence your card for good through the replacement parts linked above and enjoy quiet, reliable cooling.


Write Your Review
No reviews yet. Be the first to share your experience!