how to check laptop gpu is one of those tasks that sounds technical but takes only a couple of minutes once you know where to look. Whether you are checking a new purchase, troubleshooting a game, or simply curious what graphics card is inside, this guide walks you through it step by step. You will learn the fastest ways to find your GPU on Windows, how to read the specs that actually matter, and which free tools make the whole process effortless.
Why Knowing Your Laptop GPU Matters
Before the steps, it helps to know why this small check is worth doing. Your GPU determines your gaming and creative performance, so identifying it correctly guides everything from in-game settings to upgrade decisions.
What the GPU Actually Controls
The GPU, or graphics card, renders everything visual in games and creative apps. Knowing exactly which one you have tells you what settings and resolutions to expect and whether a game’s requirements match your machine.
It also matters for driver updates, since the right drivers depend on the right GPU. A quick, accurate check saves you from installing the wrong software or chasing performance problems that come down to hardware you misidentified.
In short, your GPU is the part that most directly shapes how games and visual apps run, so a correct identification is the foundation for every performance decision you make afterward, from settings to whether a new title will run well at all. It is also the spec people most often get wrong on a quick glance, so taking a moment to confirm it properly is the difference between guessing and actually knowing what your laptop can handle.
Why the Name Alone Is Not Enough
Finding the GPU name is only half the job, because two laptops with the same chip can perform very differently depending on their TGP, the wattage the laptop feeds the GPU. The name tells you the family; the wattage tells you the real performance.
That is why this guide shows you how to find both the name and the deeper specs. Checking the wattage and the live behavior reveals what your laptop can actually do, not just what its sticker claims.
Treating the name as the full story is the most common reason buyers feel let down, so this guide deliberately goes a step further to show you the wattage and live behavior that reveal your laptop’s true capability. Once you have seen the difference the wattage makes, you will never read a laptop’s graphics listing the same way again, because you will know to look past the badge for the number that actually sets your frames.
When You Should Check
It is worth checking your GPU right after buying a laptop to confirm you received the configuration you paid for, before installing a demanding game, and whenever you troubleshoot performance.
A regular check also helps before selling a machine or comparing it against a new one, since an accurate spec gives you credibility and confidence. In each case, a couple of minutes of verification prevents bigger surprises later.
Making this a quick habit at these moments turns a vague sense of how your laptop performs into concrete knowledge, which is far more useful when you need to troubleshoot, upgrade, or simply decide whether a game will run smoothly. The whole check takes only a couple of minutes, so there is little reason to skip it whenever a question about your laptop’s performance comes up.
What You Will Need to Check Your GPU
You do not need anything special to identify your GPU, just the tools built into Windows plus a couple of free utilities and accessories that make deeper checks easy. Each item below explains why it helps.
Built-In Windows Tools
Windows includes everything you need for a basic check. Task Manager, Device Manager, and the DirectX Diagnostic Tool all reveal your GPU name without any download, and they are the fastest starting point.
These tools are perfect for a quick identification, and they require no setup at all. For the deeper details like live wattage and clocks, you will want a dedicated utility, but the built-in options confirm the name in seconds.
Because these tools ship with every Windows machine, they are also the safest first stop, with no risk of downloading the wrong software. Start here to confirm the name, then move to a dedicated utility only when you need the deeper performance picture. For most casual checks, these built-in options are all you will ever need, and they work the same way on virtually every recent Windows laptop, so the steps stay familiar across machines.
Free Third-Party Utilities
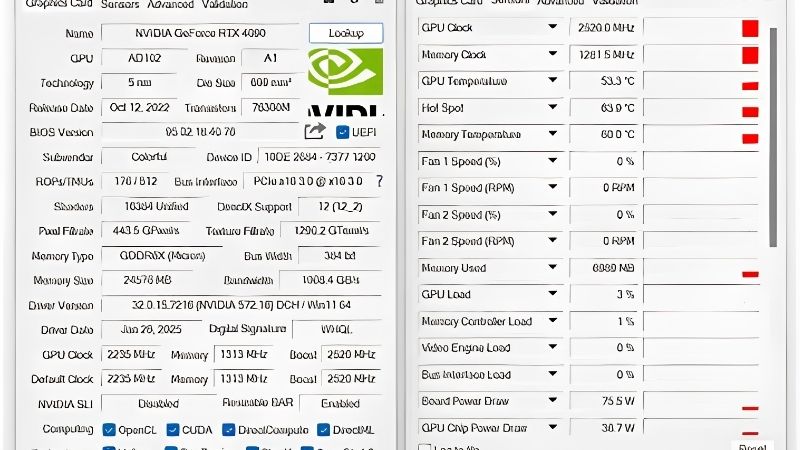
A free GPU monitoring utility shows the live board power, clock speeds, temperature, and memory, which is how you confirm your TGP and watch for throttling. It is the single most useful tool for going beyond the name.
A simple benchmarking app is also handy, letting you compare your laptop’s score against published numbers for the same chip. A low score can reveal a low-TGP configuration you would want to know about.
Run these utilities during an actual game rather than at idle, since a GPU’s real behavior, including its sustained wattage and any throttling, only appears under load. That live view is what separates a surface-level name check from a true understanding of your hardware. Watch the wattage settle after a few minutes of play; a steady figure near the rated TGP means the cooling is keeping up, while a number that climbs and then sags points to throttling worth investigating.
Accessories That Help You Test
A laptop cooling pad is a worthwhile companion when you run a stress test or benchmark, since it helps a thin laptop sustain its rated power and gives you a truer picture of its performance. You can find well-reviewed cooling pads through the links in this guide.
A compact USB-C hub is also handy if you want to connect an external monitor or peripherals while testing on a desk, since it restores ports a thin laptop often lacks. A reliable multiport adapter keeps the process tidy.
A compact external SSD is a third handy companion if you plan to install several large games to test performance, since it keeps your main drive free and load times short. You can compare dependable cooling pads, hubs, and drives through the links here.
Step-by-Step: How to Check Your Laptop GPU
With the tools ready, here is the simple process to identify your GPU and read its real specs. Follow the numbered steps in order; each takes only a minute or two and builds on the last.
The Step-by-Step Method
Work through these steps to find your GPU name and confirm its real behavior.
- Open Task Manager. Press Ctrl, Shift, and Escape, click the Performance tab, and select GPU. The name appears in the corner along with live usage.
- Check Device Manager. Right-click the Start button, open Device Manager, and expand Display adapters to see every GPU, including integrated and dedicated.
- Run DirectX Diagnostic. Press the Windows key and R, type dxdiag, and open the Display tab to confirm the GPU name and memory.
- Read live power with a monitoring tool. Launch a game and watch the sustained wattage to confirm your TGP and check for throttling.
Run through all four and you will know not just which GPU you have, but how hard your laptop actually runs it during real use. Most people can stop after the first three steps if they only need the name, and add the fourth whenever performance is the real question.
Pro Tips and Mistakes to Avoid
The most common mistake is stopping at the name and assuming performance, when the TGP is what truly decides it. Always check the live wattage if frames feel lower than expected. If the wattage sits well below the chip’s rated maximum, the cause is usually a low-power configuration or restricted cooling rather than a faulty GPU, and that single check often explains a performance gap on its own.
Another error is confusing the integrated GPU with the dedicated one, since laptops have both. Make sure your games are using the dedicated card, and keep your drivers current so it performs as intended.
Finally, avoid judging your GPU on a single short test, since a brief run can hide throttling that only appears after several minutes. A slightly longer benchmark gives a far more honest reading of how your laptop sustains performance.
Pros and Cons of Each Checking Method
Each method has its place, so it helps to know the trade-offs before you start.
Built-in tools pros: instant, no download, reliable for the name. Cons: no live wattage or deep detail. Third-party tools pros: full picture including TGP, temperature, and throttling. Cons: a quick download and a little learning.
For a fast identification, the built-in tools win; for the full truth about performance, a monitoring utility is essential.
See More:
- best gpu for stable diffusion
- best gpu for deep learning
- best gpu for ai training
- best gpu for ai
- best gpu for machine learning
Conclusion
Now that you know how to check laptop gpu hardware for yourself, the process should take just a couple of minutes from start to finish. Use the built-in Windows tools to confirm the name first, then a free monitoring utility to read the TGP and watch for throttling, and you will understand exactly what your machine can do. To get the truest picture during a stress test and to keep a thin laptop performing at its best, it is worth pairing it with quality cooling and connectivity accessories, which you can compare through the links in this guide. With these simple checks in hand, you will always know exactly what graphics power sits inside your machine.


Write Your Review
No reviews yet. Be the first to share your experience!