
- Top Pick: NVIDIA GPU Performance Engineering: A Comprehensive Guide to PTX, SASS, CUDA Optimization, Kernel Analysis, Memory Hierarchies, Warp Execution, and High-Throughput Parallel Computing
- Best Value: The NVIDIA Full Stack: From CUDA Kernels to Cloud-Native AI Deployment
- Premium Choice: NVIDIA Certified Associate: Generative AI LLMs (NCA-GENL) (NVIDIA Certification Guides)
NVIDIA CUDA tutorial results are mostly one of two things: a 40-minute video where the code is on screen but not in your clipboard, or a wall of theory about warps and occupancy before you have run a single line. This is neither. You will have a working kernel compiled and executing in about twenty minutes, every character of it copy-pasteable, and then we will explain what you just ran. Theory is more useful once you have something to attach it to.
Before Your First Kernel: What You Actually Need
Two questions block beginners before they write any code, and both have shorter answers than the internet suggests. One is about hardware. The other is about the toolkit, and getting it wrong is where most people lose an afternoon.
The Hardware Bar Is Lower Than You Think
You need an NVIDIA GPU. That is the whole requirement.
Not a fast one. Not a modern one. A GTX 1050 runs CUDA. A kernel that is wrong is wrong at any speed, so whatever card is in your machine almost certainly works.
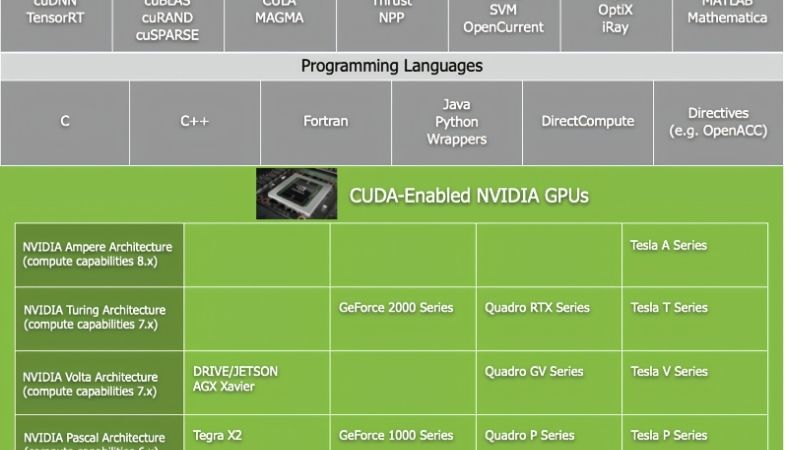
The one thing worth checking is compute capability, which decides which toolkit versions target your card. NVIDIA retires older architectures from each toolkit generation — Kepler is long gone, and Maxwell, Pascal, and Volta have moved off the current path. If your card predates roughly 2018, verify toolkit support before starting.
No GPU at all? Google Colab gives you one free in a browser. Every line of code below runs there unchanged.
Toolkit or No Toolkit: The Five-Minute Check
This is the question that saves the most time and almost no tutorial asks it.
If you only want to run PyTorch, you do not need the CUDA Toolkit. PyTorch ships its own CUDA runtime. A single pip command gets you a working GPU setup with no toolkit, no cuDNN, no PATH configuration.
But this article is about writing CUDA yourself, which means compiling CUDA C++, which means you need nvcc. So you do need the toolkit. Install it, then verify:
nvidia-smi          # driver sees the GPU?
nvcc --version      # toolkit on PATH?
If these disagree, nothing is broken. nvidia-smi reports the maximum CUDA version your driver supports — not what you have installed. nvcc --version reports the actual toolkit. Seeing 12.8 in one and 12.1 in the other is normal and expected.
The Mental Model: Host and Device
Internalise this and everything else follows.
Your CPU is the host. Your GPU is the device. Separate memory, separate execution. The host launches work on the device and carries on — it does not wait unless told.
A kernel is a function that runs on the device. You launch it with thousands of threads at once, and every thread runs the same code on different data. Same instructions, different index. That is the whole model.
The corollary trips up everyone once: kernel launches are asynchronous. Your CPU fires the kernel and runs the next line immediately. If that line reads the results, it reads garbage.
Your First CUDA Kernel, Line by Line
Copy this, compile it, run it. Then read the explanation with something concrete in front of you.
The Code You Can Copy Right Now
Save as add.cu:
#include <stdio.h>
#include <math.h>

__global__ void add(int n, float *x, float *y)
{
    int index  = blockIdx.x * blockDim.x + threadIdx.x;
    int stride = blockDim.x * gridDim.x;
    for (int i = index; i < n; i += stride)
        y[i] = x[i] + y[i];
}

int main(void)
{
    int N = 1 << 20;              // 1,048,576 elements
    float *x, *y;

    cudaMallocManaged(&x, N * sizeof(float));
    cudaMallocManaged(&y, N * sizeof(float));

    for (int i = 0; i < N; i++) {
        x[i] = 1.0f;
        y[i] = 2.0f;
    }

    int blockSize = 256;
    int numBlocks = (N + blockSize - 1) / blockSize;
    add<<<numBlocks, blockSize>>>(N, x, y);

    cudaDeviceSynchronize();

    float maxError = 0.0f;
    for (int i = 0; i < N; i++)
        maxError = fmaxf(maxError, fabsf(y[i] - 3.0f));
    printf("Max error: %f\n", maxError);

    cudaFree(x);
    cudaFree(y);
    return 0;
}
Expected output: Max error: 0.000000. If you get that, you have just run over a million additions in parallel on your GPU.
What Every Line Actually Does
__global__ marks a kernel: runs on the device, called from the host. Its sibling __device__ runs on the device and is called from the device. No qualifier means host code.
blockIdx.x * blockDim.x + threadIdx.x is the line you will write for the rest of your life. Threads are grouped into blocks; blocks form a grid. This arithmetic converts “thread 5 of block 3” into a unique global index. Every CUDA program computes it.
cudaMallocManaged allocates unified memory — one pointer both host and device can touch, with the driver migrating pages as needed. The older approach is cudaMalloc plus explicit cudaMemcpy both ways. Unified memory is slower in production and far easier to learn with.
add<<<numBlocks, blockSize>>>(N, x, y) is the execution configuration. The triple-angle brackets are CUDA’s only real syntax addition to C++. First number: how many blocks. Second: threads per block.
blockSize = 256 is not arbitrary. The GPU executes threads in warps of 32, so your block size should always be a multiple of 32. 256 is the sane default; try 128 or 512 later and measure.
(N + blockSize - 1) / blockSize is ceiling division. With N = 1,048,576 and blockSize = 256 that is exactly 4,096 blocks. The + blockSize - 1 matters when N is not a clean multiple — without it you silently drop the last partial block.
cudaDeviceSynchronize() is the line whose absence causes the most confusion in CUDA. It blocks the host until the device finishes. Delete it and your maxError loop reads memory the GPU has not written yet, printing a number that looks like a bug in your maths.
Compiling and Running It
nvcc add.cu -o add
./add
That is it. If nvcc is not found, the toolkit is not on your PATH — that is a configuration problem, not an install problem, and opening a new terminal after setting PATH fixes it more often than reinstalling.
If it compiles but reports no kernel image is available for execution on the device, the binary was built for architectures that do not include yours. Target it explicitly:
nvcc -arch=sm_86 add.cu -o add # sm_86 = Ampere; use your ownLook up your compute capability and substitute. This single error accounts for a large share of “CUDA does not work on my machine” posts.
Pros and Cons of Learning CUDA in 2026
Worth being honest before you invest weeks. CUDA is not the only route to GPU compute, and for many people reading this it is not the right one.
The Three Mistakes Every Beginner Makes
Forgetting to synchronise. Covered above and worth repeating, because the failure is silent. No crash, no error — just wrong numbers. If your results look like uninitialised memory, this is why.
Not checking errors. Kernel launches do not return an error code. The launch succeeds, the kernel fails, and your program continues cheerfully. Add this after every launch while learning:
cudaError_t err = cudaGetLastError();
if (err != cudaSuccess)
    printf("Kernel launch failed: %s\n", cudaGetErrorString(err));
Assuming more threads is faster. Launching a million threads for a thousand elements does not help. Occupancy is a real concept with real limits, and thread count is not a throttle you open.
Where CUDA Is Worth Your Time
Learn it if you need control. Custom kernels beat library calls when your problem does not fit a library’s shape — unusual access patterns, fused operations, algorithms nobody has written for you.
Learn it to understand what PyTorch is doing. Profiler output makes far more sense once you know what a kernel launch costs.
Learn it for employability, honestly. CUDA expertise stays scarce relative to demand — precisely because most people stop at the library layer.
When Numba or CuPy Is the Better Answer
Be pragmatic. If you work in Python and your problem is array maths, CuPy is a near drop-in NumPy replacement that runs on the GPU. Change your import, get a speedup, write no CUDA.
Numba sits between. Decorate a function with @cuda.jit and you write kernels in Python syntax — same mental model, none of the C++ toolchain.
Both are the right answer more often than purists admit. Reach for raw CUDA when you need control the abstraction denies you, not as a rite of passage.
Where to Go After Your First Kernel
Your kernel works. Three concepts turn it from a toy into something that performs, and each is a small change to the code you already have.
Grid-Stride Loops and Why They Matter
Look again at the loop in the kernel above. It is a grid-stride loop — which is why the code differs from the simpler version most tutorials show.
The naive kernel is if (i < n) y[i] = x[i] + y[i]; — one thread, one element. It breaks when you have more elements than threads.
The grid-stride version works for any N with any launch configuration. Each thread handles multiple elements, striding by the total thread count. Launch with four blocks or four thousand; it stays correct. Write kernels this way from the start.
Memory Coalescing: The First Real Optimisation
This is the concept that separates working CUDA from fast CUDA, and it costs nothing to get right.
Threads in a warp execute together. When they access consecutive addresses, the hardware merges those reads into one transaction. Scattered addresses mean 32 separate ones — and most of your bandwidth thrown away.
Your kernel is already coalesced: thread 0 reads x[0], thread 1 reads x[1]. Change the indexing to x[i * 32] and throughput collapses while the code stays correct. That is the lesson — correctness and speed are separate problems.
Profiling With Nsight Instead of Guessing
Do not optimise by intuition. Measure.
nsys profile ./add     # timeline: where does time go?
ncu ./add              # kernel detail: why is it slow?
Nsight Systems shows the whole timeline — often revealing that your kernel is fast and your memory transfers are the problem. Nsight Compute dissects an individual kernel: occupancy, memory throughput, whether you are compute-bound or bandwidth-bound.
Almost every beginner optimising CUDA optimises the wrong thing. Ten minutes with nsys prevents ten hours of that.
See More:
- NVIDIA
- NVIDIA DeepStream
- NVIDIA GPU driver update
- NVIDIA GeForce NOW download
- NVIDIA RTX A2000 12GB driver
Conclusion
This NVIDIA CUDA tutorial got you to a working kernel because that is the only place understanding actually starts. You have unified memory, a grid-stride loop, a correct global index, and a synchronise call — which is genuinely most of what CUDA is.
Three things to carry forward. blockIdx.x * blockDim.x + threadIdx.x is the line you will write forever. cudaDeviceSynchronize() is the line whose absence produces silent, confusing wrongness. And nvidia-smi reports your driver’s ceiling, not your toolkit — the two disagreeing is normal.
Next: change blockSize to 128 and 512 and time it. Break the coalescing on purpose and watch what happens. Then run ncu and see whether the profiler agrees with your theory about why. That loop — change something, measure it, find out you were wrong — is the whole skill.
Frequently Asked Questions
What hardware do I need to start writing CUDA?
Any CUDA-capable NVIDIA GPU works, including a modest laptop card, since your first kernels are limited by understanding rather than throughput. Note that CUDA 13 dropped Maxwell, Pascal and Volta, so a Turing card or newer is the practical minimum for current toolkits. Nothing else in the system matters much initially.
Do I need the full toolkit or just a driver?
Writing and compiling your own kernels requires the full CUDA toolkit, because you need nvcc, the headers and the profiling tools. If you were only running existing frameworks the driver alone would suffice, but a tutorial that compiles source needs the toolkit installed and on your PATH.
Why is my first kernel slower than the CPU version?
Almost always because host to device memory transfer dominates. A small array copied across PCIe costs far more time than the arithmetic saved. Speedups appear when the data is large, stays resident on the GPU across many operations, and the work is genuinely parallel with minimal branching between threads.
How do I choose block and grid sizes?
Start with 256 threads per block, which suits most architectures, and compute the grid size as the problem size divided by the block size rounded up. Then use the occupancy calculator or Nsight Compute to refine. Guessing blindly wastes time; measuring with the profiler shows whether you are occupancy or memory bound.
What should I learn after a basic kernel?
Shared memory tiling, coalesced global memory access patterns, and streams for overlapping transfer with compute. Those three concepts account for most real-world speedups. After that, look at cuBLAS and cuDNN, since hand-written kernels rarely beat vendor libraries for standard linear algebra and convolution operations.
As an Amazon Associate we earn from qualifying purchases at no extra cost to you.







Write Your Review
No reviews yet. Be the first to share your experience!