
Getting the NVIDIA toolkit download right is the first step for anyone doing AI, machine learning, or GPU computing, because the CUDA Toolkit is what lets your applications tap into your graphics card’s power. Yet a wrong version, an unsafe source, or a mismatched framework can turn a simple download into hours of frustration and dreaded “CUDA not available” errors. This guide shows you exactly where to download the NVIDIA CUDA Toolkit safely, how to choose the right version for your setup, how to install and verify it, and how to fix the most common download and install problems. Whether you are new to GPU computing or setting up a fresh machine, follow along to get it right the first time.
What You Are Downloading and Why
Before clicking download, it helps to know what the CUDA Toolkit is and which version you actually need. Getting these basics right prevents the most common mistakes. Here is what you are getting and why version choice matters.
What the CUDA Toolkit Download Includes
The NVIDIA CUDA Toolkit is a development package that lets software use your GPU for general computing. The download includes the compiler, runtime, libraries, and tools that AI and computing applications rely on to run on your card.
It is not a single tiny file but a full development environment. For a deeper explanation of what the toolkit is and does, our guide on the CUDA Toolkit covers the concept in detail, while this article focuses on getting it downloaded and installed correctly.
Knowing that it is a full environment rather than a single file also sets expectations for the download size and install time. Planning for a few gigabytes of space and a short setup avoids surprises, especially on a machine with limited storage.
Who Needs to Download It
You need the CUDA Toolkit if you develop or run AI models, use frameworks that require compiling GPU code, or do scientific computing that leans on your graphics card. Many tools list it as a requirement.
If you only play games, you do not need the toolkit, since games use the graphics driver instead. Confirming you actually need the toolkit before downloading saves time and avoids installing software you will not use.
It is also common for frameworks to bundle the CUDA runtime they need, so some users can run GPU-accelerated tools without a full toolkit install. Checking whether your specific workflow requires the complete toolkit or just the runtime can save you an unnecessary download.
Matching the Version to Your Framework
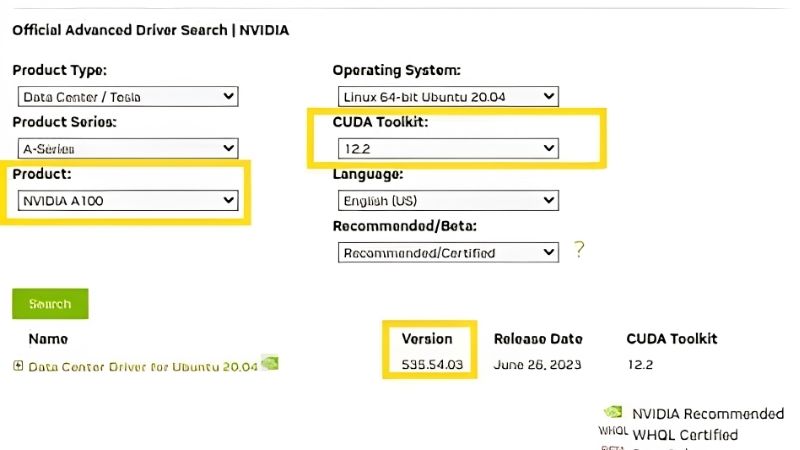
This is the most important step. Frameworks like PyTorch and TensorFlow support specific CUDA versions, so you must download the version your framework requires rather than simply grabbing the newest one.
Installing a mismatched version is the single most common cause of the frustrating “CUDA not available” error. Checking your framework’s supported CUDA version before you download prevents the majority of these problems entirely.
Each framework publishes a compatibility table listing the CUDA versions it supports, and a quick look there is the single most valuable minute you can spend. Matching that version from the start turns a potentially frustrating setup into a smooth one.
Where and How to Download It Safely
Choosing a safe, correct source matters as much as picking the right version. The official route protects your system and guarantees the proper files. Here is where to download and what to select.
Use the Official NVIDIA Developer Site
Always download the CUDA Toolkit from NVIDIA’s official developer website, which offers verified installers straight from the source. This is the only safe place to get it, with no risk of tampered files.
Bookmarking the official CUDA download page makes future downloads quick and keeps you away from questionable mirrors. Sticking to the official source is the simplest way to ensure a genuine, safe toolkit.
NVIDIA also keeps an archive of older toolkit versions on its official site, which is essential when your framework requires a specific earlier release. Downloading the exact version you need from that official archive is far safer than hunting for it elsewhere.
Choosing Your OS, Version, and Installer Type
On the download page you select your operating system, architecture, and the specific toolkit version, then choose an installer type. A local installer bundles everything and does not depend on your connection during setup.
For most users, the local installer is the safest choice, especially on an unreliable connection. Selecting the exact options that match your system ensures the download works correctly the first time.
If you work offline or on an unstable network, the local installer is the clear choice, since it does not need to fetch components mid-install. On a fast, reliable connection, either installer type works, so pick whichever suits your situation.
Avoid Unofficial Download Sources
Never download the CUDA Toolkit from third-party sites, which may offer outdated, altered, or unsafe files. These provide no benefit over the official source and carry real security and stability risks.
If a search result points anywhere other than NVIDIA’s official developer site, close it. Official channels are the only route worth using for something as central to your work as the toolkit.
Installing and Verifying the Download
Once downloaded, installing correctly and confirming it worked prevents wasted hours later. The process is straightforward if you follow the order. Here is how to install and verify your toolkit.
The Installation Steps
Follow these steps for a clean install:
- Update your GPU driver to a compatible version first.
- Run the downloaded installer and accept the terms.
- Choose the express option unless you need to customize.
- Allow the bundled driver only if yours is older.
- Reboot when the installer finishes.
These steps take only a few minutes and set up the toolkit correctly, avoiding many of the issues that come from rushing the process.
Following the order matters, particularly updating the driver first, since a mismatched or outdated driver is a common reason an install appears to succeed but the GPU is not detected. A little patience through each step prevents that frustrating outcome.
Verifying the Install with nvcc
Do not assume the download worked. Open a terminal and run the command to check the compiler version, and if it prints a version number, the toolkit is installed correctly and on your path.
Running the command that shows your GPU and driver confirms your hardware is recognized. If both respond, your system is ready, and your framework should now be able to use the GPU.
A quick check inside your framework, confirming it reports the GPU as available, is the final reassurance that everything is wired up. If that check passes, you can move straight into your actual AI or computing work with confidence.
Setting Up Environment Paths
If the compiler command is not found after installing, the toolkit’s location may not be on your system path. Adding it ensures your terminal and tools can locate the toolkit’s components.
On most systems the installer handles this automatically, but a manual check helps if something is not detected. Correct paths are the final piece that lets everything find and use the toolkit.
If you use multiple toolkit versions for different projects, managing paths carefully becomes even more important, since the system needs to know which one to use. Keeping your environment tidy prevents the confusing conflicts that arise when several versions compete.
Fixing Download and Install Issues Plus Tips
Even with the right source and version, things occasionally go wrong, and most issues have clear fixes. Here is how to solve common problems and a few tips for a smooth experience.
When the Download or Install Fails
If a download stalls, check your connection and free disk space, then try again, since interruptions and full drives are common causes. A local installer avoids problems from a dropped connection mid-setup.
If the installer itself fails, close background applications and temporarily pause security software during installation. Restarting your PC before retrying also clears temporary conflicts that block the installer.
On some systems, removing a previous toolkit version before installing a new one avoids clashes between the two. When an install repeatedly fails, a clean slate is often the fastest path to a working setup.
Fixing the “CUDA Not Available” Error
The most common post-install problem is a framework reporting that the GPU is not available. This almost always traces to a version mismatch between the toolkit and your framework rather than broken hardware.
Confirm your framework’s required CUDA version and match it, checking your driver is current too. Aligning these versions resolves the vast majority of “CUDA not available” cases without deeper troubleshooting.
Pros, Cons, and Download Tips
Here is the balanced view of the download experience:
| Pros | Cons |
|---|---|
| Unlocks true GPU acceleration for AI | Large download and disk footprint |
| Official installers are safe and verified | Version mismatches cause errors |
| Local installer works offline | Only useful with an NVIDIA GPU |
The key tip is to match your version to your framework, download only from NVIDIA’s official site, and verify with the compiler command before assuming anything is wrong.
See More:
- Radeon drivers
- What is NVIDIA CUDA Toolkit
- 4080 Super vs 5060 Ti
- NVIDIA PhysX
- NVIDIA Game Ready Driver
Conclusion
A successful NVIDIA toolkit download comes down to three things: choosing the version your framework needs, using NVIDIA’s official developer site, and verifying the install with the compiler command. Confirm you actually need the toolkit, select the matching version and a local installer, follow the install steps, and check your paths. If a framework reports the GPU is missing, a version mismatch is almost always the cause. Get your NVIDIA toolkit download right and your GPU will be ready for AI, machine learning, and computing work with no wasted hours.
Frequently Asked Questions
Where should I download the CUDA Toolkit from?
Only from the official NVIDIA developer downloads page, where you select operating system, architecture, distribution and installer type. Third-party mirrors frequently host outdated or tampered builds. On Linux, the network repository installer is preferable because it keeps CUDA and driver packages consistent with your package manager over time.
Do I need the CUDA Toolkit just to run PyTorch or Stable Diffusion?
Usually not. Prebuilt PyTorch and TensorFlow wheels bundle the CUDA runtime libraries they need, so a current display driver is sufficient. You only need the full toolkit when compiling custom kernels, building extensions from source, or using tools like nvcc, Nsight Compute and the profiling suite.
How do I match the toolkit version to my driver?
Run nvidia-smi and read the CUDA version in the header, which reports the highest runtime your driver supports. Newer drivers are backward compatible with older toolkits, so installing the latest driver first is the safe order. Avoid letting the toolkit installer downgrade a working driver.
Should I let the installer replace my graphics driver?
No, uncheck the driver component if you already have a working Game Ready or Studio driver. The bundled driver is often older and can break display output or overwrite your current version. Install the toolkit components only, then verify with nvcc –version and a sample build.
Can I have multiple CUDA versions installed at once?
Yes. Each release lands in its own versioned directory, and you switch by pointing the CUDA_HOME variable and PATH at the version you want. On Linux the symbolic link at /usr/local/cuda controls the default. This is common when different projects pin different toolkit requirements.
As an Amazon Associate we earn from qualifying purchases at no extra cost to you.







Write Your Review
No reviews yet. Be the first to share your experience!