
- Top Pick: 64GB – Bootable USB Drive 3.2 for Windows 11/10 / 8.1/7, Install/Recovery, No TPM Required, Included Network Drives (WiFi & LAN),Supported UEFI and Legacy, Data Recovery, Repair Tool
- Best Value: 5-in-1 Win Repair & Reinstall Bootable USB Flash Drive – Fix, Recover, or Reinstall Windows 11 (amd64 + arm64) / 10/7 – Includes PE Tools, Driver Pack, Antivirus, Data Recovery & Password Reset | Legacy toolkit for Windows 11/10/7 repair, reinstall, WinPE tools, drivers, antivirus and password reset
- Premium Choice: Recovery and Repair USB Drive for Windows 11, 64-bit, Install-Restore-Recover Boot Media – Instructions Included
Uninstall AMD drivers the clean way and you can fix stubborn crashes, avoid conflicts when switching graphics cards, and give a fresh driver the best possible start. Doing it properly matters more than most people realize, since a sloppy removal leaves behind files that cause the very problems you were trying to solve. This guide walks you through why and how to remove AMD drivers completely, the exact steps using DDU, the mistakes to avoid, and what to do afterward for a stable system.
Why You Might Need to Uninstall AMD Drivers
There are a few common situations where removing your AMD drivers is the right move, and understanding which one applies helps you do it correctly. A clean removal is not just routine housekeeping; in the right circumstances it is the single most effective fix for a range of frustrating problems.
Knowing your reason also tells you how thorough to be. A simple driver update rarely needs a full wipe, but switching cards or chasing a stubborn crash absolutely does, and matching the method to the situation saves both time and hassle.
Switching to a New GPU
The most common reason to remove AMD drivers is switching graphics cards, especially when moving from an AMD card to an Nvidia one. Leftover drivers from the old card are a classic source of conflicts with the new one.
Even when moving between two AMD cards, a clean removal ensures the new card starts fresh without inheriting old settings. This is why experienced builders always clear the previous drivers before installing a new GPU.
Skipping this step is one of the most common causes of instability after an upgrade, so it is worth doing properly whenever you change cards.
The rule applies in both directions, whether you are moving to a faster card or a different brand entirely. A clean starting point simply gives the new hardware the best chance to perform exactly as it should from the first boot.
Fixing Crashes and Black Screens
A clean driver removal is also a powerful troubleshooting tool. Persistent crashes, black screens, flickering, and driver timeouts often trace back to corrupted or conflicting driver files.
When a normal update or reinstall does not fix these issues, completely removing the drivers and installing fresh usually does. It clears out the corrupted leftovers that a standard reinstall leaves in place.
This is why a clean removal is so often the fix that finally works after other attempts fail. When simple reinstalls have not helped, the leftover files are usually the hidden culprit, and only a complete wipe truly clears them.
What a Clean Removal Actually Does
A standard uninstall through Windows removes the obvious parts of a driver but often leaves behind registry entries, settings, and files. These remnants are exactly what cause lingering problems.
A clean removal tool goes much further, wiping every trace so the system is genuinely driver-free before you reinstall. This thoroughness is why it succeeds where a normal uninstall fails.
Think of the difference as sweeping versus deep cleaning. A standard uninstall tidies the surface, while a clean removal tool scrubs out every hidden remnant, which is exactly what a genuinely fresh start requires.
How to Uninstall AMD Drivers Step by Step
Removing the drivers properly is a short, repeatable process once you know the steps. Follow them in order and you will end up with a genuinely clean system ready for a fresh driver, whether for a new card or a troubleshooting fix.
The whole process takes only a few minutes and requires no special expertise, just a little preparation. The single most important habit is to gather everything you need before you begin, which the first step covers directly.
Steps 1 to 2: The Standard Uninstall
Step 1 — Download what you need first. Before removing anything, download the clean removal tool DDU and the fresh driver you plan to install, since you will be offline or without graphics acceleration partway through.
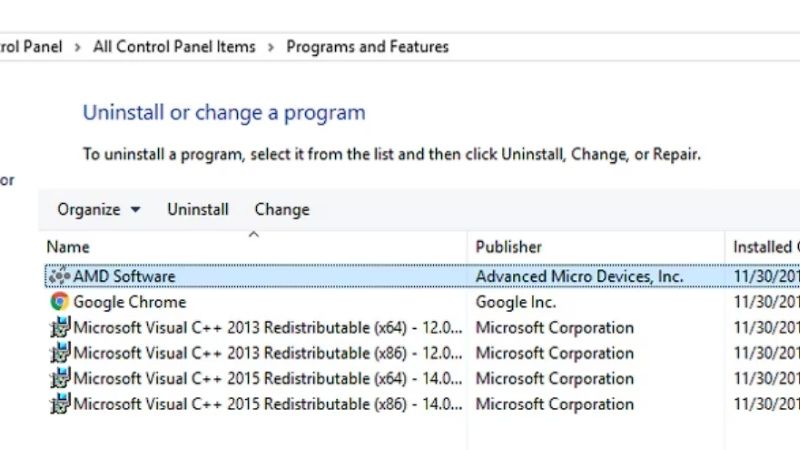
Step 2 — Remove AMD software. Optionally uninstall the AMD Adrenalin software through Windows settings first. This is not strictly required with DDU, but it makes for a tidy start.
Preparing in this order matters because once you remove the display driver, you will be running on basic graphics with no easy way to download anything. Having your files ready beforehand is what keeps the process smooth and stress-free.
Steps 3 to 5: Using DDU for a Clean Wipe
Step 3 — Boot into Safe Mode. Restart Windows into Safe Mode, which prevents Windows from interfering while you remove the drivers. DDU works best and most reliably in this mode.
Step 4 — Run DDU and remove AMD drivers. Open Display Driver Uninstaller, select AMD as the device type, and choose the clean and restart option. DDU will wipe every trace of the old drivers.
Step 5 — Reboot normally. After DDU finishes and restarts your PC, you will be running on basic display drivers, ready to install the fresh driver you downloaded earlier.
The screen may look lower resolution at this stage, which is completely normal. Windows is using a basic display driver until you install the proper one, so there is no cause for concern between the wipe and the reinstall.
Pros and Cons of a Full DDU Removal
The pros of a full DDU removal are clear: it eliminates the leftover files that cause most driver problems, guarantees a truly clean slate, and resolves conflicts that normal uninstalls cannot. For troubleshooting or switching cards, it is the gold standard.
The cons are minor. It takes a few extra minutes, requires booting into Safe Mode, and temporarily leaves you on basic display drivers until you reinstall. For anyone but the most casual user facing a simple update, though, that small effort is well worth the reliable result.
In practice, the choice is easy. If you are simply updating a working driver, a standard install is fine, but the moment you are switching cards or troubleshooting, the few extra minutes for a full DDU wipe pay for themselves many times over.
After Uninstalling: What Comes Next
Removing the drivers is only half the job; installing the new ones correctly is what completes a stable setup. Handling this final stage carefully ensures the clean slate you just created actually pays off in a smooth, problem-free system.
This stage is where the payoff arrives, so it is worth a little patience. Rushing the reinstall or grabbing the wrong file can undo the clean slate you just created, while a careful final step locks in a stable result.
Installing Fresh Drivers
With the old drivers gone, install the fresh driver you downloaded earlier. If you are switching to a new card, this is the point to shut down and physically install the new GPU before installing its driver.
Choose the correct driver for your new hardware, whether that is a fresh AMD driver or the Nvidia driver for a new GeForce card. Installing from the official source ensures you get a genuine, current file.
Once installed, a quick reboot and a check that everything looks right confirms the job is done. From there, your system is running on clean, current drivers, which is the whole reason for going through the process in the first place.
Common Mistakes to Avoid
The most common mistake is forgetting to download the new driver first, leaving you without graphics acceleration and no easy way to get online. Always grab everything you need before you start.
Another frequent error is skipping Safe Mode, which lets Windows interfere with the removal. Running DDU outside Safe Mode is less reliable and can leave the very remnants you were trying to remove.
A third mistake is installing the wrong driver afterward, such as one meant for a different card or operating system. Double-checking the driver matches your exact hardware before installing avoids trading one problem for another.
When the Problem Is the Hardware
Sometimes a clean driver removal and reinstall does not fix persistent problems, because the issue is the hardware rather than the software. If crashes and artifacts continue across clean installs, the card itself may be failing or simply too old.
Low frame rates that no driver can improve are a different sign, pointing to a card that has fallen behind modern games. When you reach that point, an upgrade is the real answer, and the recommended GeForce cards linked in this review are a smart starting point for a stable, capable replacement.
The honest rule is to try the free fix first: a clean removal and reinstall costs nothing and resolves the majority of driver issues. Only when that fails repeatedly does the evidence point to hardware, and to a genuine upgrade rather than more troubleshooting.
Reaching for a new card should always be the last step, taken only after the free software fixes have genuinely been exhausted.
See More:
Final Verdict: Uninstall AMD Drivers the Right Way
Learning to uninstall AMD drivers cleanly is one of the most useful skills a PC gamer can have, since a full DDU removal in Safe Mode fixes stubborn crashes and prevents conflicts when switching cards far more reliably than a standard uninstall. Download everything first, boot into Safe Mode, wipe the old drivers with DDU, then install fresh, and most driver headaches disappear.
Just remember that a clean removal solves software problems, not hardware ones. If crashes persist across clean installs or your frame rates stay stubbornly low, the card itself is the limit, and an upgrade is the real fix. When you reach that point, compare the recommended GeForce cards linked throughout this review for a reliable, high-performance replacement.
Frequently Asked Questions
Why should I uninstall AMD drivers before upgrading?
Leftover registry entries, control panel services and old kernel-mode files can conflict with a new driver or a different brand of GPU, producing black screens, missing settings pages and random crashes. A clean removal removes those remnants so the incoming driver installs against a known-good baseline rather than a layered mess.
What is the safest tool to use?
AMD supplies its own Cleanup Utility, which handles most straightforward cases. For stubborn problems or a switch to NVIDIA or Intel, Display Driver Uninstaller is the enthusiast standard because it scrubs registry keys and leftover folders that the official uninstaller can miss on long-lived Windows installations.
Do I have to boot into safe mode?
Safe mode is strongly recommended because Windows cannot reload the display driver mid-removal and Windows Update cannot silently reinstall a stale package. Disconnect the network first, boot into safe mode, run the cleanup, then reboot and install the driver you actually want before reconnecting to the internet.
Will my screen resolution break during the process?
Yes, temporarily. Once the driver is removed Windows falls back to a basic display adapter, so you will see a low resolution, large icons and possibly a single monitor active. That is normal, and everything returns once the new driver installs and you reboot.
Do I need this when moving from AMD to NVIDIA?
Absolutely, this is the scenario where a clean uninstall matters most. Remove the AMD software while the old card is still installed if possible, shut down, swap hardware, boot, then install the NVIDIA driver. Mixing two vendors of leftover files is the most common cause of post-upgrade instability.
As an Amazon Associate we earn from qualifying purchases at no extra cost to you.





Write Your Review
No reviews yet. Be the first to share your experience!