
- Top Pick: Getting Started with NVIDIA GPUs : A Beginner’s Guide to AI Acceleration with python, C++ and Cuda
- Best Value: The NVIDIA Full Stack: From CUDA Kernels to Cloud-Native AI Deployment
- Premium Choice: AI Systems Performance Engineering: Optimizing Model Training and Inference Workloads with GPUs, CUDA, and PyTorch
NVIDIA CUDA Toolkit download page is where most developers land when they need the current release fast, plus a few clear steps to install it without breaking their environment. If you are here, you want the right installer, the correct options for your system, and a straight explanation of the choices in front of you, not a long walkthrough video. This review breaks down what the page offers, how to install cleanly, and why your GPU still shapes everything you do afterward.
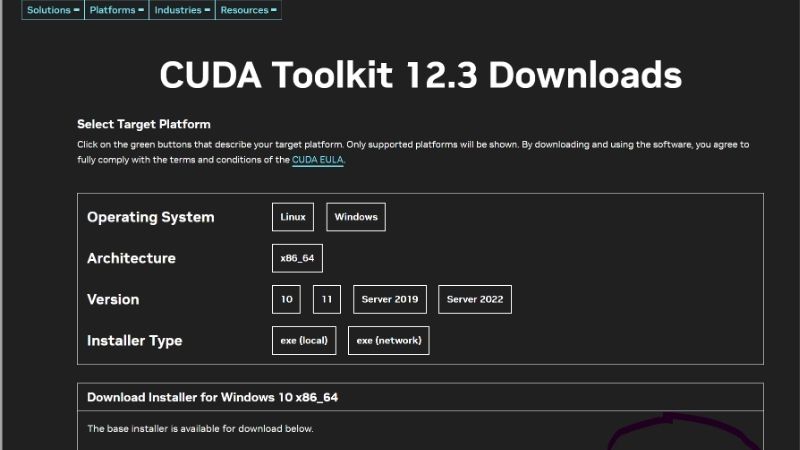
What the NVIDIA CUDA Toolkit Download Page Offers
The download page is NVIDIA’s front door for the latest CUDA Toolkit, presenting installers tailored to your operating system, architecture, and preferred installation method. It looks simple, but each selection you make changes what gets downloaded and how the install behaves, so understanding the options up front saves you from a reinstall later.
The Installer Options and Platforms Explained
The page asks you to select your platform step by step: operating system, architecture, distribution or version, and installer type. Each choice narrows the download to a package built specifically for your setup, which is why answering them accurately matters more than it appears.
For Windows the choice is usually a straightforward executable installer, while Linux offers several routes including package-manager repositories and standalone runfiles. Picking the option that matches how you manage software on your system keeps the install clean and the toolkit easy to update or remove later.
The practical rule is to match the installer to your existing workflow. If you already manage packages through your Linux distribution, use the repository option so updates flow through the same channel; if you want an isolated, self-contained install, the runfile gives you that control.
Local vs Network Installer: Which to Choose
Many platforms offer both a local and a network installer, and the difference is simple but important. The local installer bundles the entire toolkit in one large download, while the network installer fetches components during installation and keeps the initial download small.
Choose the local installer when your connection is slow or unreliable, or when you need to install on a machine that will be offline, because everything you need is already inside the package. It is also the safer choice for reproducible setups, since the bundle does not change between installs.
The network installer suits fast, stable connections and machines that will stay online, since it downloads only what it needs and can pull the newest sub-components. For a quick single install on a well-connected workstation, it is the lighter option.
There is a storage angle worth weighing too. The local installer is a large file and consumes meaningful disk space during installation, while the network installer keeps the footprint smaller. On a workstation with limited fast storage, that difference can matter, so factor your available disk space into the choice alongside your connection speed.
Verifying Your Download and System Requirements
Before running any installer, confirm your system meets the toolkit’s requirements: a supported operating system version, a compatible GPU driver, and enough disk space. The page and its documentation list these clearly, and checking them first prevents the most common install failures.
It is also good practice to verify the integrity of a large download using the checksums NVIDIA provides. A corrupted or incomplete file is a frequent, avoidable cause of installers that error out partway through, and a quick checksum comparison rules that out.
Finally, only ever download from NVIDIA’s official page. Toolkit installers sourced from third-party mirrors are a known vector for tampered software, and there is no reason to take that risk when the official download is free and direct.
How to Install CUDA From the Download Page
A clean CUDA install is mostly about preparation rather than the install itself. Get the driver, GPU, and operating system aligned first, and the actual installation is usually uneventful, which is exactly what you want from foundational software.
Pre-Install Checklist: Driver, GPU, and OS
Start by confirming that your GPU driver meets the minimum version the toolkit requires, because a mismatched driver is the single most common reason a fresh CUDA install fails to work. The download page documentation states the minimum driver for each release.
Next, verify your GPU’s architecture is supported by the version you are installing. A very recent card may need a recent toolkit, and the download page always serves the latest release, so newer hardware is generally well covered here.
Finally, make sure your operating system version appears in the supported list. Installing onto an unsupported or end-of-life OS is a recipe for subtle failures, and it is far easier to confirm compatibility before you begin than to debug it afterward.
Step-by-Step Installation Overview
The general flow is consistent across platforms. First, select your exact system on the download page and choose local or network. Second, run the installer and pick either an express install for defaults or a custom install to control which components land on your system.
Third, let the installer place the toolkit, samples, and any bundled components, then reboot if prompted. Fourth, confirm the install succeeded by checking that the CUDA compiler reports a version and that a simple device query recognizes your GPU. These two checks catch the vast majority of problems immediately.
If either verification step fails, the cause is almost always a driver mismatch or a missing environment path rather than a bad toolkit. Addressing those two areas resolves most first-time installation issues quickly.
A custom install is worth choosing if you want to avoid overwriting a driver you already trust. The installer bundles a driver, but on a working system you often want to keep your existing one and install only the toolkit components, which a custom install lets you control. Unchecking the bundled driver is a common step for developers who manage their driver separately.
Pros and Cons of Using the Latest Download
The advantages of taking the newest release from the download page are real: you get the latest performance optimizations, support for the newest GPU architectures, current security fixes, and the longest window of ongoing maintenance. For new projects on new hardware, this is the right default.
The drawbacks appear when your project depends on older software. A framework or library pinned to an earlier CUDA release may not run against the newest toolkit, and in that situation the download page’s latest version is exactly the wrong choice, which is when the versioned archive becomes the better route.
The honest balance: use the download page’s current release for fresh, unconstrained projects, and reach for a specific older version only when a dependency forces your hand. Knowing which situation you are in prevents hours of compatibility troubleshooting.
CUDA, the AI Boom, and Your GPU in 2026
The download page is a software resource, but the reason it sees so much traffic is inseparable from the hardware race around artificial intelligence. A little market context explains both the platform’s momentum and why your choice of GPU carries real weight.
What the H200-to-China News Means for Developers
A significant recent development is that the United States has permitted NVIDIA to sell the H200, one of its most powerful AI chips, to China. That decision underscores how central NVIDIA’s compute platform, and CUDA alongside it, has become to the global AI supply chain.
For a working developer, the practical takeaway is reassurance: CUDA sits at the heart of the world’s AI infrastructure and is not going anywhere. The time you invest in learning the toolkit, navigating the download page, and understanding version management is time spent on a durable, in-demand skill.
It also signals sustained, heavy demand for capable NVIDIA hardware at every tier. When the most powerful accelerators are in intense global demand, the same platform flows down to the consumer and prosumer cards developers actually buy, which keeps that hardware valuable and worth choosing carefully.
Choosing a GPU That Matches Your CUDA Work
Downloading the toolkit is free, but running real workloads is bounded entirely by the GPU underneath it. For modern deep-learning and local AI experimentation, VRAM capacity is usually the first wall you hit, and older or lower-memory cards force painful compromises on model size and batch settings.
A consumer card with 16 GB of memory has become a practical sweet spot for local AI work, letting you run meaningfully larger models than 8 GB or 12 GB cards allow before you are pushed toward cloud instances. That jump in capacity changes what is possible, not just how fast it runs.
If your projects keep bumping into memory limits, upgrading the card is often a better investment than any amount of software tuning. When you reach that point, comparing current GPU options is the sensible next step, since the right card removes a ceiling no toolkit version can lift.
Who Should Use the Download Page vs the Archive
The download page is the right destination for anyone starting a fresh project, setting up new hardware, or learning CUDA for the first time, because it always serves the current, best-supported release. For the majority of everyday cases, it is exactly where you should be.
The versioned archive is the better choice when a specific framework or reproducible environment pins you to an older release. Knowing which resource fits your situation is half the battle, and it comes down to a single question: does anything in your stack require an older version?
Most developers will use both over time, defaulting to the download page and dropping to the archive only when a dependency demands it. Treating them as complementary rather than competing keeps your setup smooth across projects.
One habit smooths the whole process: once you confirm a working combination of toolkit, driver, and framework, write it down. That short record means your next setup, whether on a new machine or after an operating system reinstall, starts from a known-good configuration rather than trial and error, and it tells you immediately whether the download page or the archive is your correct starting point next time.
See More:
- NVIDIA GeForce Game Ready Driver
- NVIDIA CUDA Toolkit Archive
- Gigabyte GeForce RTX 5070 Windforce OC
- AMD Radeon RX 9070 XT vs NVIDIA GeForce RTX 5070
- PNY GeForce RTX 5070 Ti Triple Fan
Conclusion
The NVIDIA CUDA Toolkit download page is the fastest, safest route to the current release, giving you platform-matched installers and the newest optimizations for any fresh project or new GPU. Choose the right installer for your workflow, run through the driver and OS checklist before you begin, and drop to the archive only when a dependency pins you to an older version. And because every CUDA workload is ultimately limited by the card running it, if memory is your bottleneck, checking current GPU options through the link below is the practical next step.
Frequently Asked Questions
Do I need the CUDA Toolkit just to play games?
No. Games only need the GeForce driver, which already includes the CUDA runtime components applications require. The Toolkit is a developer package containing the nvcc compiler, headers, libraries, and profiling tools. Installing it on a gaming PC adds several gigabytes and no frame rate benefit whatsoever.
Should I use the network installer or the local installer?
The network installer is small and pulls only the components you select, which suits fast connections and minimal installs. The local installer is a multi-gigabyte package that works offline and gives reproducible results across machines, making it the better choice for lab systems, air-gapped servers, and scripted deployments.
Will the Toolkit overwrite my current display driver?
It can, because the bundled driver is often older than the current Game Ready or Studio release. On Windows deselect the display driver component in the advanced or custom install screen. On Linux use the runfile with the no-opengl-files and driver skip flags, or install the toolkit-only package.
Which CUDA version works with my GPU and framework?
Match the framework first. PyTorch and TensorFlow builds are compiled against a specific CUDA major version, so check their release notes before downloading. Then confirm your GPU compute capability is supported, since very old cards like Kepler and Maxwell are dropped from recent Toolkit releases entirely.
How do I verify the install actually worked?
Run nvcc –version to confirm the compiler is on your PATH, then nvidia-smi to confirm the driver sees the GPU. Note that nvidia-smi reports the maximum CUDA version the driver supports, not the Toolkit version installed, which is a common source of confusion.
As an Amazon Associate we earn from qualifying purchases at no extra cost to you.







Write Your Review
No reviews yet. Be the first to share your experience!