
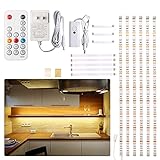
- Top Pick: Litever Kitchen Under Cabinet LED Lighting Kit, Super Bright, 6 PCS 12 Inches Light Bars, Plug-in or Hardwire Power Adapter, 31W 2000 Lumen, for Cabinet Counter Shelf Workbench (Daylight White 5000K)
- Best Value: WOBANE Under Cabinet LED Lighting Kit,Dimmable Strip Lights with RF Remote
- Premium Choice: CULAVON Motion Sensor Under Cabinet Lights, Plug in, Seamlessly Linkable, 6 Pcs 12 Inch Under Counter Lighting Bars for Kitchen, Closet, Gun Safe, Shelf, Display Case, LED 5000k Daylight
The best under cabinet lighting systems are hardwired LED bars or tape for bright task lighting in a primary kitchen, plug-in bars or light strips for renters and easy upgrades, and battery-powered pucks or bars for inside cabinets and small zones where you cannot run wires.
- Hardwired vs. Plug-In vs. Battery: At a Glance
- Hardwired Systems: Maximum Brightness and a Clean Look
- Plug-In Systems: The Best Balance for Most Kitchens
- Battery-Powered Systems: No-Wire Convenience With Trade-Offs
- How to Choose Based on Your Kitchen Layout
- Worked Example: Power Budget and Battery Runtime Calculation
- Brightness and Color Temperature Settings That Actually Work
- Installation Tips That Save Rework
- Frequently Asked Questions
As an Amazon Associate we earn from qualifying purchases at no extra cost to you.



Hardwired vs. Plug-In vs. Battery: At a Glance
All three systems use LEDs, but they differ in how they get power, how much light they produce, and how difficult they are to install. Your choice comes down to whether you own the home, need high brightness for cooking, and want dimming or smart control without visible cords.
| System Type | Typical Brightness | Power Draw | Color Temperature Options | Installation Effort | Best For |
|---|---|---|---|---|---|
| Hardwired LED Bar or Tape | 300–700 lumens per foot | 4–8 watts per foot, on 120V line with low-voltage driver | 2700K–5000K, often tunable white or RGB+CCT | Electrician required, 2–4 hours for 10–15 ft run | Owned kitchens, full remodels, primary task lighting |
| Plug-In LED Bar or Strip | 180–400 lumens per foot | 3–6 watts per foot, 120V outlet + transformer | 2700K–4000K fixed, or selectable 3000K/4000K/5000K switch | DIY, 30–60 minutes, screw or adhesive mount | Renters, upgrades without opening walls, L-shaped counters |
| Battery-Powered Puck or Bar | 80–200 lumens per fixture, 120–300 lumens per bar | 1–3 watts, rechargeable lithium or AA/AAA | 3000K–4000K fixed, some with 3-level CCT switch | DIY, 5–15 minutes, magnetic or adhesive | Inside glass cabinets, pantries, short runs under 4 feet |
General market ranges in 2026: hardwired systems usually $80–$220 for a 12-foot kit with driver and dimmer before installation labor, plug-in systems usually $40–$120 for a 3-bar or 12-foot strip kit, battery-powered usually $20–$60 for a 3-pack of pucks or 2-pack of bars.
Hardwired Systems: Maximum Brightness and a Clean Look
Hardwired systems connect directly to a wall switch or dedicated driver hidden in a cabinet or attic space, so there are no cords hanging to an outlet and no batteries to charge.
When hardwired makes sense
Choose hardwired if you are building, remodeling, or already have a switched outlet inside a wall cabinet that an electrician can convert. It is the only option that reliably delivers over 500 lumens per foot without voltage drop on long runs and supports flicker-free dimming from 100% to 5% with a compatible wall dimmer or smart driver.
Brightness and color performance
Most hardwired bars use high-density SMD 2835 or 2216 LEDs with a CRI of 90+ and R9 > 50, which renders reds and wood tones accurately. Tape lights provide the most even wash if you use an aluminum channel with a frosted diffuser; bare tape creates dots on glossy countertops. Linkable bars provide more focused task light and are easier to keep straight over a long counter.
Installation reality
Expect to run low-voltage wire from the driver to each bar through the underside of the cabinet. Code requires the 120V line side to be in a junction box. If your cabinets have a light rail or valance, you can hide the fixtures completely and only see the light, not the source. Without a rail, mount the bar toward the front third of the cabinet so the light washes the backsplash and counter, not your eyes.
Plug-In Systems: The Best Balance for Most Kitchens
Plug-in systems offer 80% of the performance of hardwired with none of the drywall work. They plug into an existing backsplash outlet and link together with thin connecting cables.
Strengths
Modern plug-in kits include a flat power cord designed to run discreetly along the cabinet underside and a wireless remote or inline dimmer. Selectable color temperature models let you flip a switch on the housing to choose 3000K warm white, 4000K neutral, or 5000K daylight instead of being locked into one temperature.
Limitations to plan for
You will have a visible cord unless you have an outlet inside an upper cabinet or can route the cord over the top of the cabinet. Daisy-chaining more than 3–4 bars on one driver can cause dimming at the far end due to voltage drop, especially with 12V systems. For runs longer than 12 feet, use a 24V system or two separate drivers.
Plug-in is ideal for U-shaped and galley kitchens where an outlet is already centered on each wall. Measure the distance to the nearest outlet before buying; extension cables are usually limited to 24–36 inches per link.
Battery-Powered Systems: No-Wire Convenience With Trade-Offs
Battery pucks and rechargeable bars are for accent and convenience, not primary cooking light. They are controlled by tap, remote, or motion sensor and are the fastest to install.
Where they excel
Use battery lights inside cabinets with glass doors, over a coffee station, under a single open shelf, or in a pantry where running 120V is impractical. Rechargeable bars with motion sensors are excellent for that use because they only turn on when you approach and last weeks between charges in low-use locations.
Where they fall short
Even high-output battery bars typically peak at 300 lumens and step down brightness as voltage drops. Most are not dimmable beyond high/low and have no high-CRI option above 85. If you try to light an 8-foot food prep counter with pucks, you will get scalloped pools of light instead of an even wash.
Expect to recharge lithium models every 20–40 hours of actual on-time. For a kitchen used 3 hours per day at full brightness, that means charging every 1–2 weeks. Models that use AAA batteries will cost more over time and dim faster.
How to Choose Based on Your Kitchen Layout
Brightness needs depend on the distance from the bottom of the cabinet to the counter, usually 15–18 inches. Dark granite or wood counters need 30–40% more lumens than white quartz to appear equally bright because they absorb more light.
| Your Situation | Recommended System | Why |
|---|---|---|
| Own home, remodeling or new build, need best light for cooking | Hardwired tunable white bar or diffused tape, 3000K–4000K, 90+ CRI | Highest output, continuous dimming, hidden wiring, works with wall switch |
| Renter or no electrical work allowed, outlets available on backsplash | Plug-in linkable bars with selectable CCT | No wall opening, removable, good output for tasks, cord can be managed |
| Long run over 14 feet or around a corner with no outlet in the middle | Hardwired 24V system or two plug-in drivers (one per wall) | Prevents voltage drop and uneven brightness |
| Inside cabinets, pantry, or single short shelf under 3 feet | Rechargeable battery bar or motion pucks | No wiring needed, light only where needed, easy to move |
| Glass tile or high-gloss backsplash | LED bar with diffused lens or tape in aluminum channel | Eliminates LED dot reflections at eye level |
Worked Example: Power Budget and Battery Runtime Calculation
Spec sheets list watts per foot, but they rarely tell you if your driver can handle the total run or how long a battery will last. Use this simple math before you buy.
Power budget for hardwired and plug-in
Formula: Total Watts = Watts per Foot x Total Feet. Required Driver Size = Total Watts x 1.2 (20% safety margin).
Example: You have a 12-foot L-shaped counter with two walls (8 feet + 4 feet). You choose a plug-in system rated at 4.5 watts per foot at 24V.
- Total Watts = 4.5 x 12 = 54 watts
- Required Driver = 54 x 1.2 = 64.8 watts. You need a 65W or larger driver. A 60W driver would be undersized and may overheat or shut down.
- Amps = Watts / Volts = 54 / 24 = 2.25 amps, which is well within most 24V wiring and connectors rated for 3–5 amps.
If the kit includes a 40W driver and three 2-foot bars (6 feet total), you cannot add another 6 feet later without upgrading the driver. Always check driver capacity on the label, not just the number of link ports.
Battery runtime estimate
Formula: Runtime (hours) = Battery Capacity (Wh) / Load (W). For rechargeable bars, capacity is often listed as mAh at 3.7V. Convert to Wh: Wh = (mAh / 1000) x 3.7.
Example: A rechargeable bar lists 2000mAh, 3.7V and draws 2 watts on high.
- Capacity = 2000 / 1000 x 3.7 = 7.4 Wh
- Runtime = 7.4 / 2 = 3.7 hours continuous on high. On low (1 watt) it would be about 7.4 hours.
- If you use it 20 minutes per day under the cabinet by the sink, 3.7 hours = 222 minutes, or about 11 days between charges. Motion sensor modes extend this further because the light is off most of the time.
This is why battery systems disappoint when used as primary task lighting left on for hours; the runtime calculation shows they are designed for intermittent use.
Brightness and Color Temperature Settings That Actually Work
For food prep, aim for 500–700 lumens per foot at the counter surface. For ambient evening light, 150–250 lumens per foot is enough. A dimmable system lets you do both without installing two sets of lights.
Color temperature guidance based on kitchen finishes, not personal preference alone:
- 2700K–3000K: Best for warm wood cabinets, brass hardware, and cozy evening ambiance. Makes white counters appear slightly yellow.
- 3500K–4000K: The most versatile for cooking. Renders food colors accurately, keeps whites white without looking clinical. Recommended if you only pick one temperature.
- 5000K: Looks bluish at night and can make wood look washed out. Useful only if you need daylight matching for detailed work or have a cool gray kitchen.
If you install tunable white (CCT adjustable from 2700K to 5000K), set 4000K and 100% during cooking, and 3000K at 30–40% for entertaining. Look for a CRI of 90 or higher and specifically R9 > 50 if you want tomatoes, meats, and skin tones to look natural rather than muted.
To avoid glare, mount the fixture 1 inch behind the front edge of the cabinet. If the LED diodes are visible in the reflection of a polished counter or backsplash, add a 45-degree angled channel or move the strip to the front light rail.
Installation Tips That Save Rework
Measure cabinet by cabinet, not the wall length. Gaps for the stove, sink window, and refrigerator break the run and require separate connectors. Order 10% extra length for corners.
For tape lights, never fold the strip over a corner; use a corner connector or solderless clip. Keep drivers in a ventilated space, not sealed behind a false panel, because heat shortens their life. If you can, put the driver inside a base cabinet near an outlet rather than high in a wall cabinet where heat rises.
For dimming, match the dimmer type to the driver: TRIAC/forward-phase for 120V hardwired dimmable drivers, 0-10V or PWM low-voltage dimmers for most plug-in systems, and remote-only for battery. Mismatched dimmers cause flicker or buzzing.
Frequently Asked Questions
Can I mix pucks and bars on the same system?
Only if they are from the same low-voltage family and share the same voltage (12V vs 24V) and connector type. Mixing 12V pucks on a 24V driver will burn them out, and mixing 24V bars on a 12V driver will make them dim. Battery pucks cannot be wired to a plug-in driver.
Do I need a diffuser?
You need a frosted diffuser if you use tape light or if your backsplash is glossy. With linkable bars that already have a diffused lens, you do not need to add one. The diffuser reduces output by about 10–15% but eliminates harsh dots.
Will under cabinet lights add heat under the cabinet?
LED systems run cool compared to halogen, but the driver can get warm. LEDs themselves add negligible heat to the counter, typically raising the underside of the cabinet by 5–10 degrees Fahrenheit during extended use, which does not affect food.
What color temperature matches recessed ceiling lights?
Match within 200K. If your ceiling lights are 3000K, set under cabinet lights to 3000K as well. Mixing 2700K ceiling with 4000K under cabinet creates a mismatched look on the backsplash where both sources overlap.
Ready to decide? Our #1 pick for 2026 is the Hardwired LED Bar or Tape.
Live price & availability on Amazon.





Write Your Review
No reviews yet. Be the first to share your experience!